
Hello World on Stream Start
Sends a simple status message when your stream goes live.
-
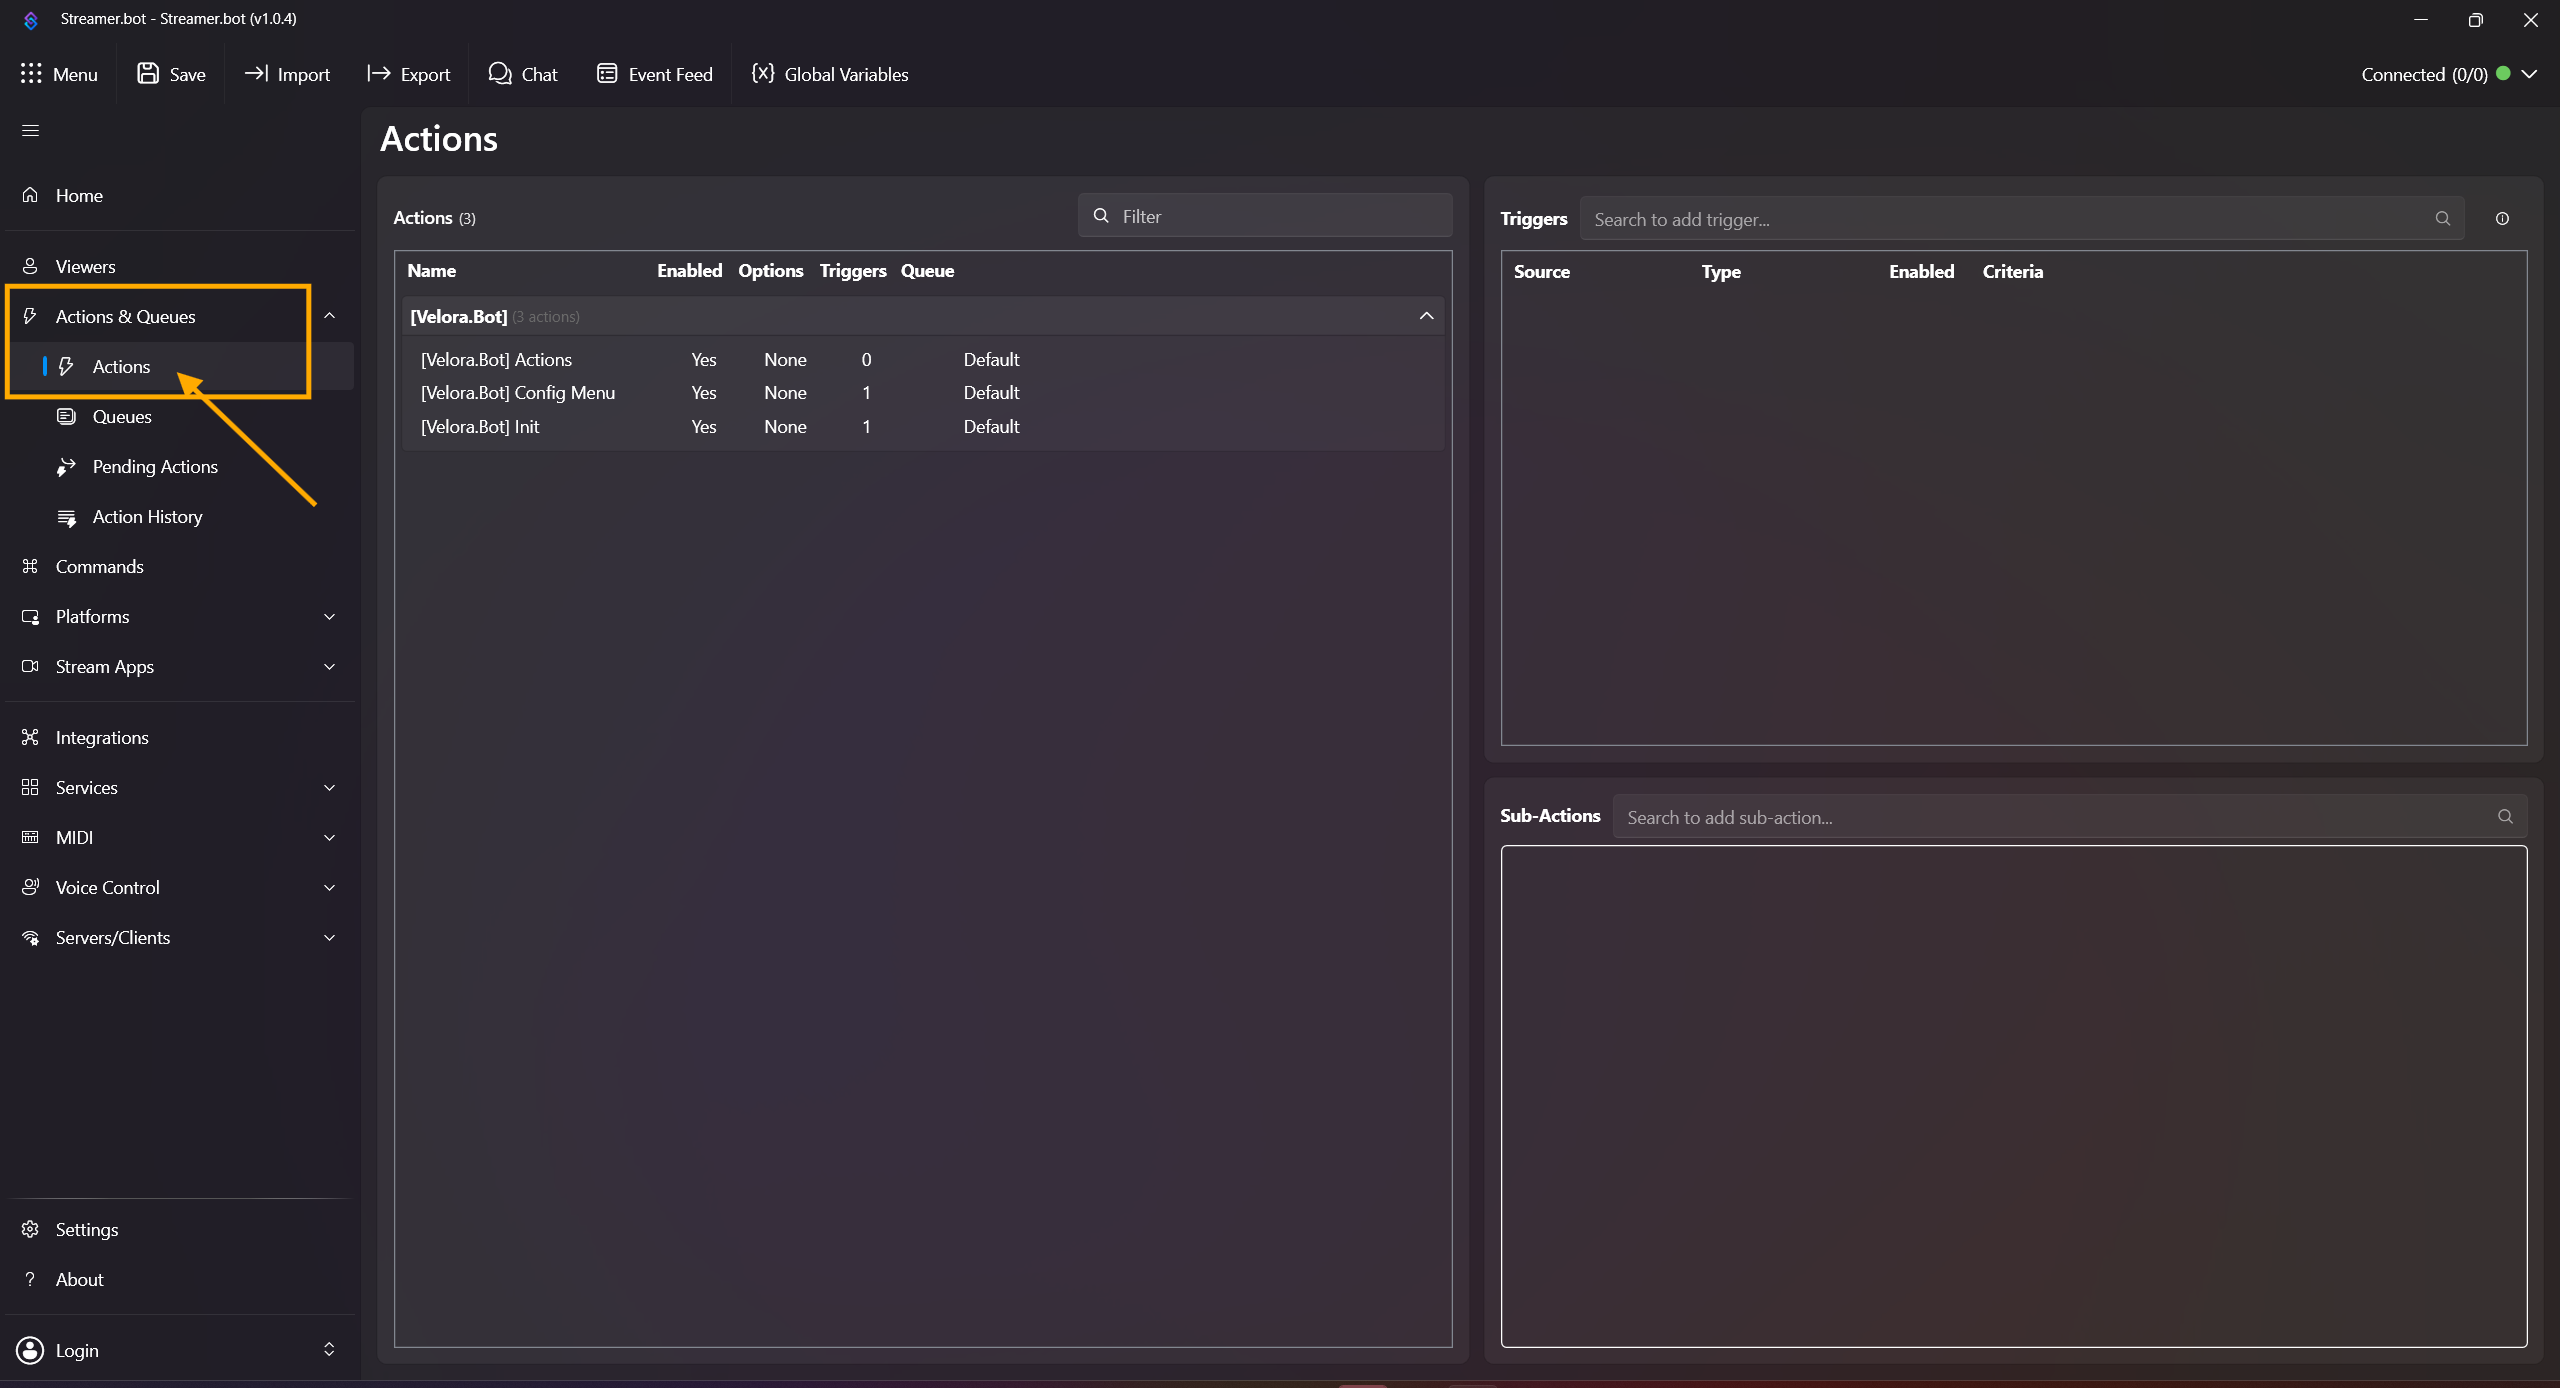
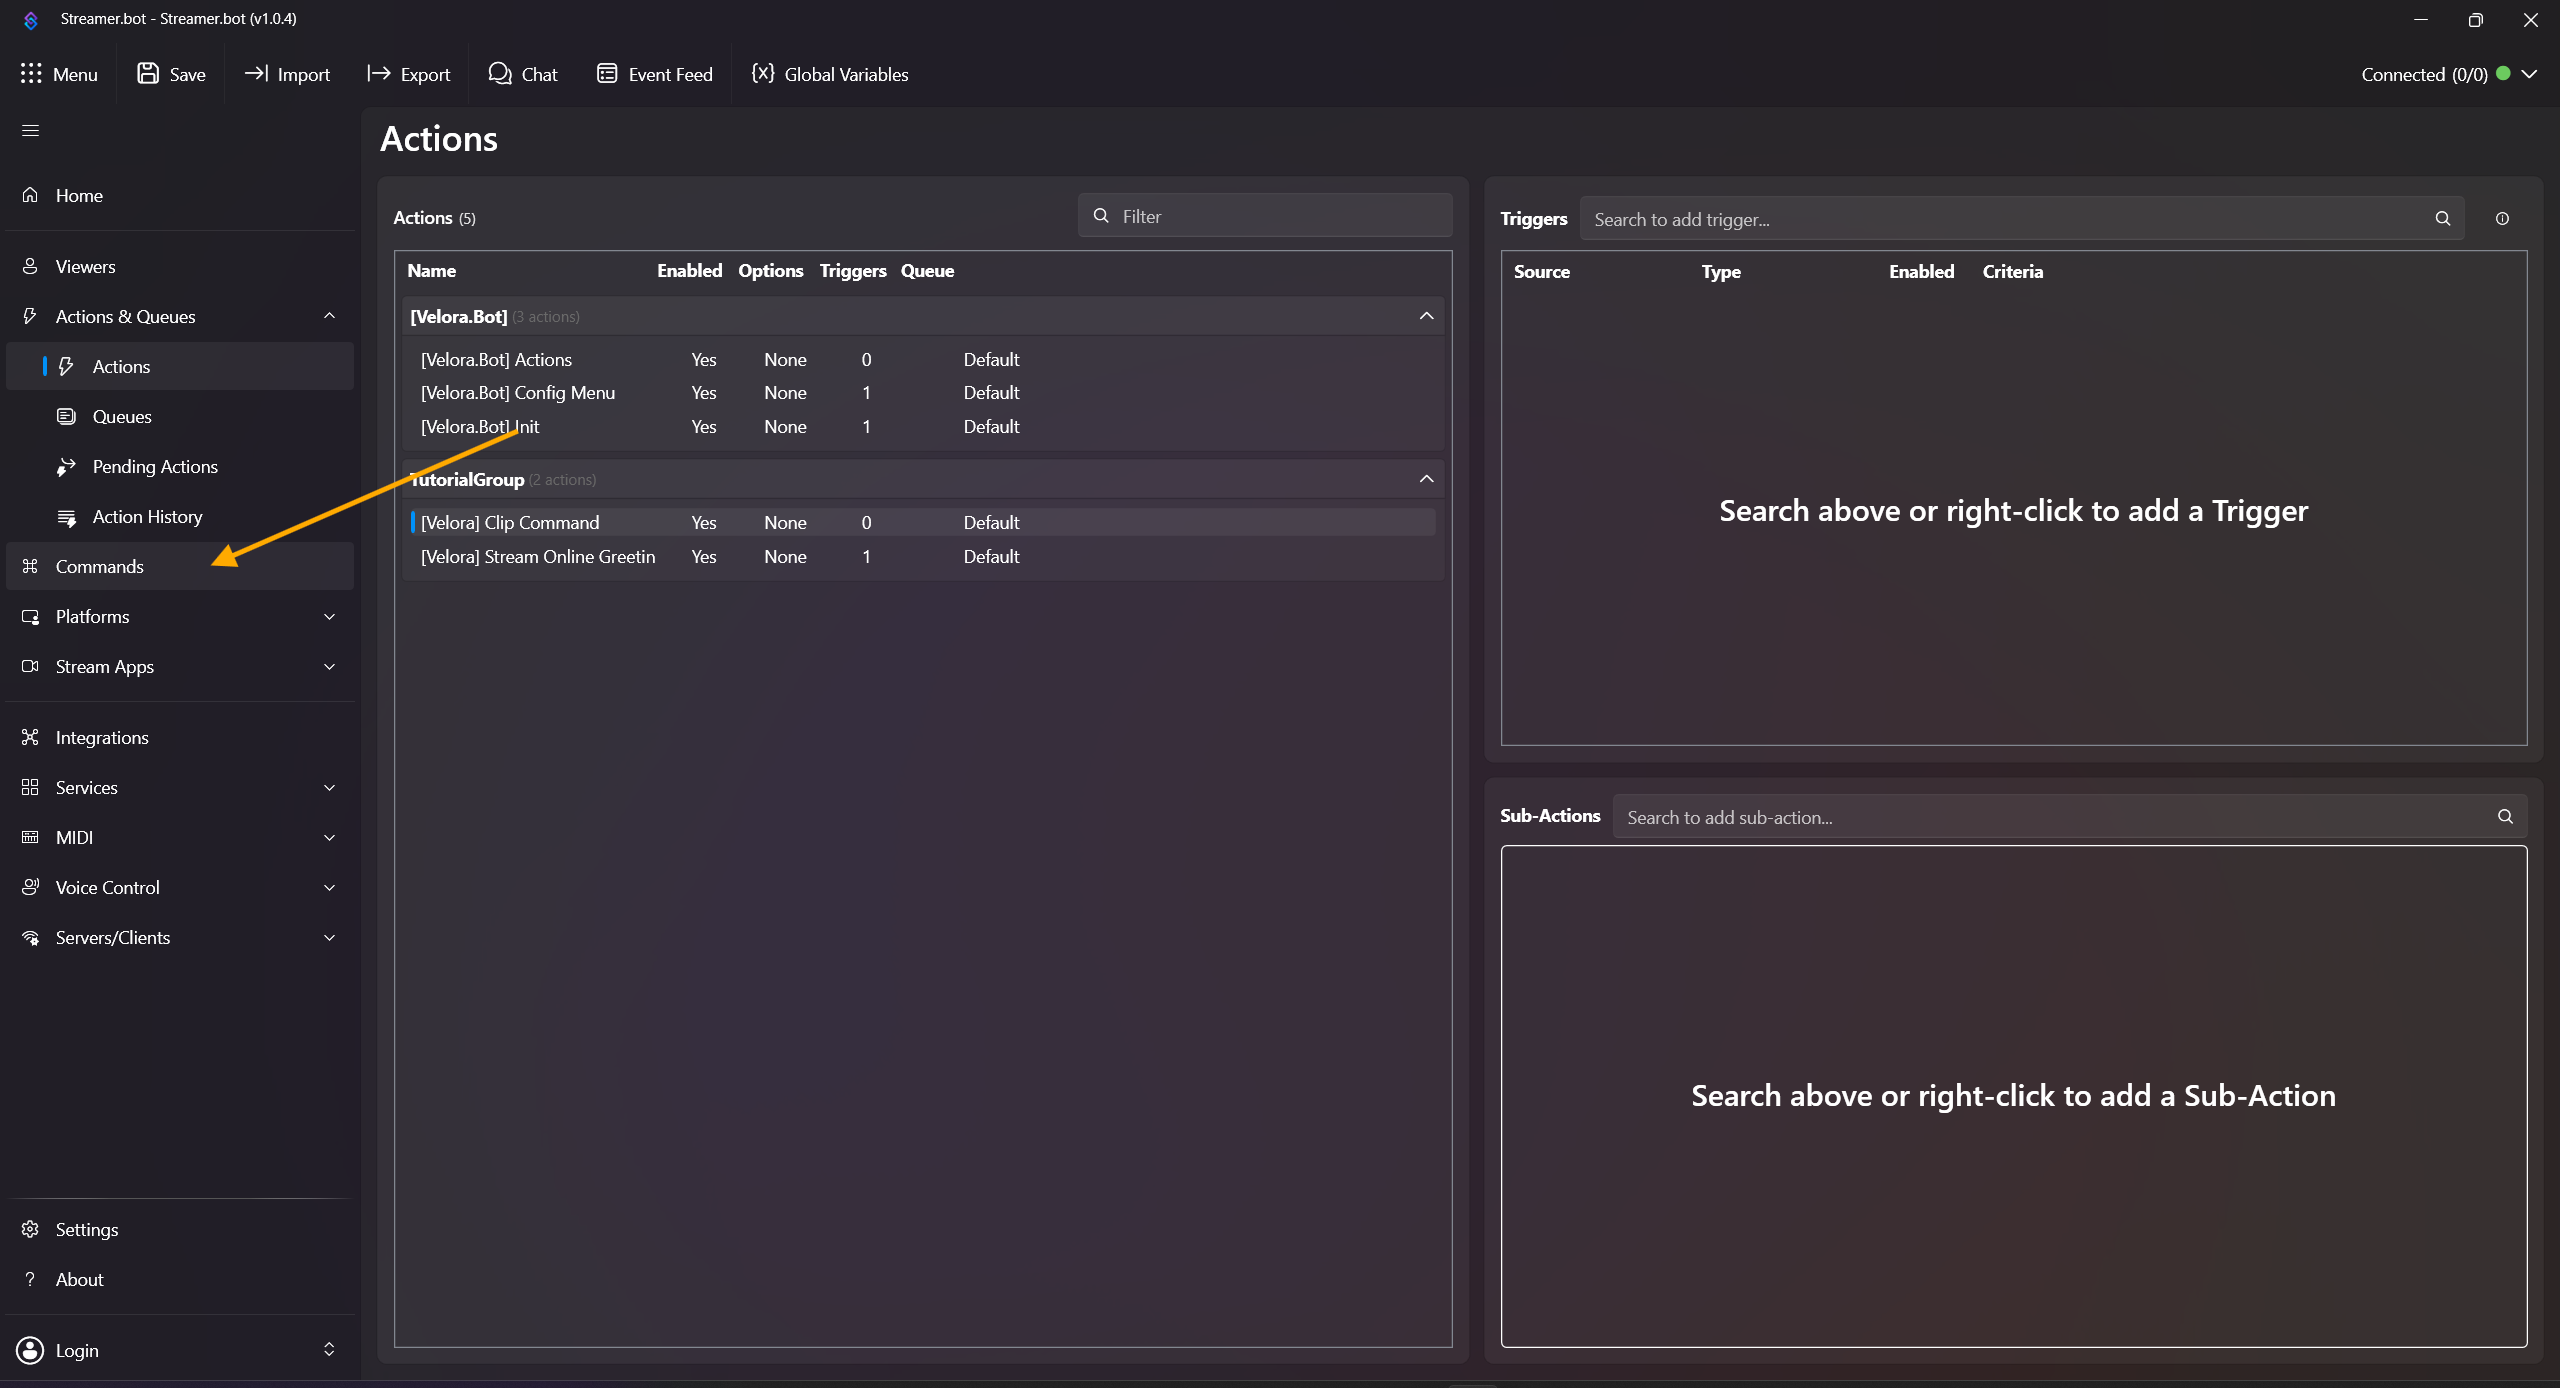
Open Actions & Queues -> Actions.

-
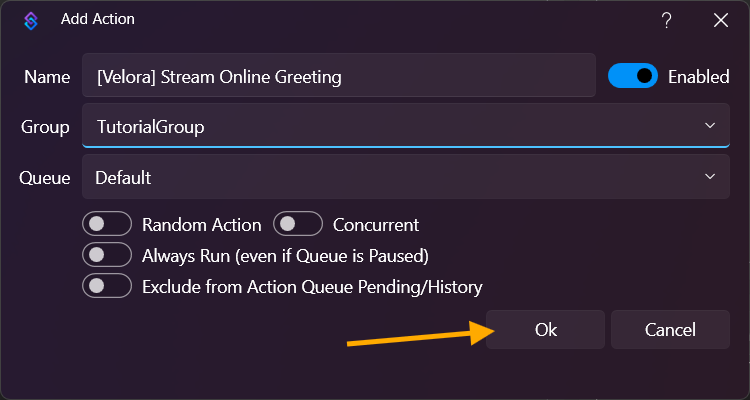
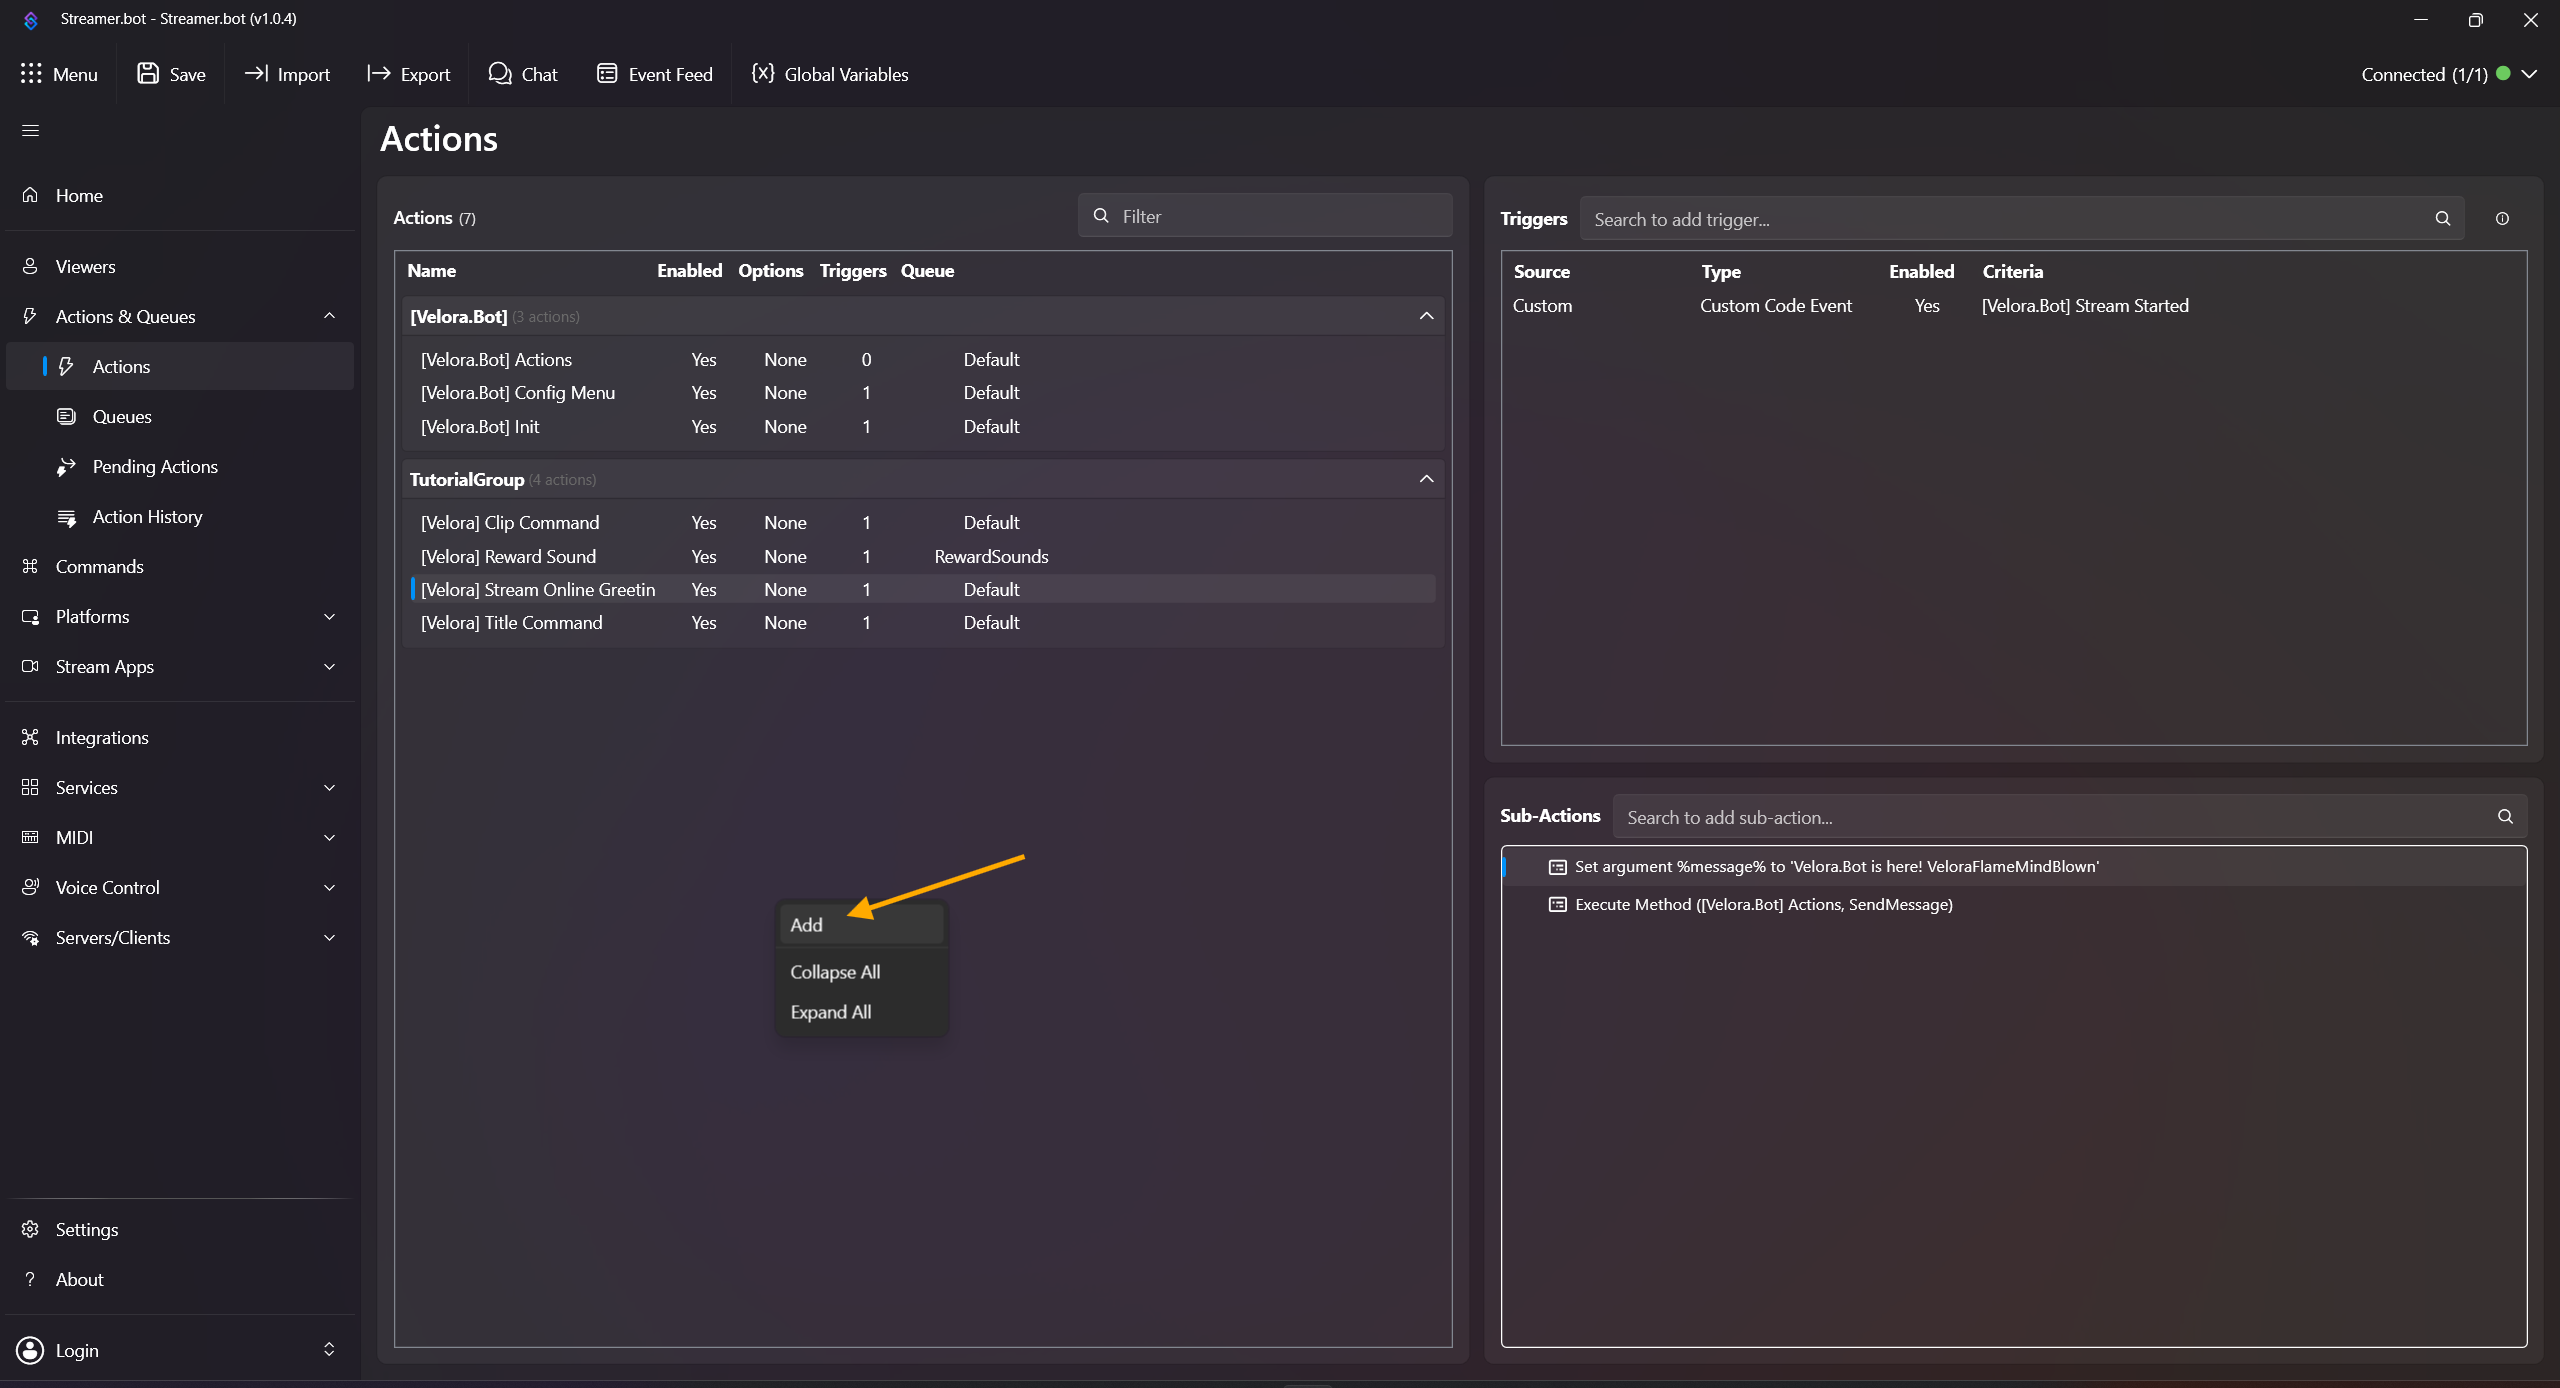
Right-click inside the Actions field, click Add Action, and name it e.g. [Velora] Bot Active Message.

- Right-click inside the Triggers field (upper-right area), then in the context menu choose:
Add -> Custom -> Velora -> Stream -> [Velora.Bot] Stream Started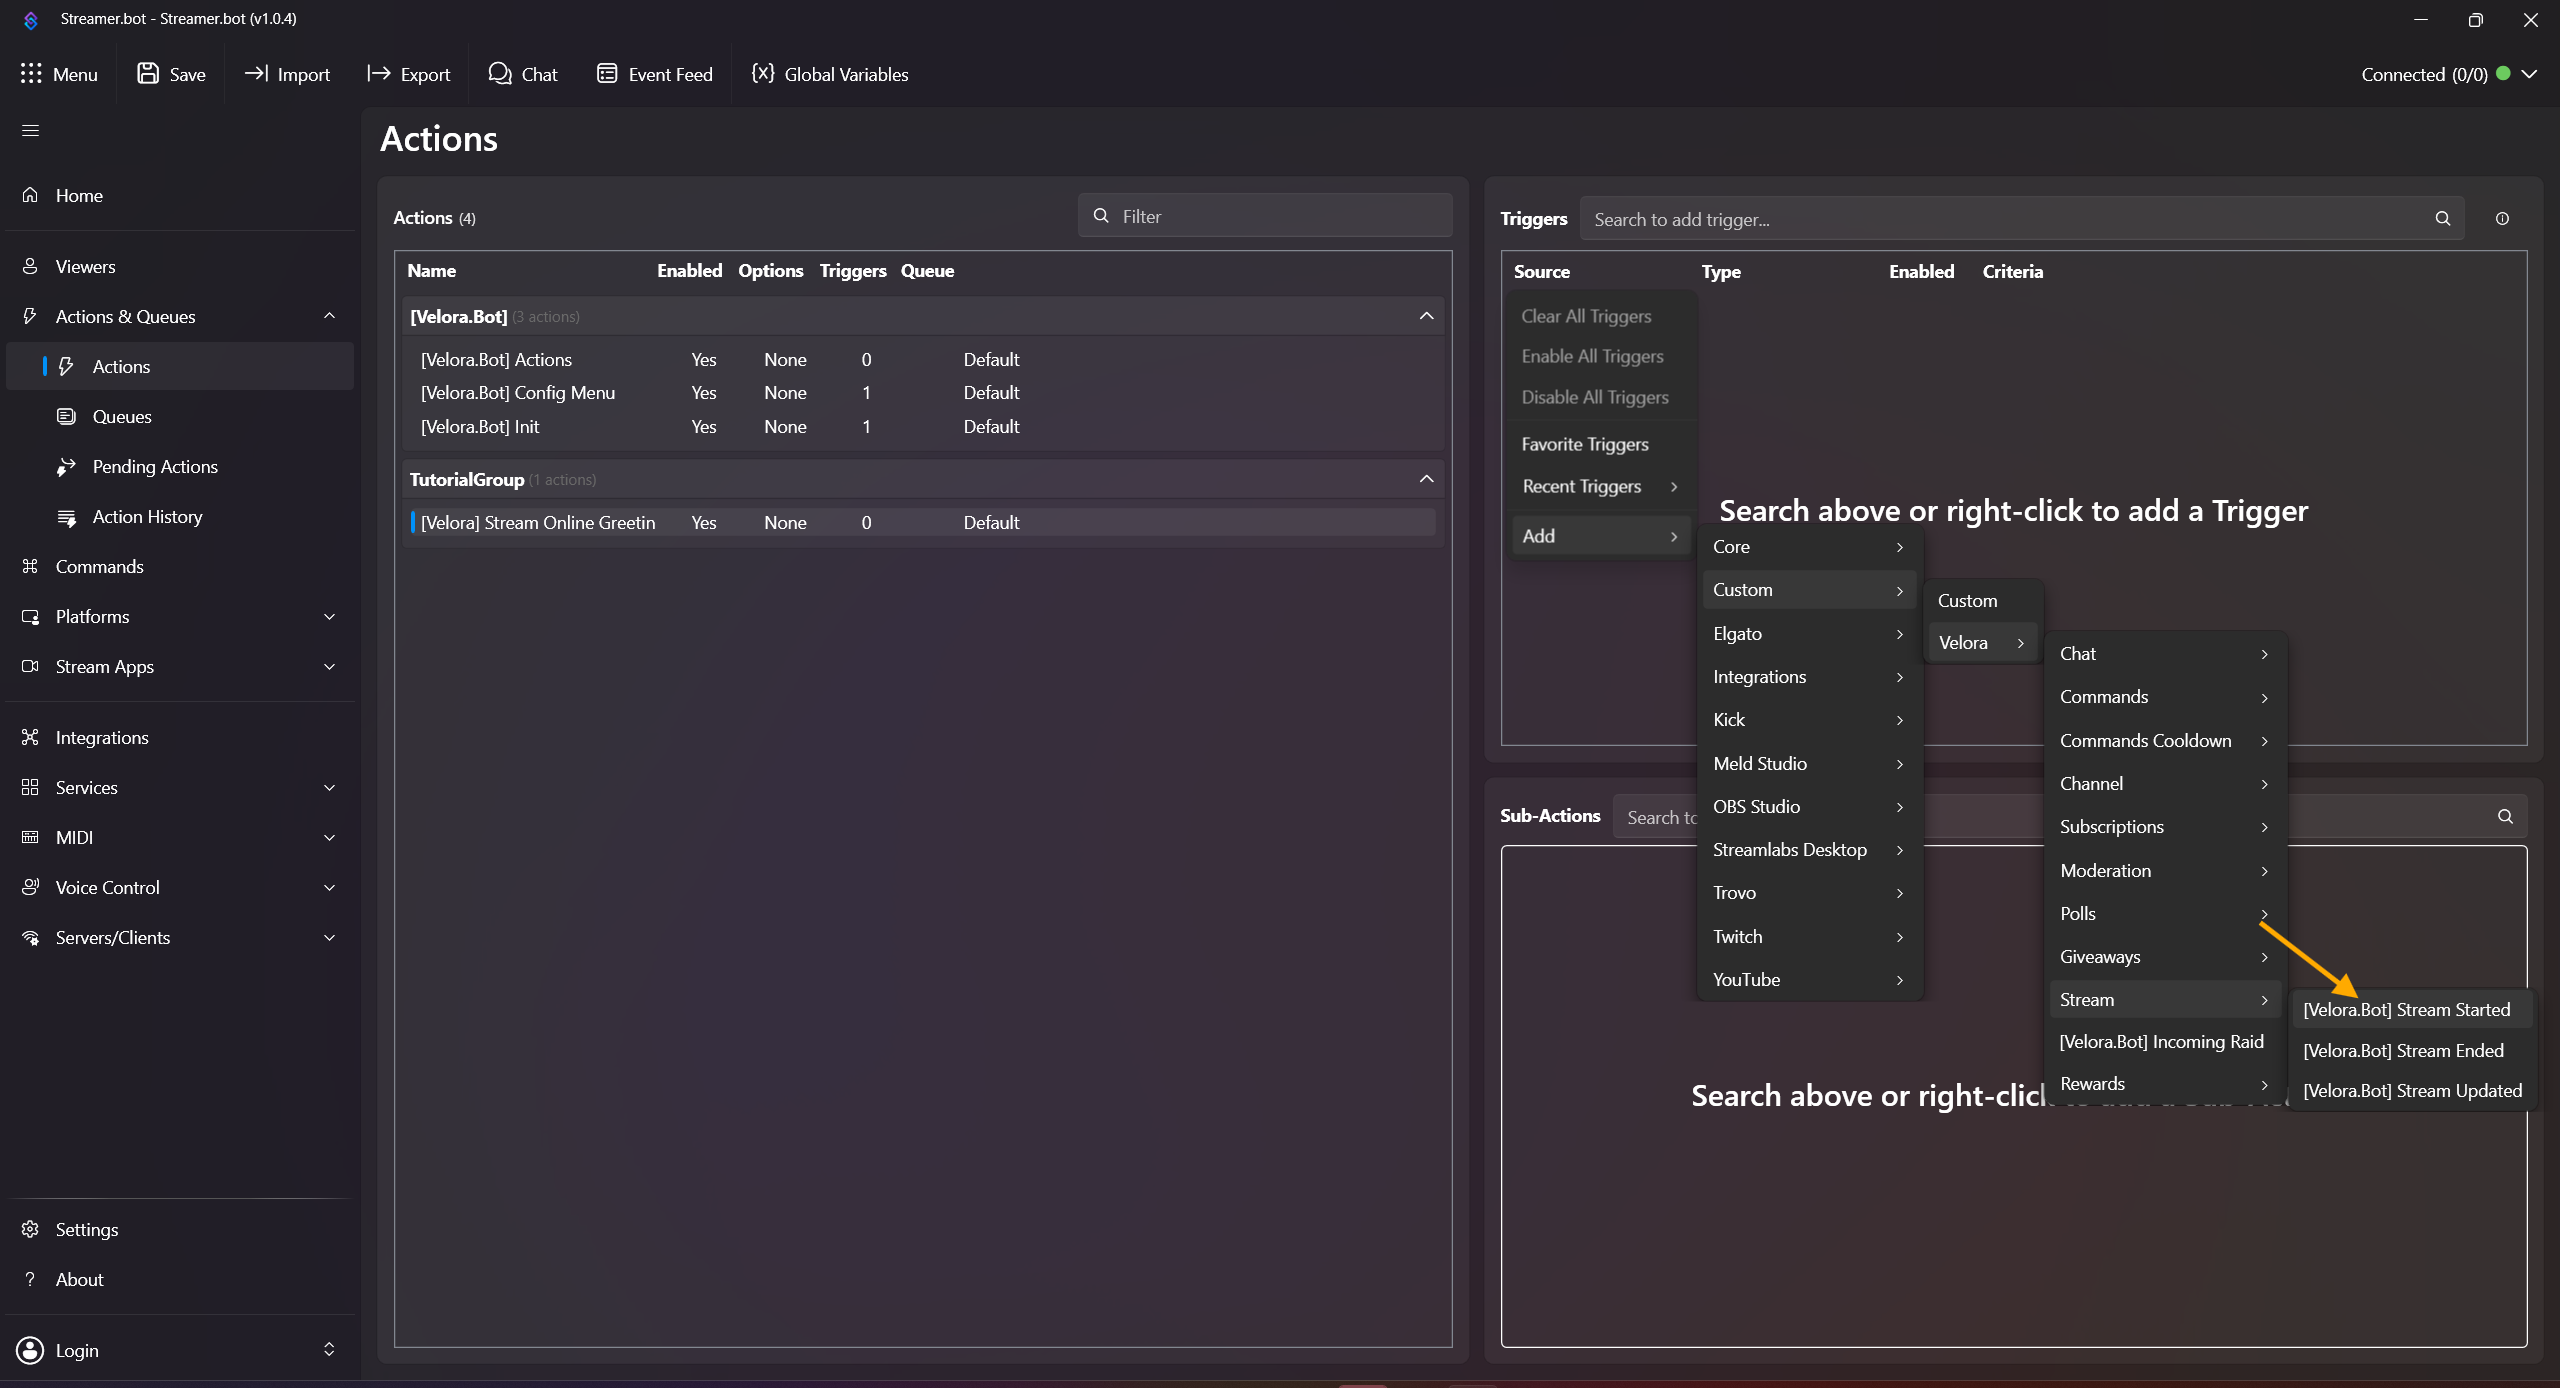
- Right-click inside the Sub-Actions field and choose:
Add -> Core -> Arguments -> Set Argument
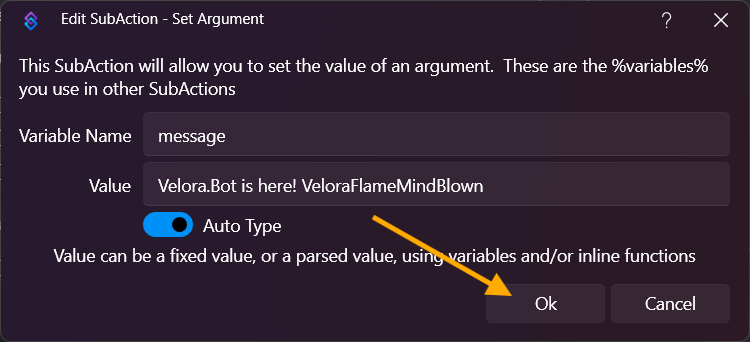
Variable Name: message (important: must be exactly this name)
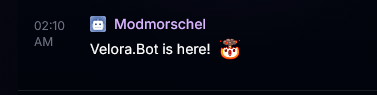
Value: Velora.Bot is here! VeloraFlameMindBlown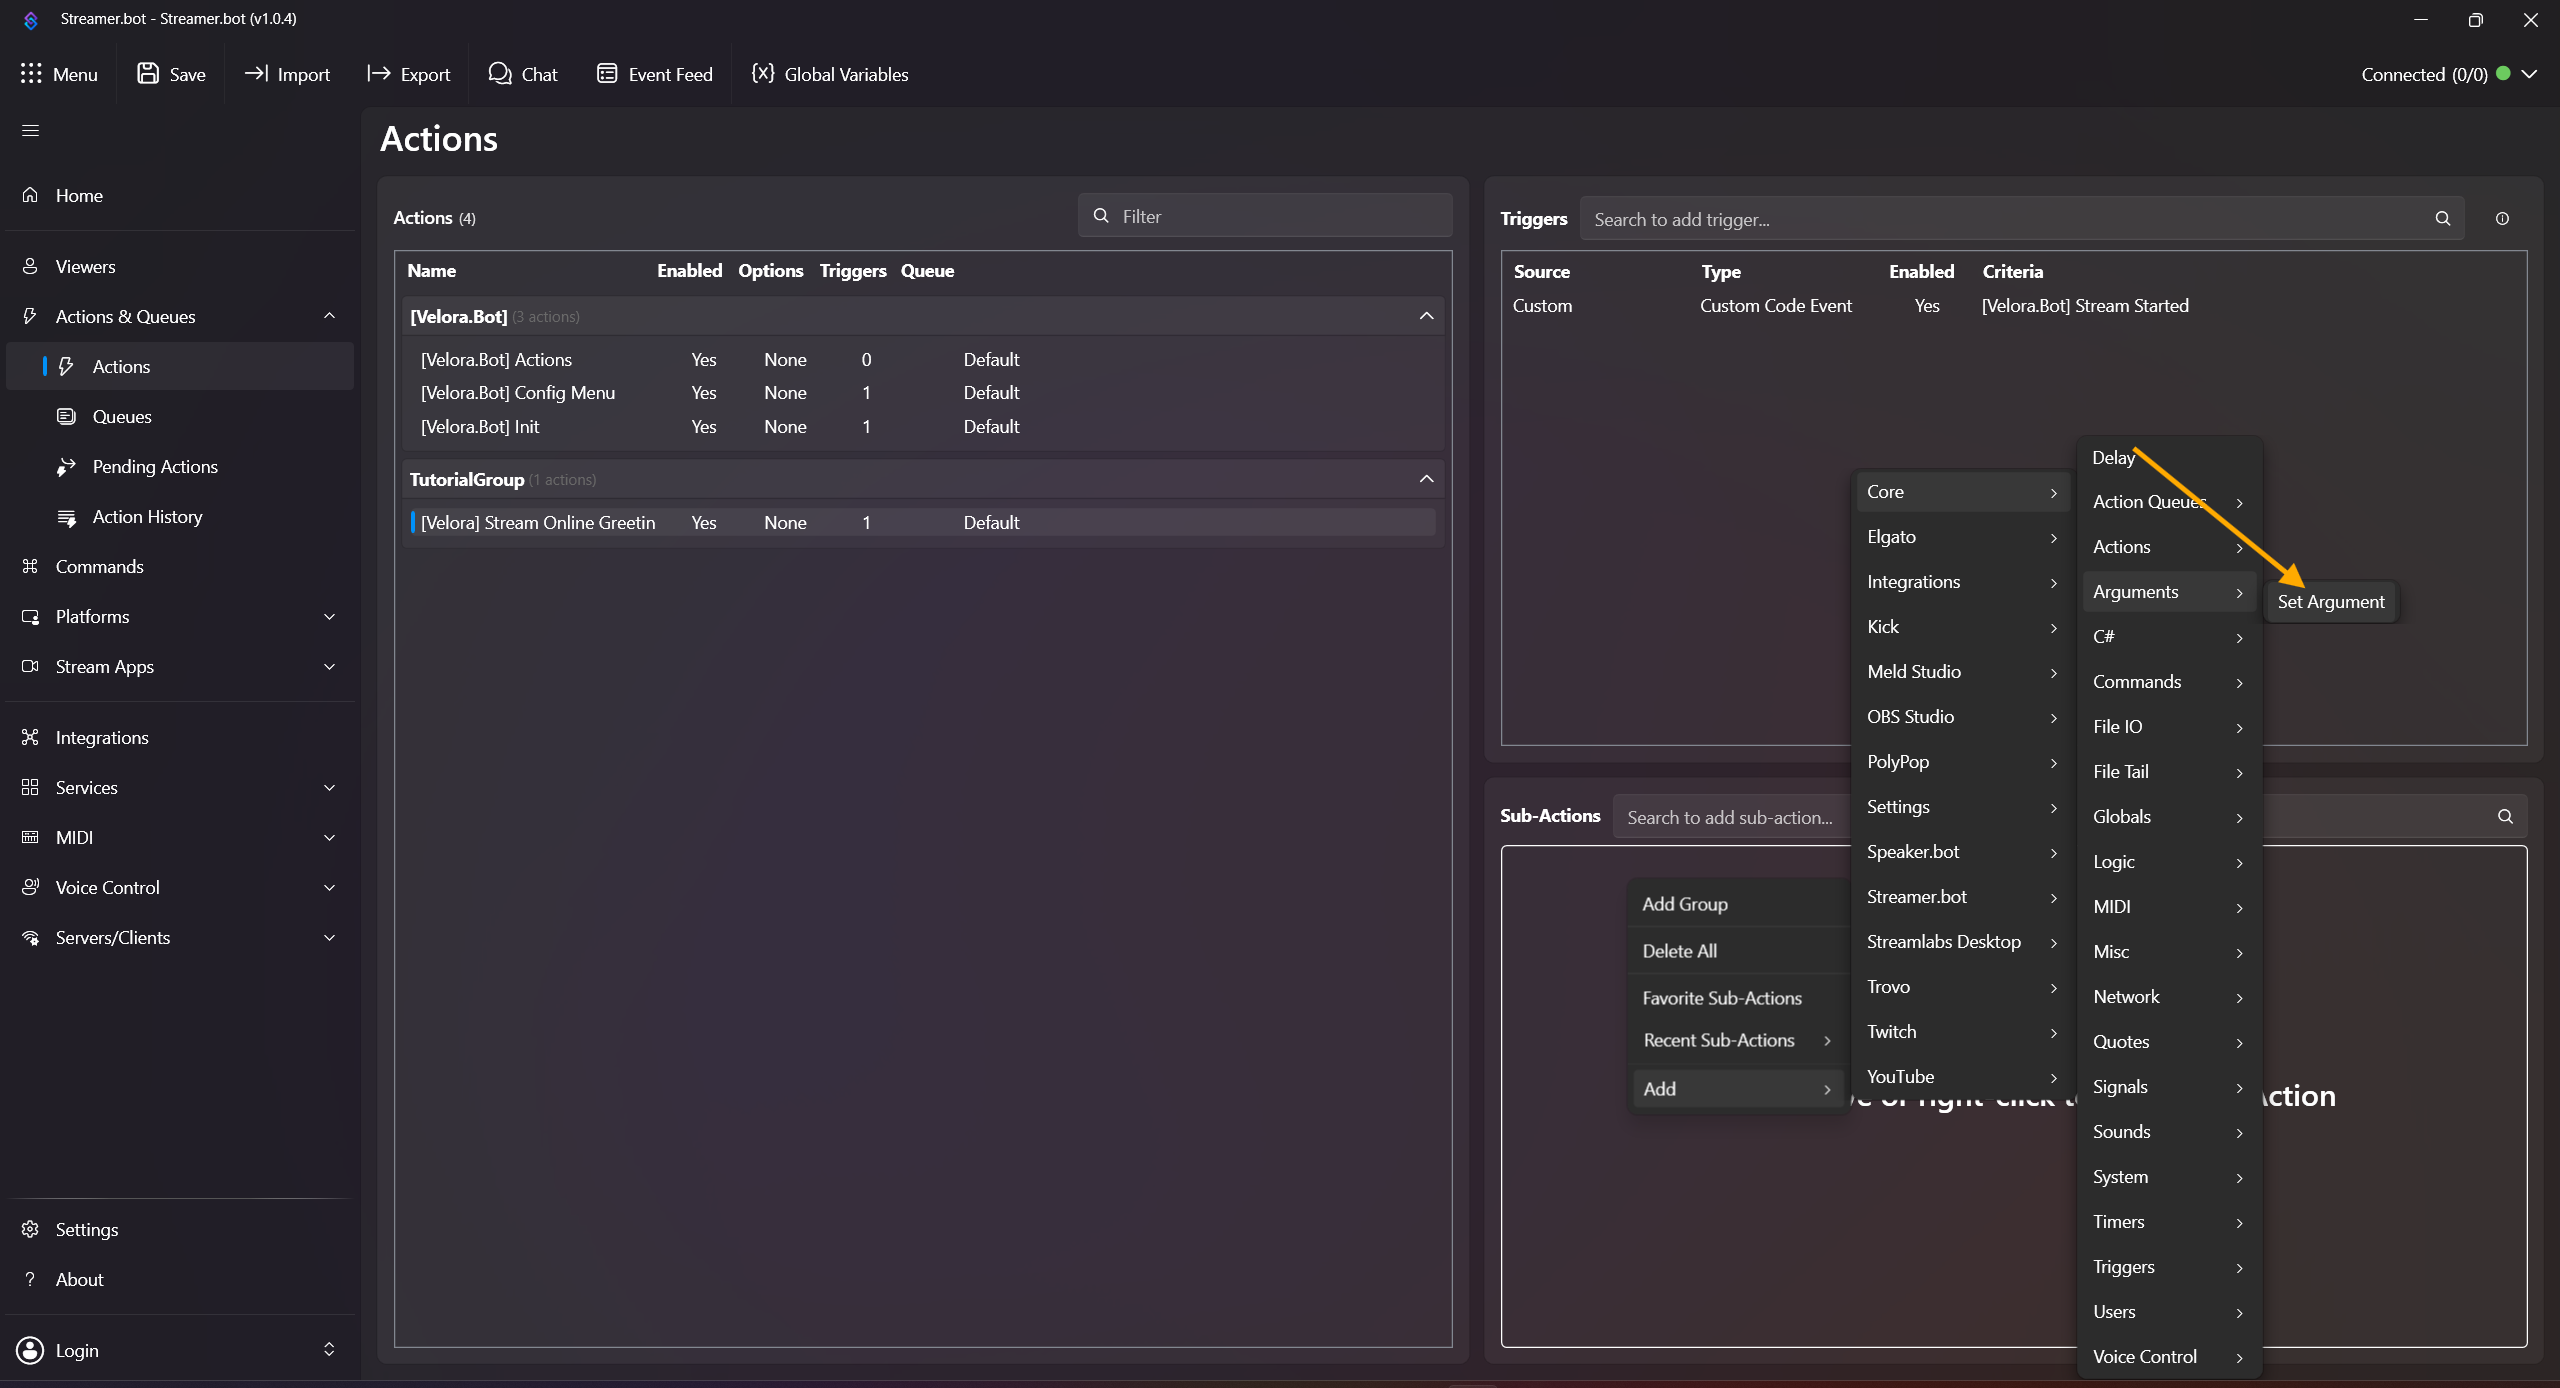
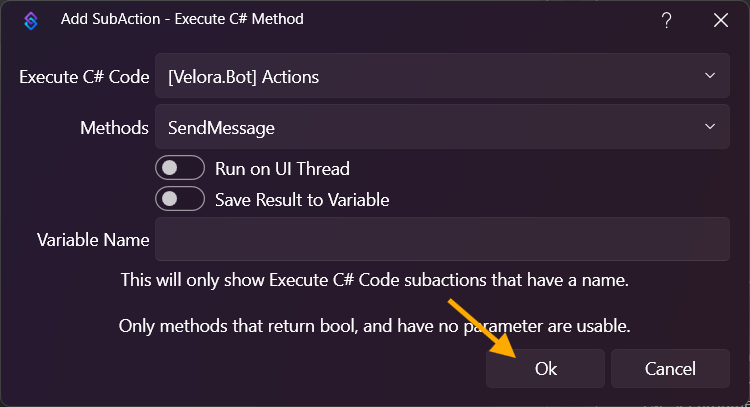
- Add Execute C# Method via:
Add -> Core -> C# -> Execute C# Method
Code: [Velora.Bot] Actions
Method: SendMessage
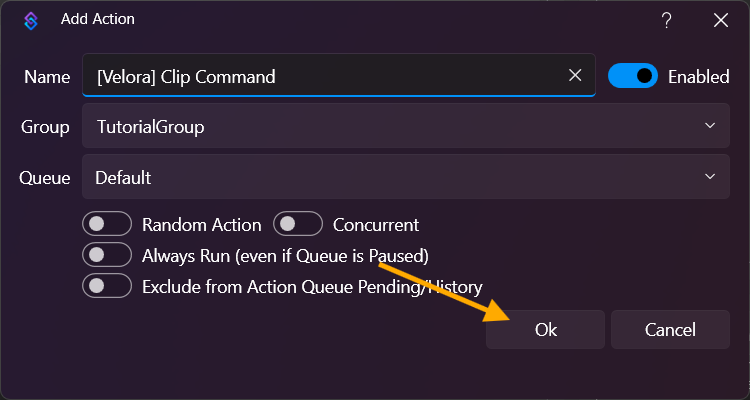
Confirm with OK.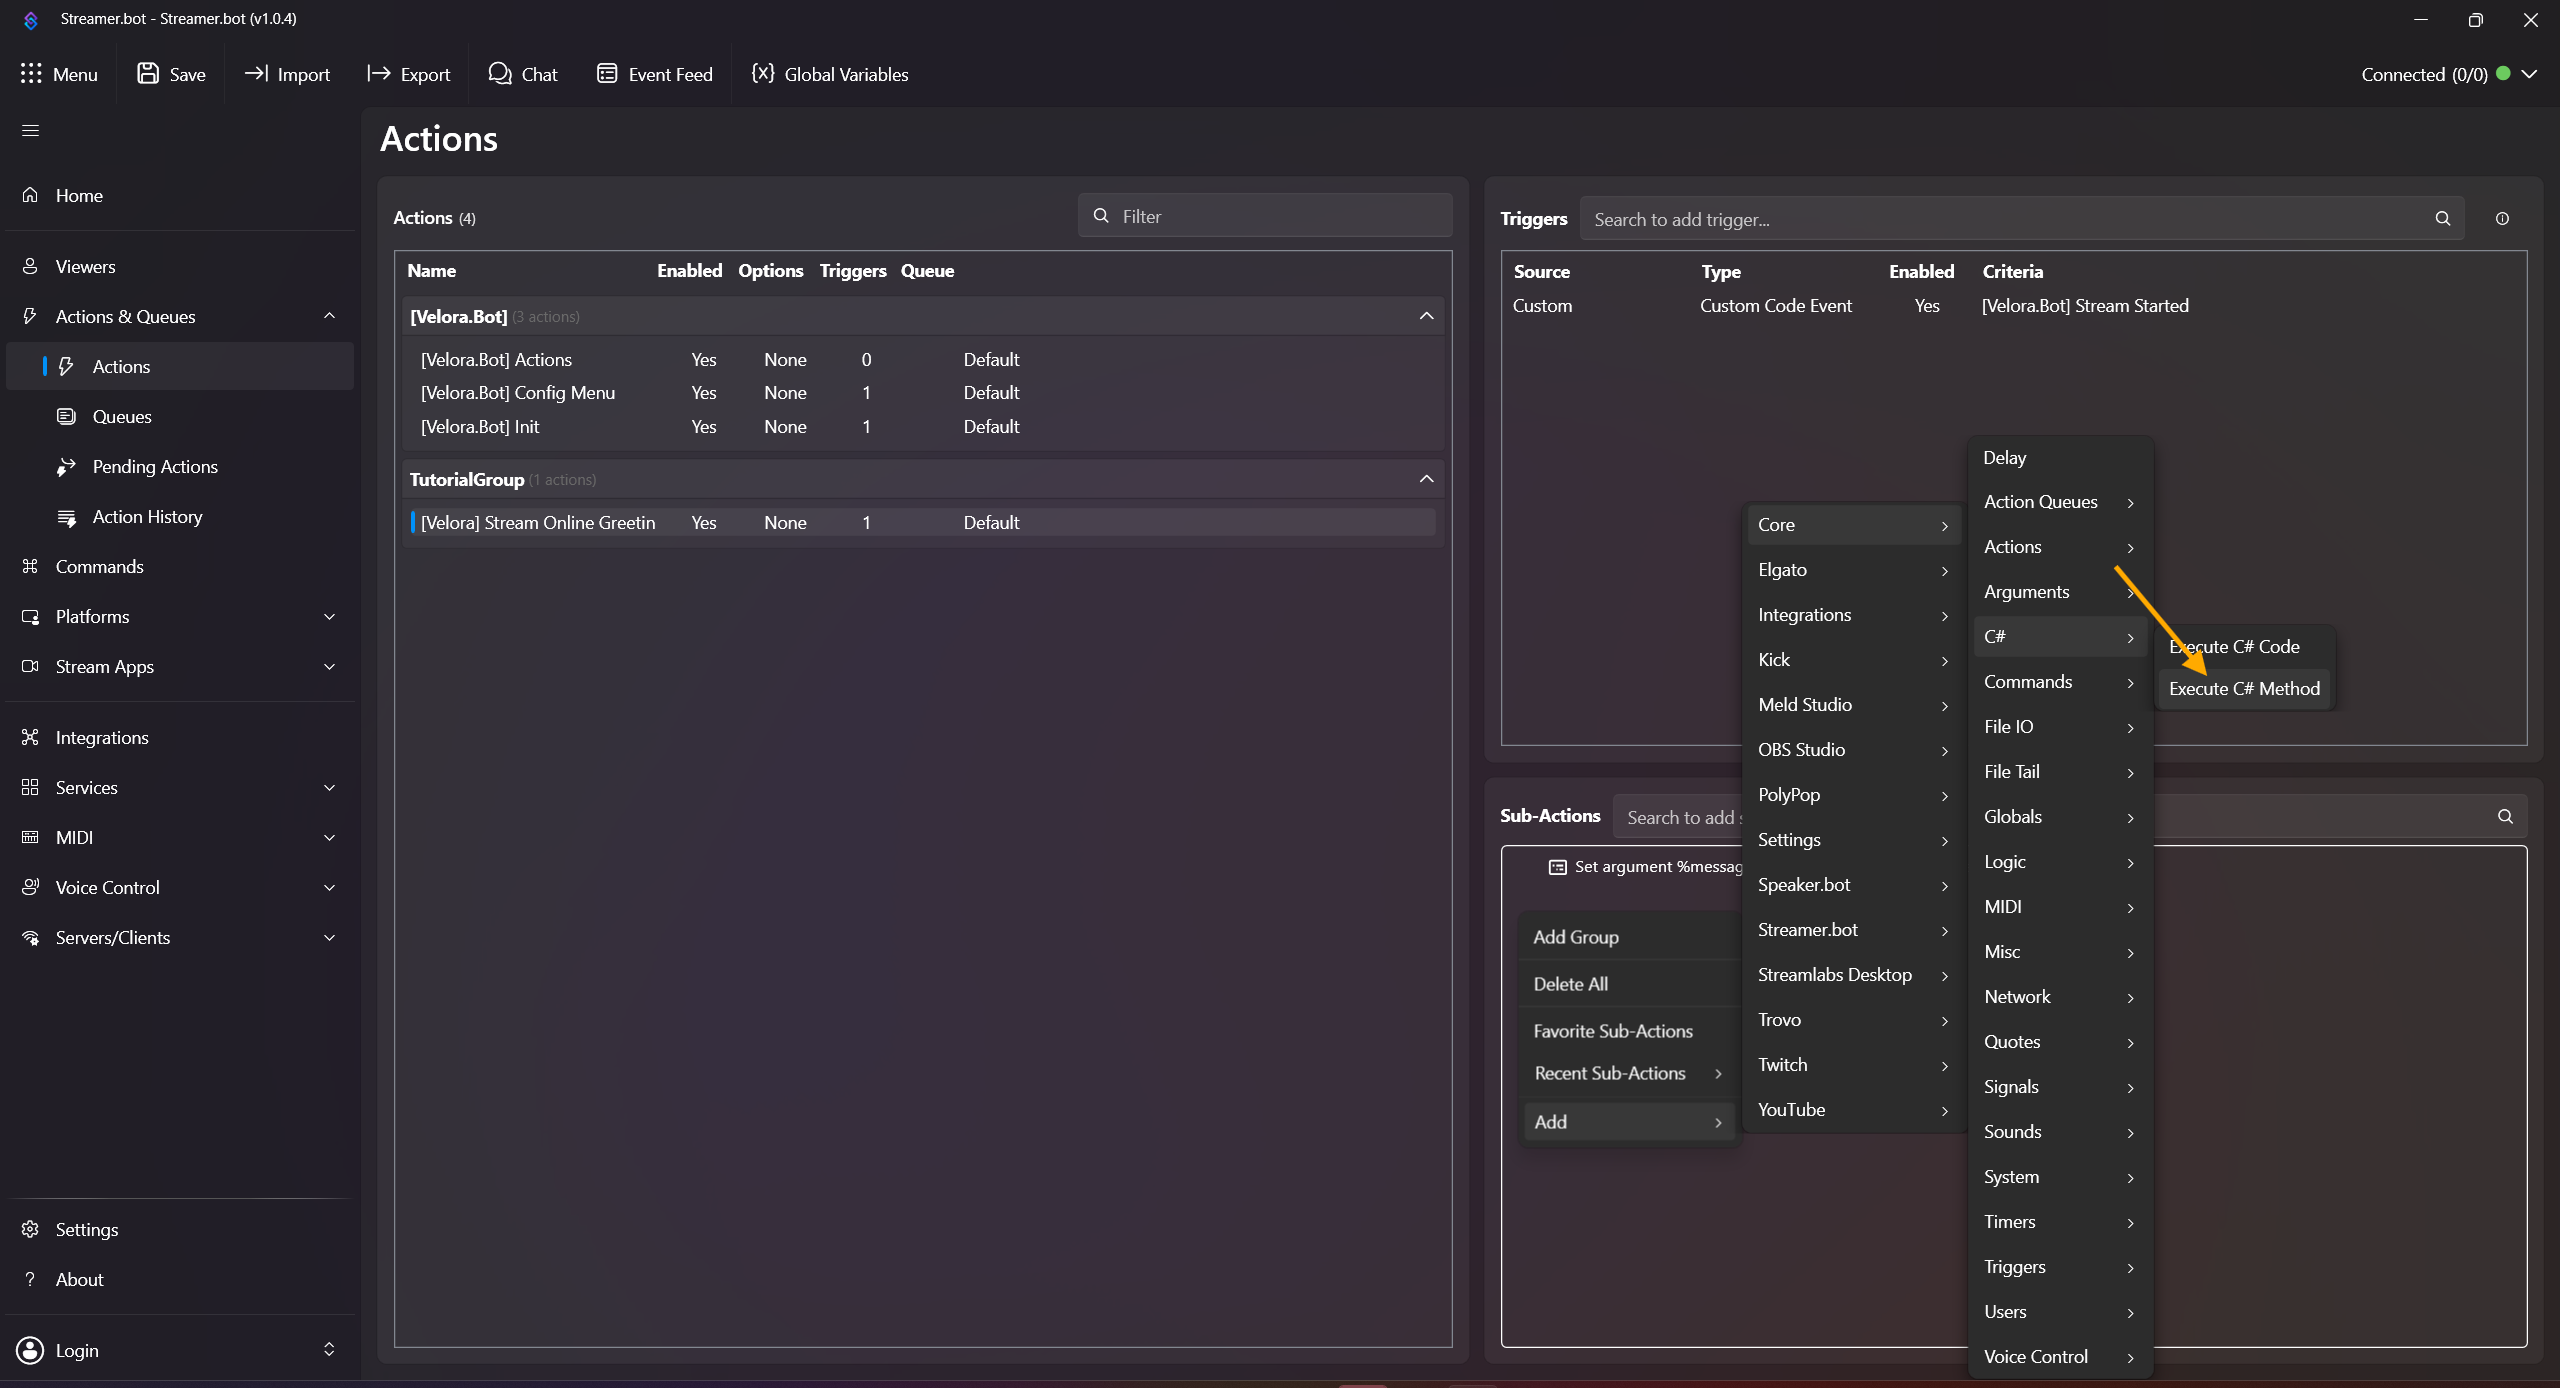
Done! For a local test, right-click the trigger and click Test Trigger.
Useful variables: %game%, %status%, %gameId%, %startedAt%.
Clip Command (!clip)
Creates clips directly from chat. Optional seconds are supported, for example !clip 45.
-
Open Actions & Queues -> Actions.
-
Right-click inside the Actions field, click Add Action, and name it e.g. [Velora] Clip Command.

-
Open Commands, then right-click in the command list and click Add Command.

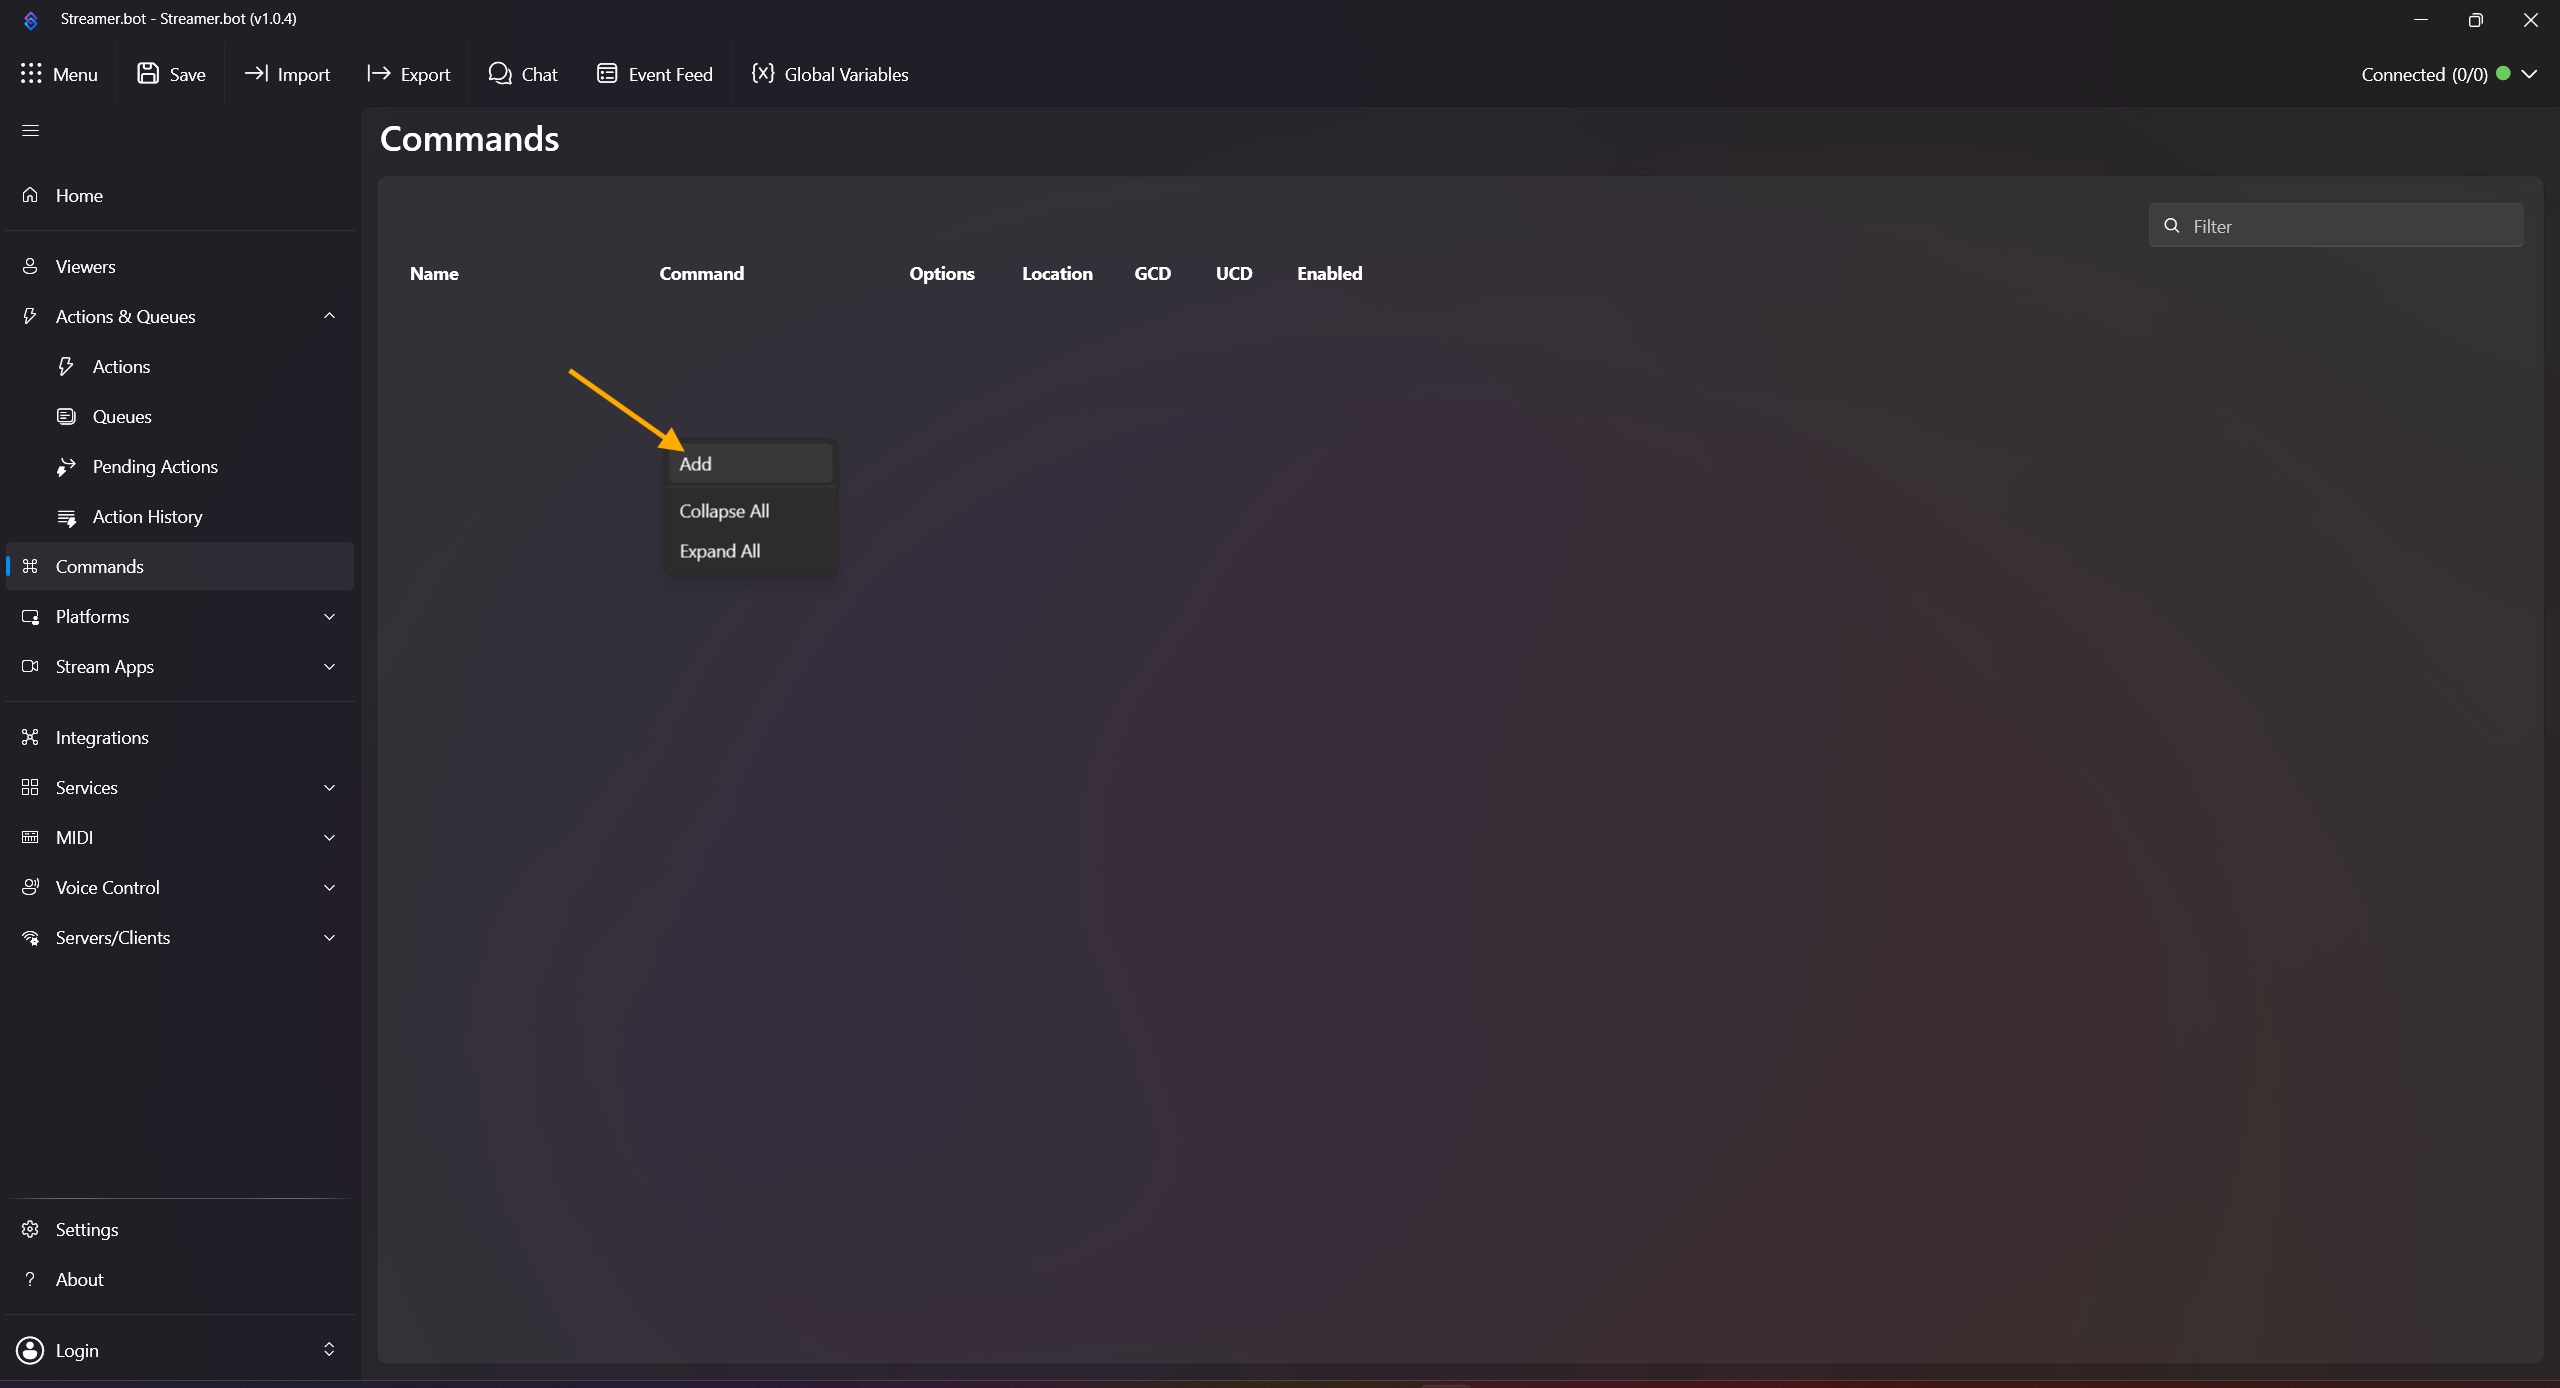
-
Configure the command:
Name: !clip
Command(s): !clip
Set your desired permissions and confirm with OK. (In this example everyone can use it.)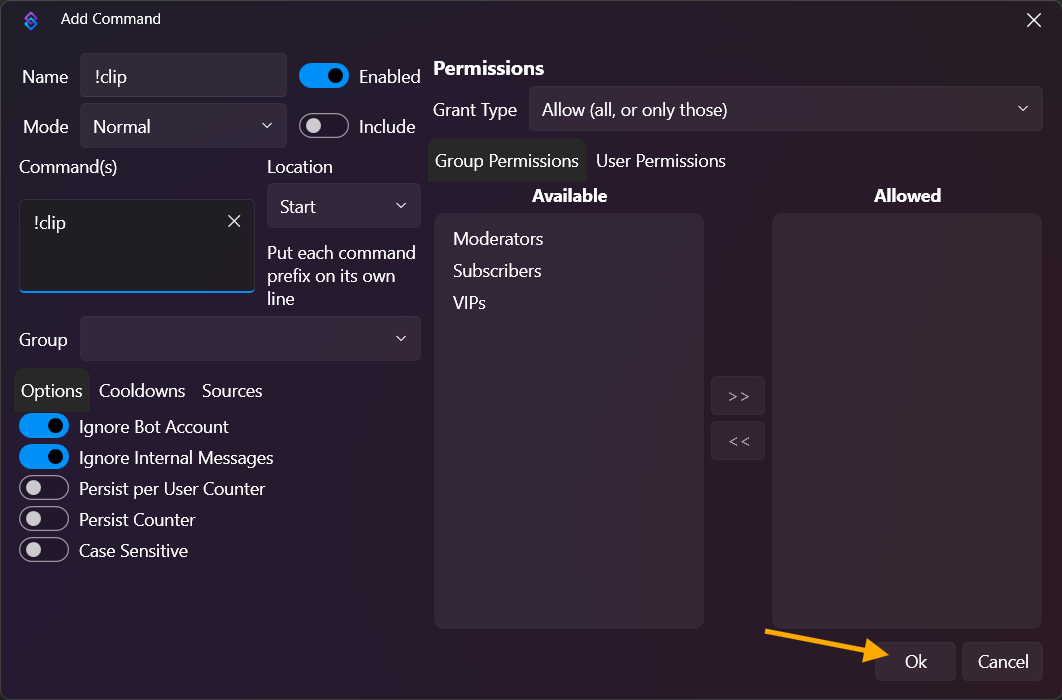
-
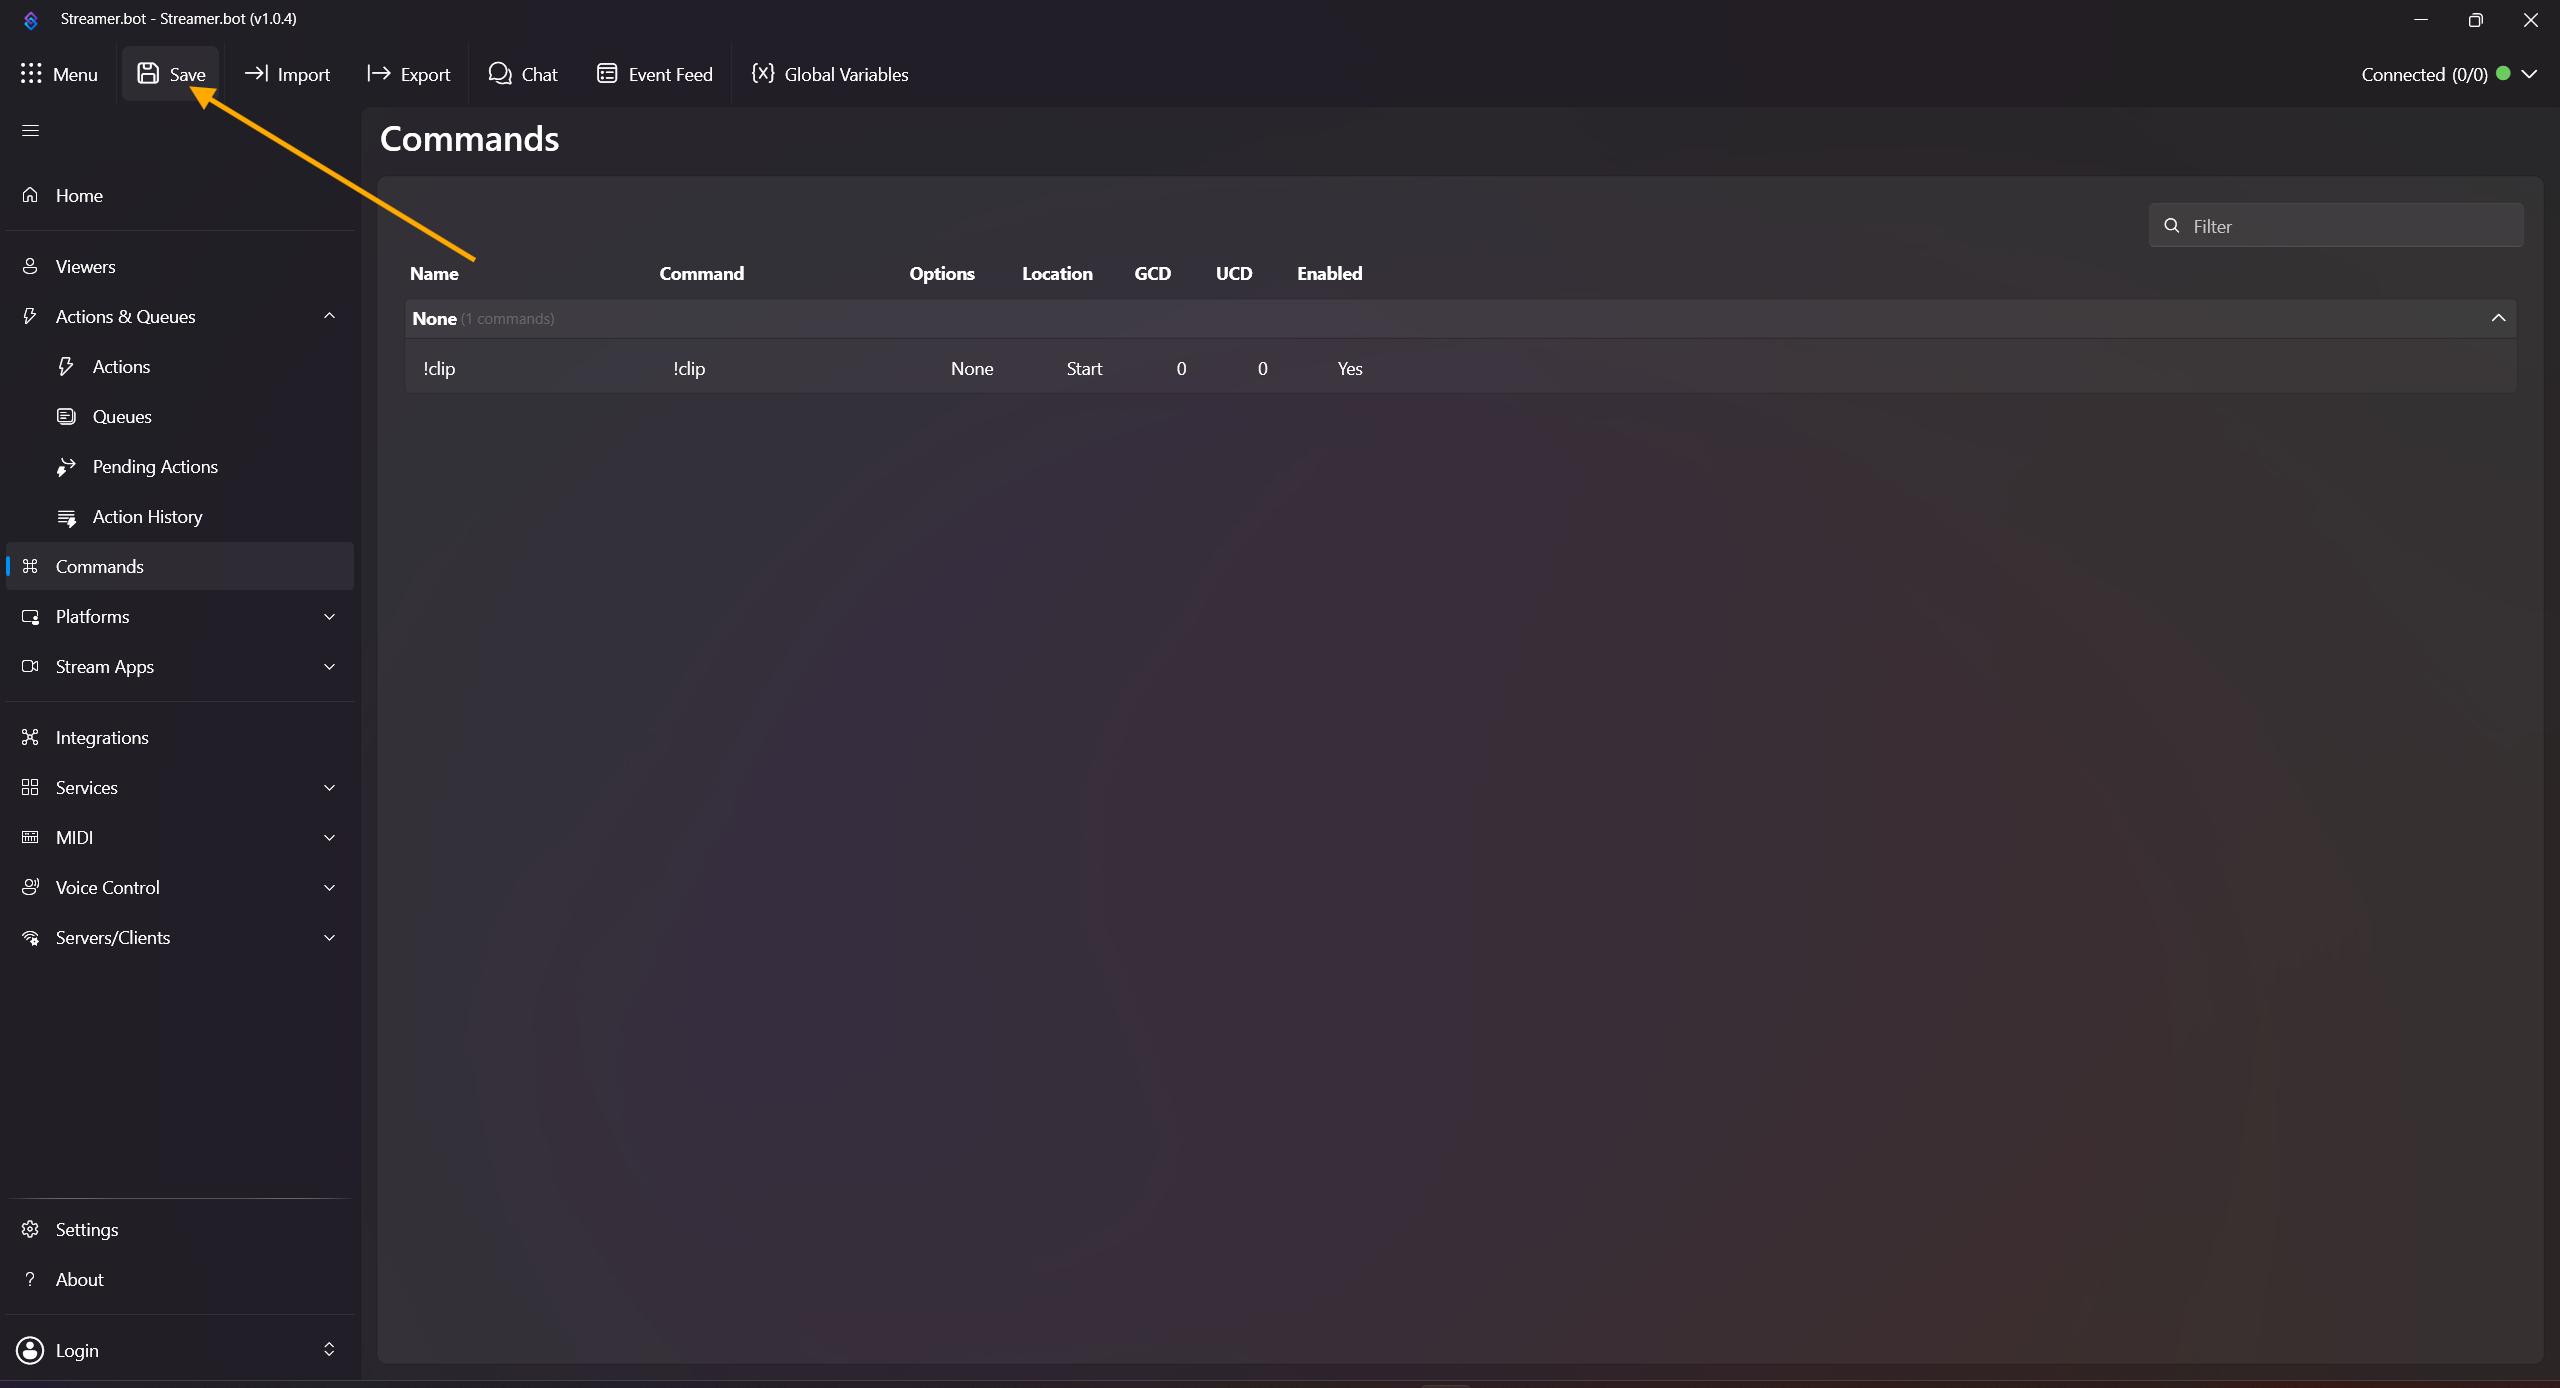
Click Save in the top left. (This is required so custom triggers for commands and rewards get added.)
- Back in Actions & Queues, make sure you are in the action you just created.
-
Right-click in the Trigger field and add:
Add -> Custom -> Velora -> Commands -> [Velora.Bot] !clip (!clip)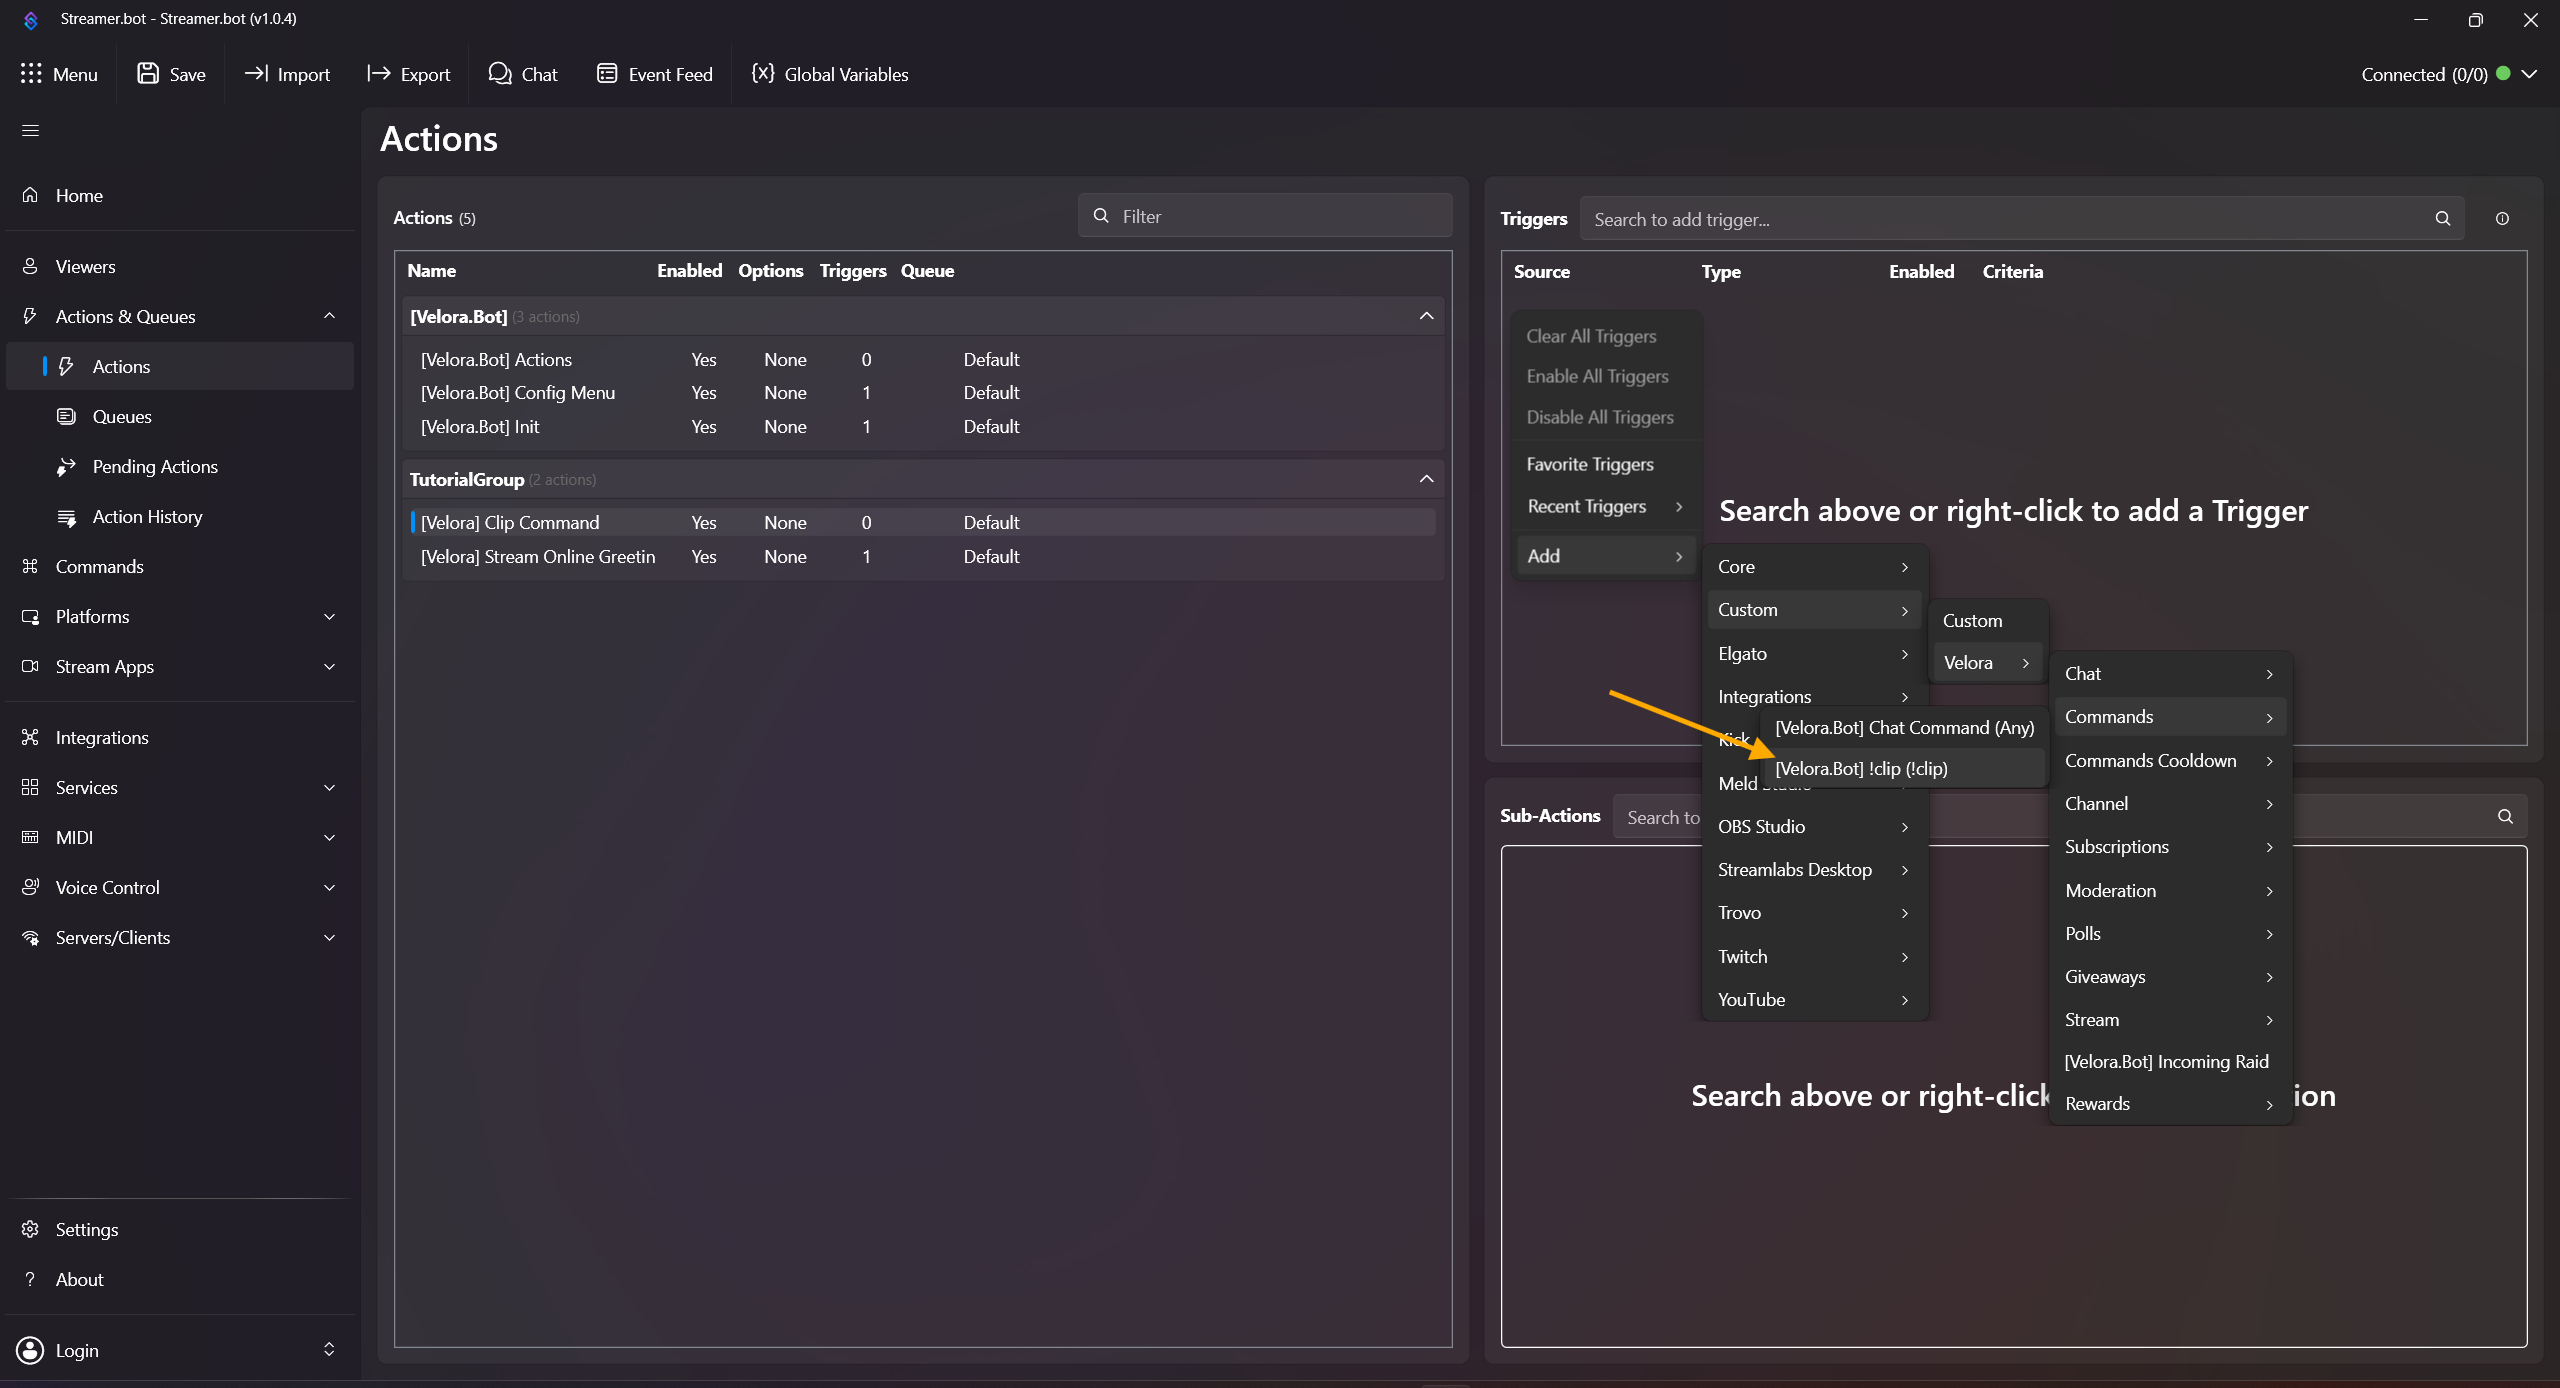
-
Clip title:
Right-click in Sub Actions and add Add -> Core -> Arguments -> Set Argument
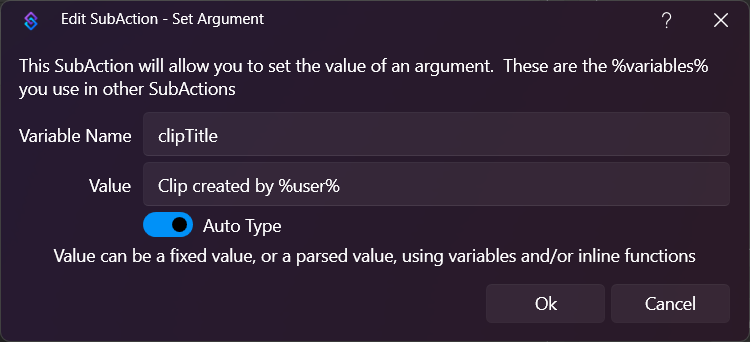
Variable Name: clipTitle
Value: Clip created by %user%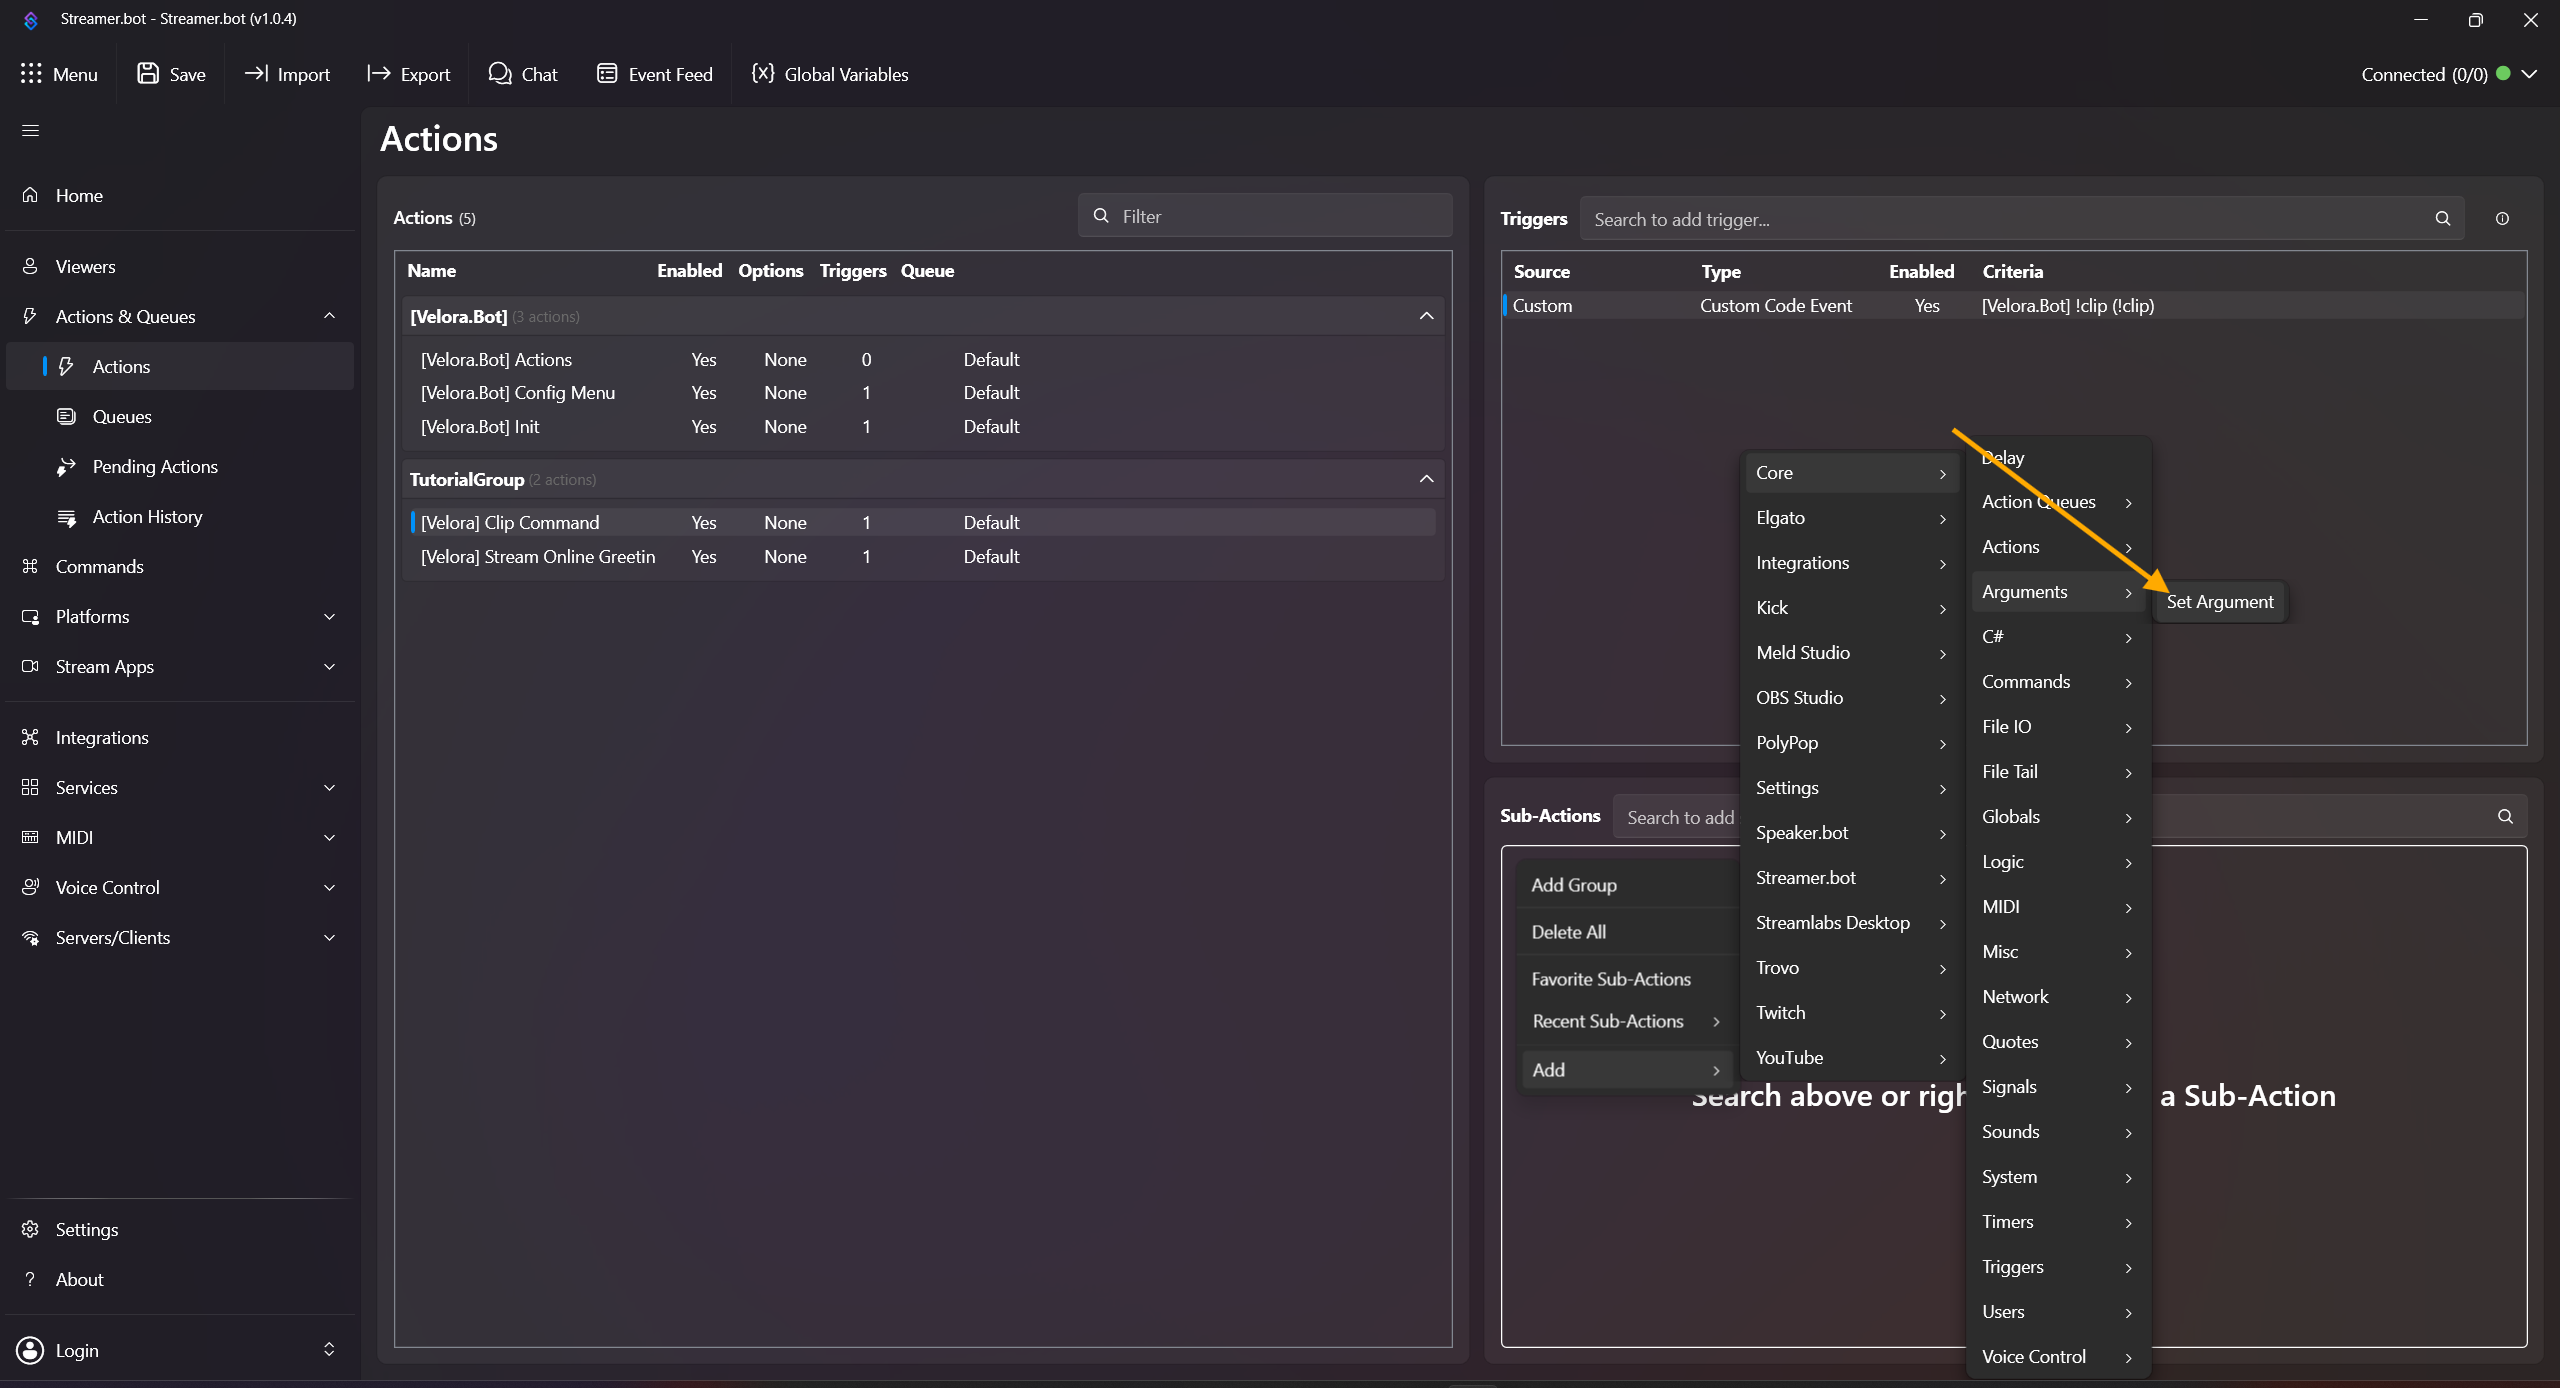
-
Right-click in Sub Actions and add Add -> Core -> C# -> Execute C# Method
Code: [Velora.Bot] Actions
Method: CreateClip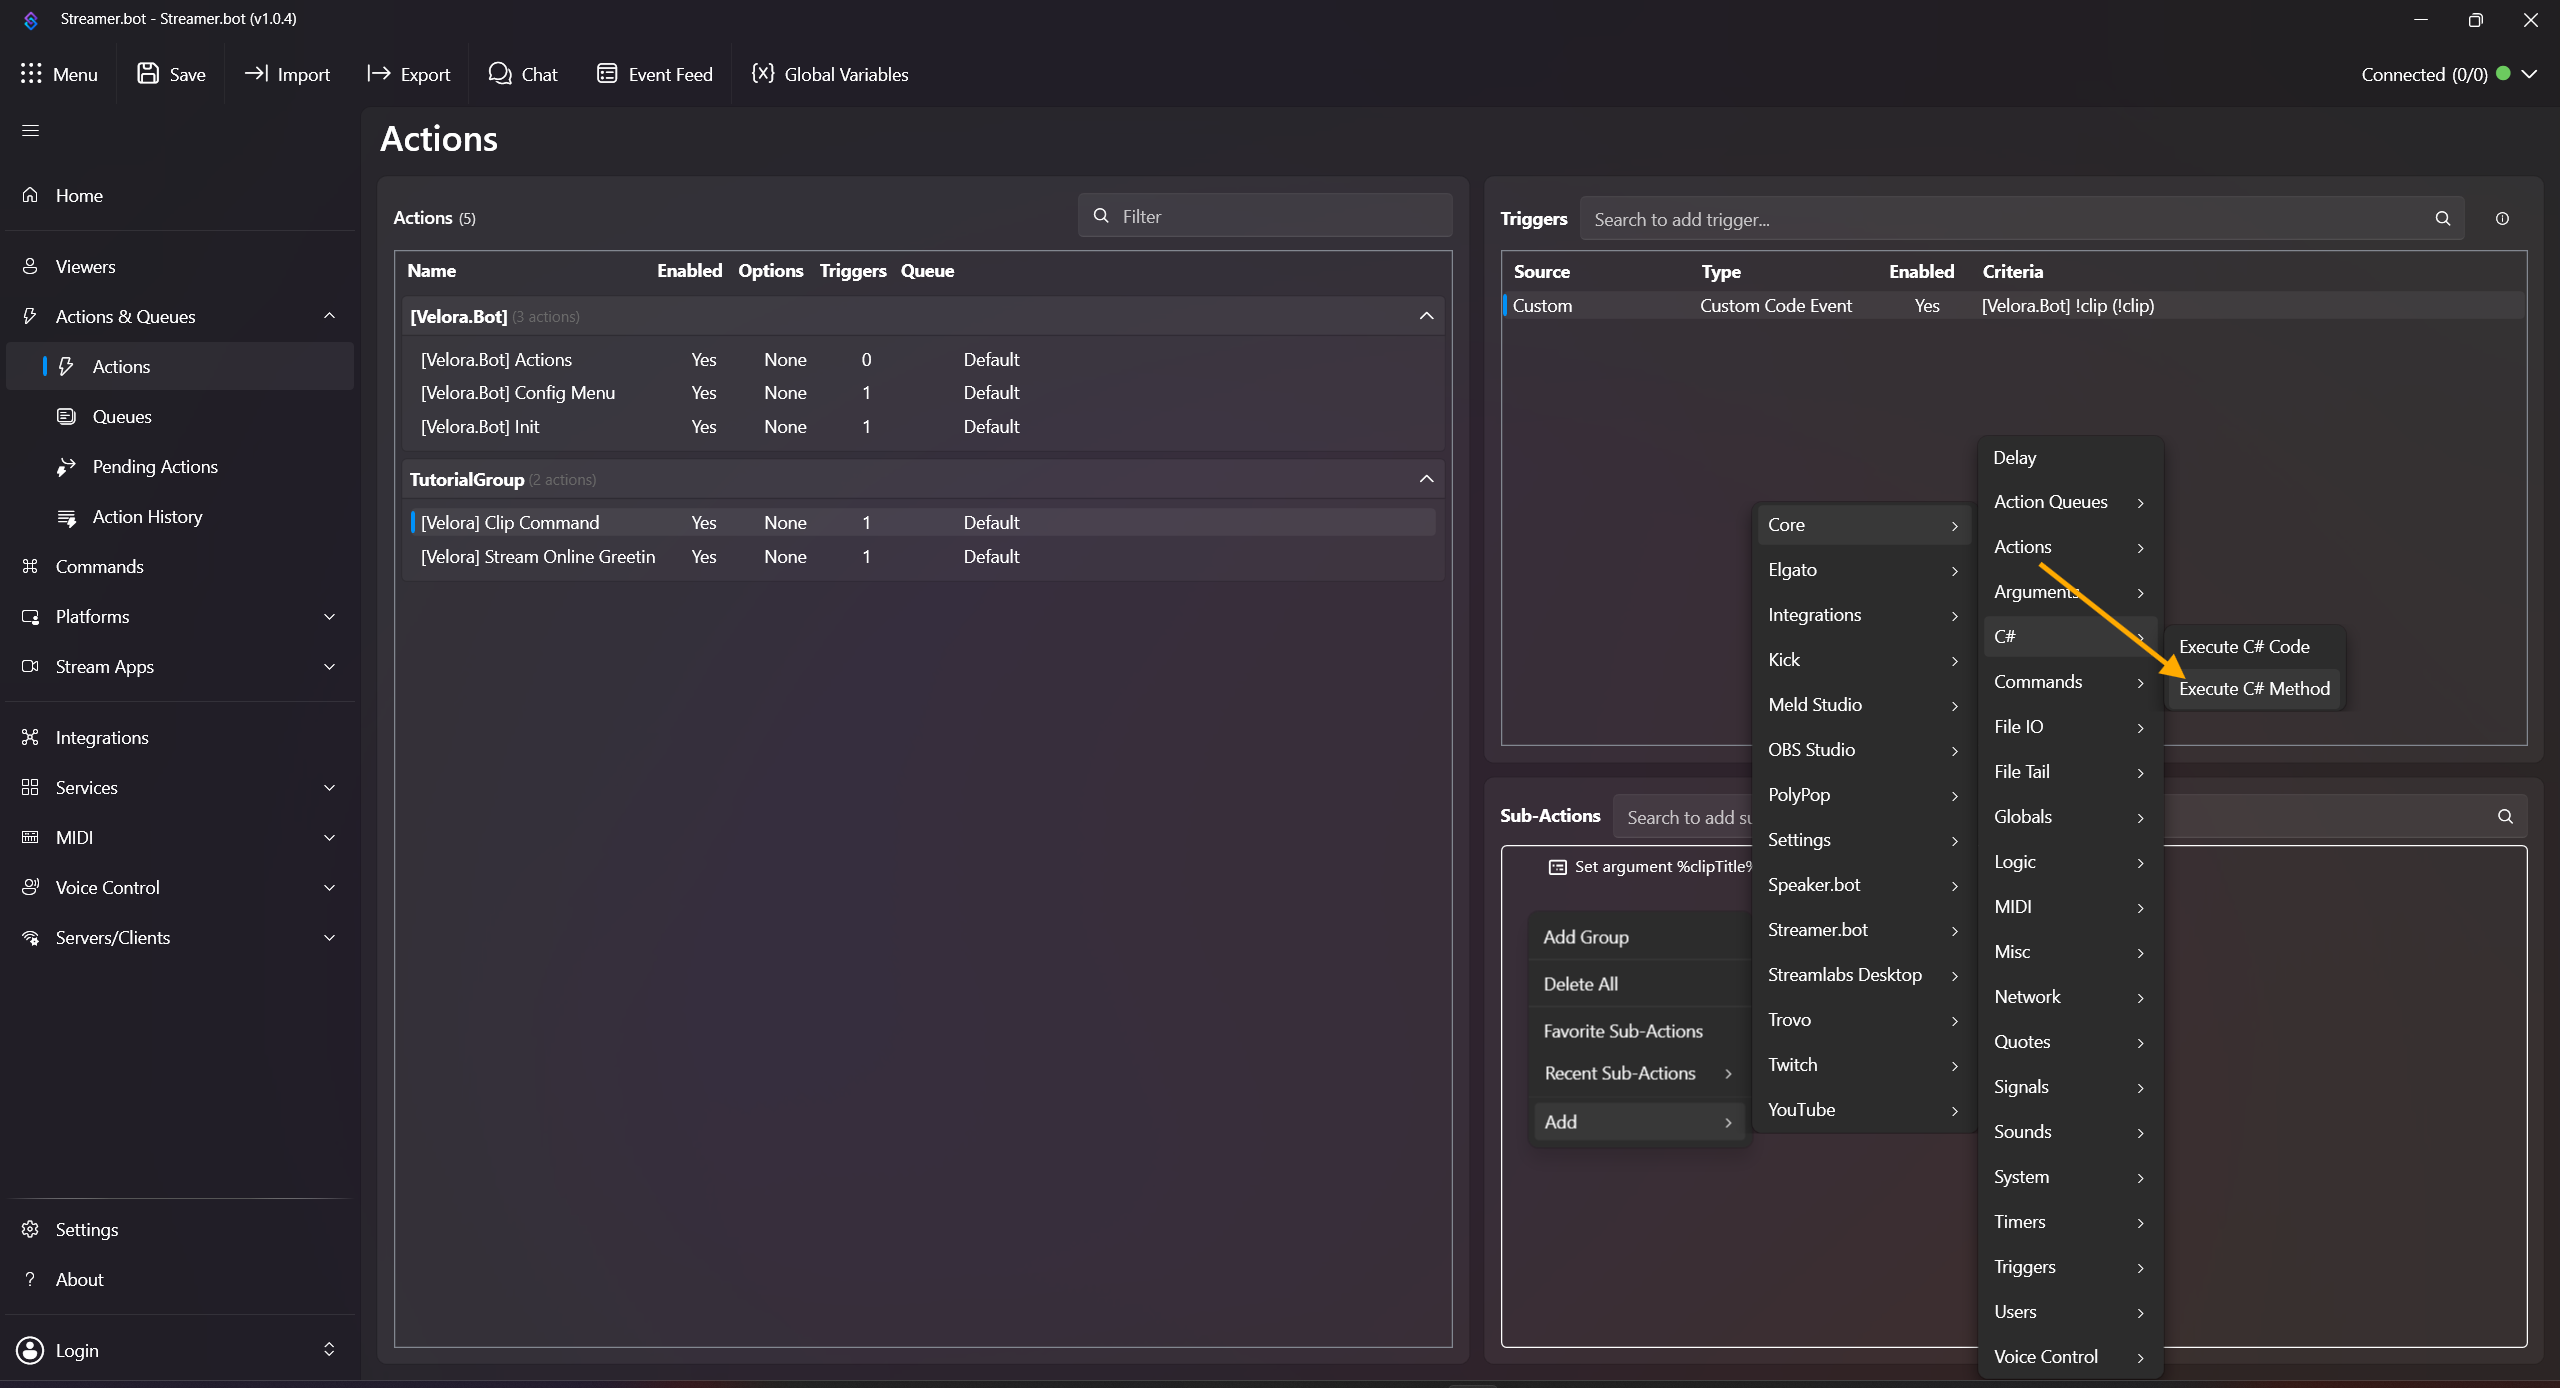
-
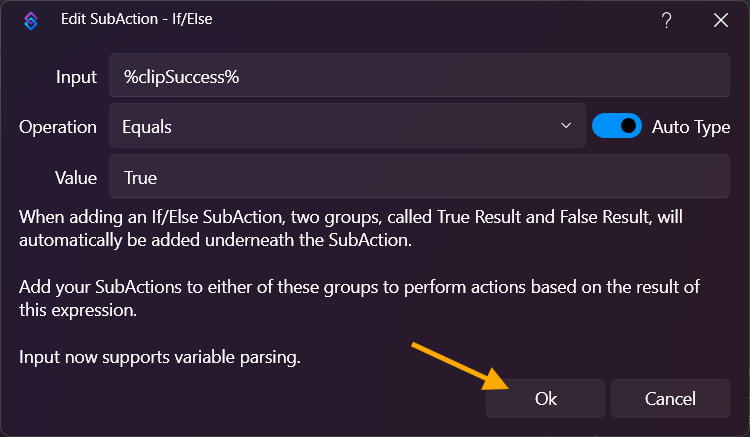
Right-click in Sub Actions and add Add -> Core -> Logic -> If/Else
Input: %clipSuccess%
Operation: Equals
Value: True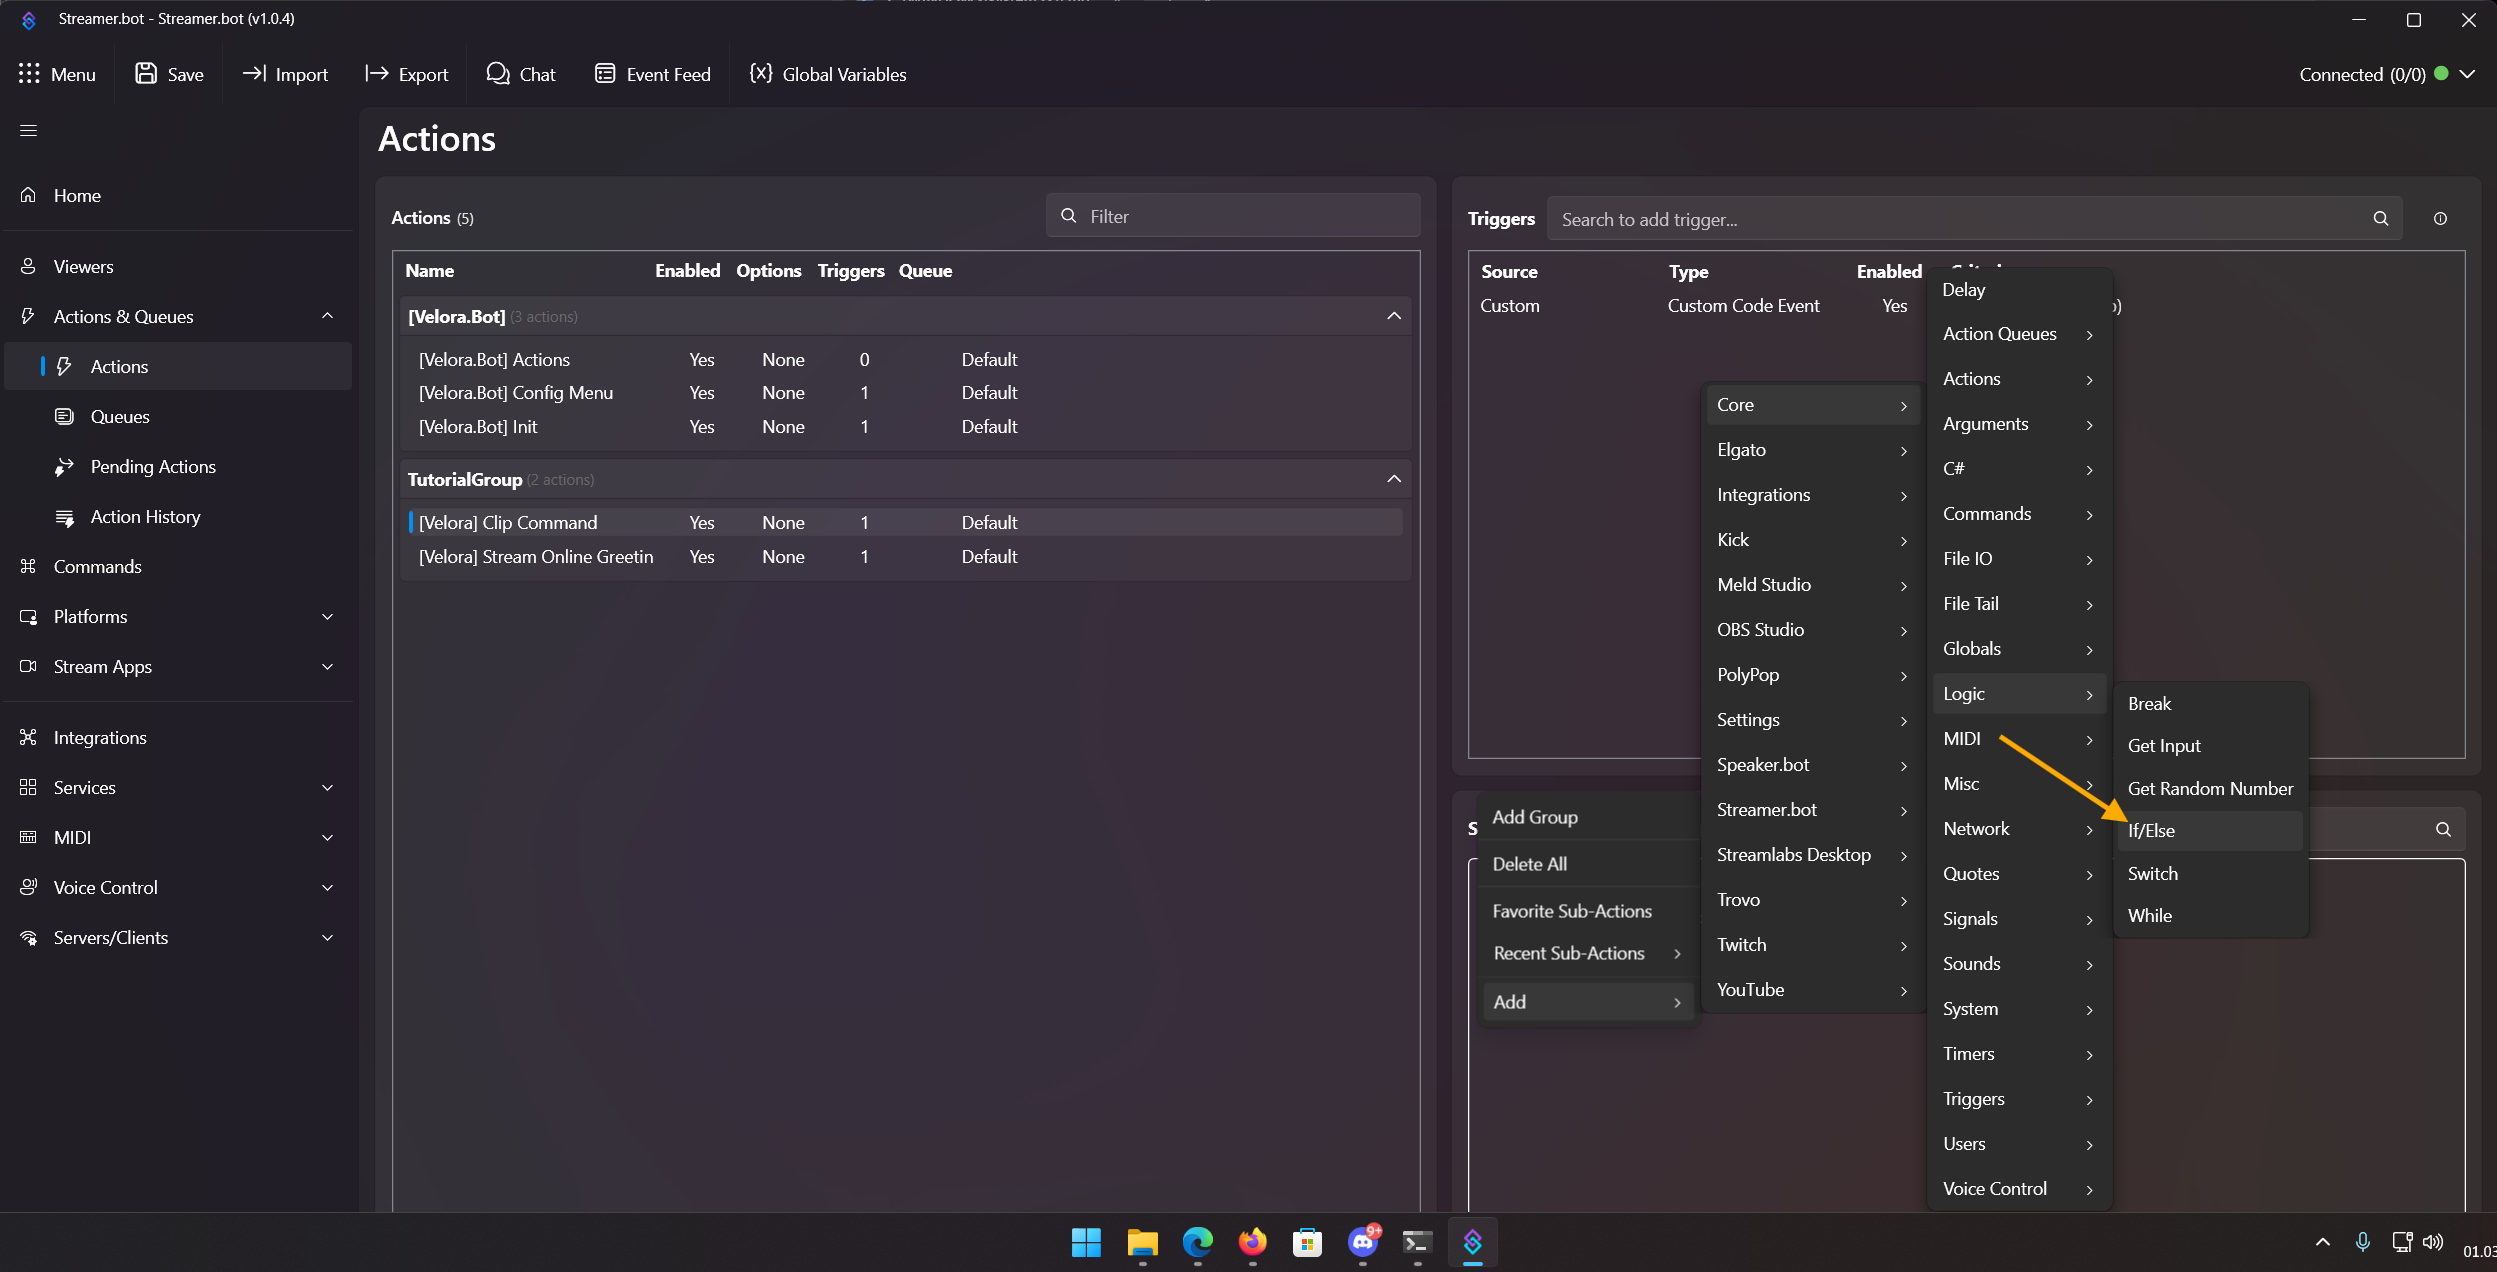
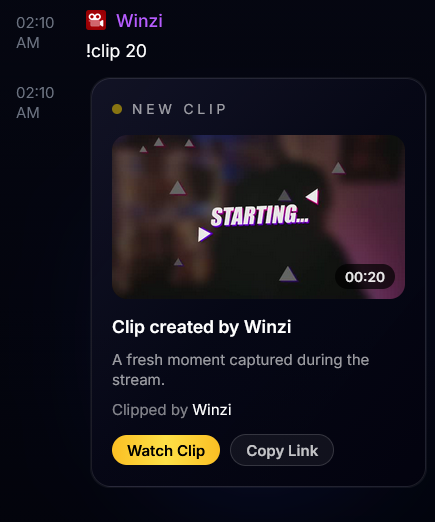
- In the True branch, nothing is required. Velora posts link + preview automatically.
-
In the False branch add:
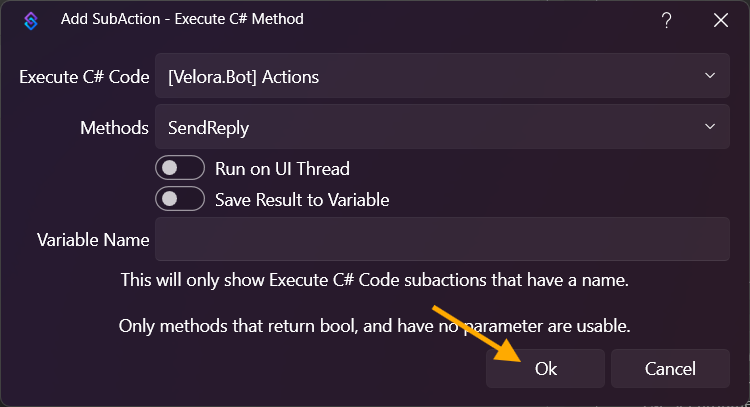
Add -> Core -> C# -> Execute C# Method -> SendReply (or SendMessage)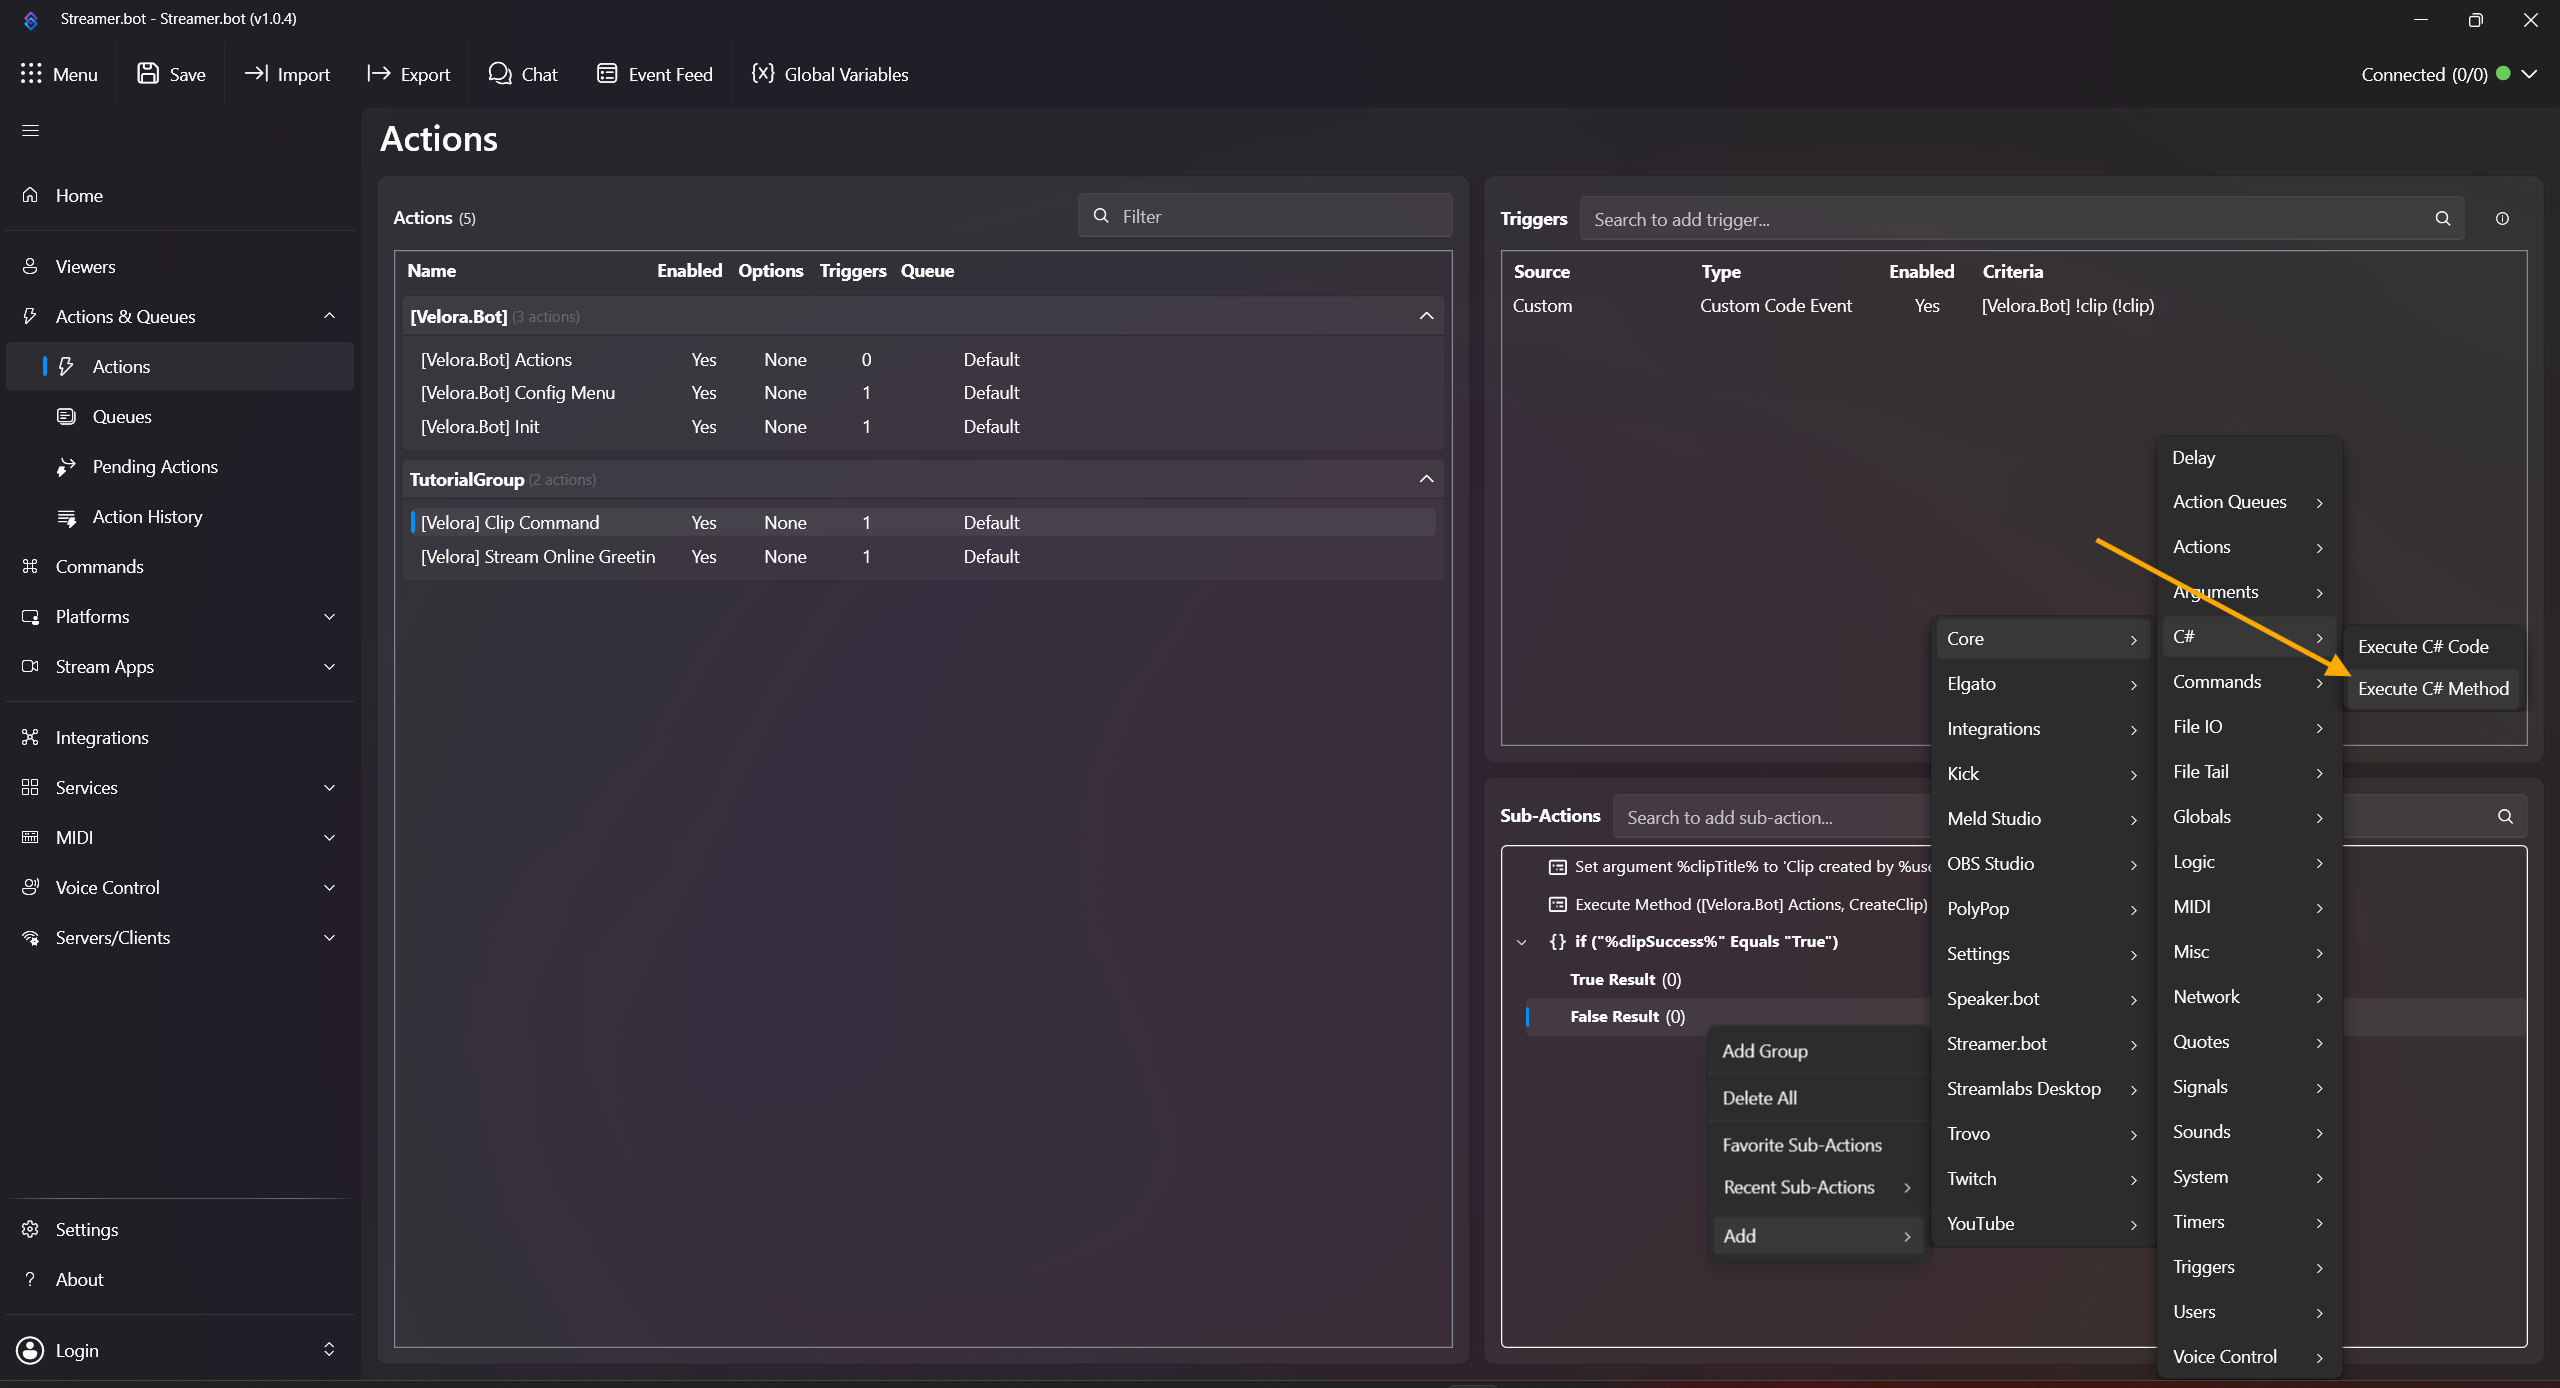
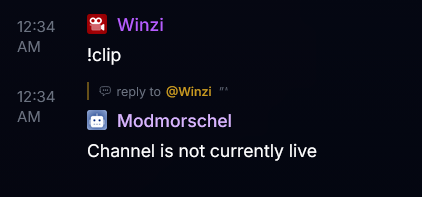
Done! Test with !clip or !clip 45 in chat. Clip creation can take a few seconds before feedback appears, and very long durations near the maximum can occasionally return a false timeout/abort message. If the streamer is offline, Velora sends an offline message.
!clip without a duration always creates a 60-second clip. Clip duration is limited to 15-120 seconds. Recommended variables: %clipSuccess%, %clipUrl%, %clipId%, %clipErrorMessage%.
Title Change Command (!title)
Allows moderators to change your stream title directly from chat.
-
Open Actions & Queues -> Actions.

-
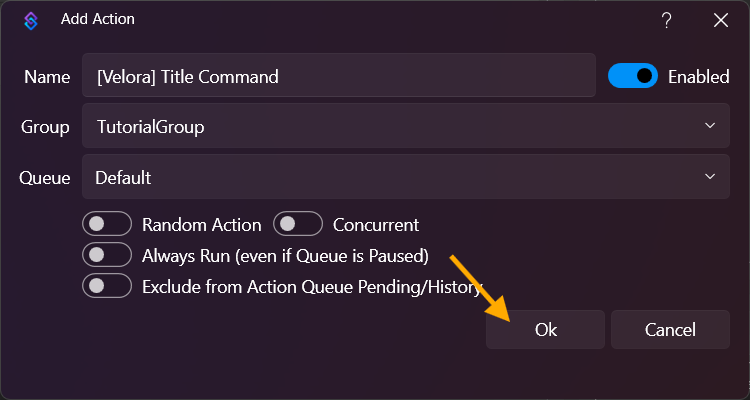
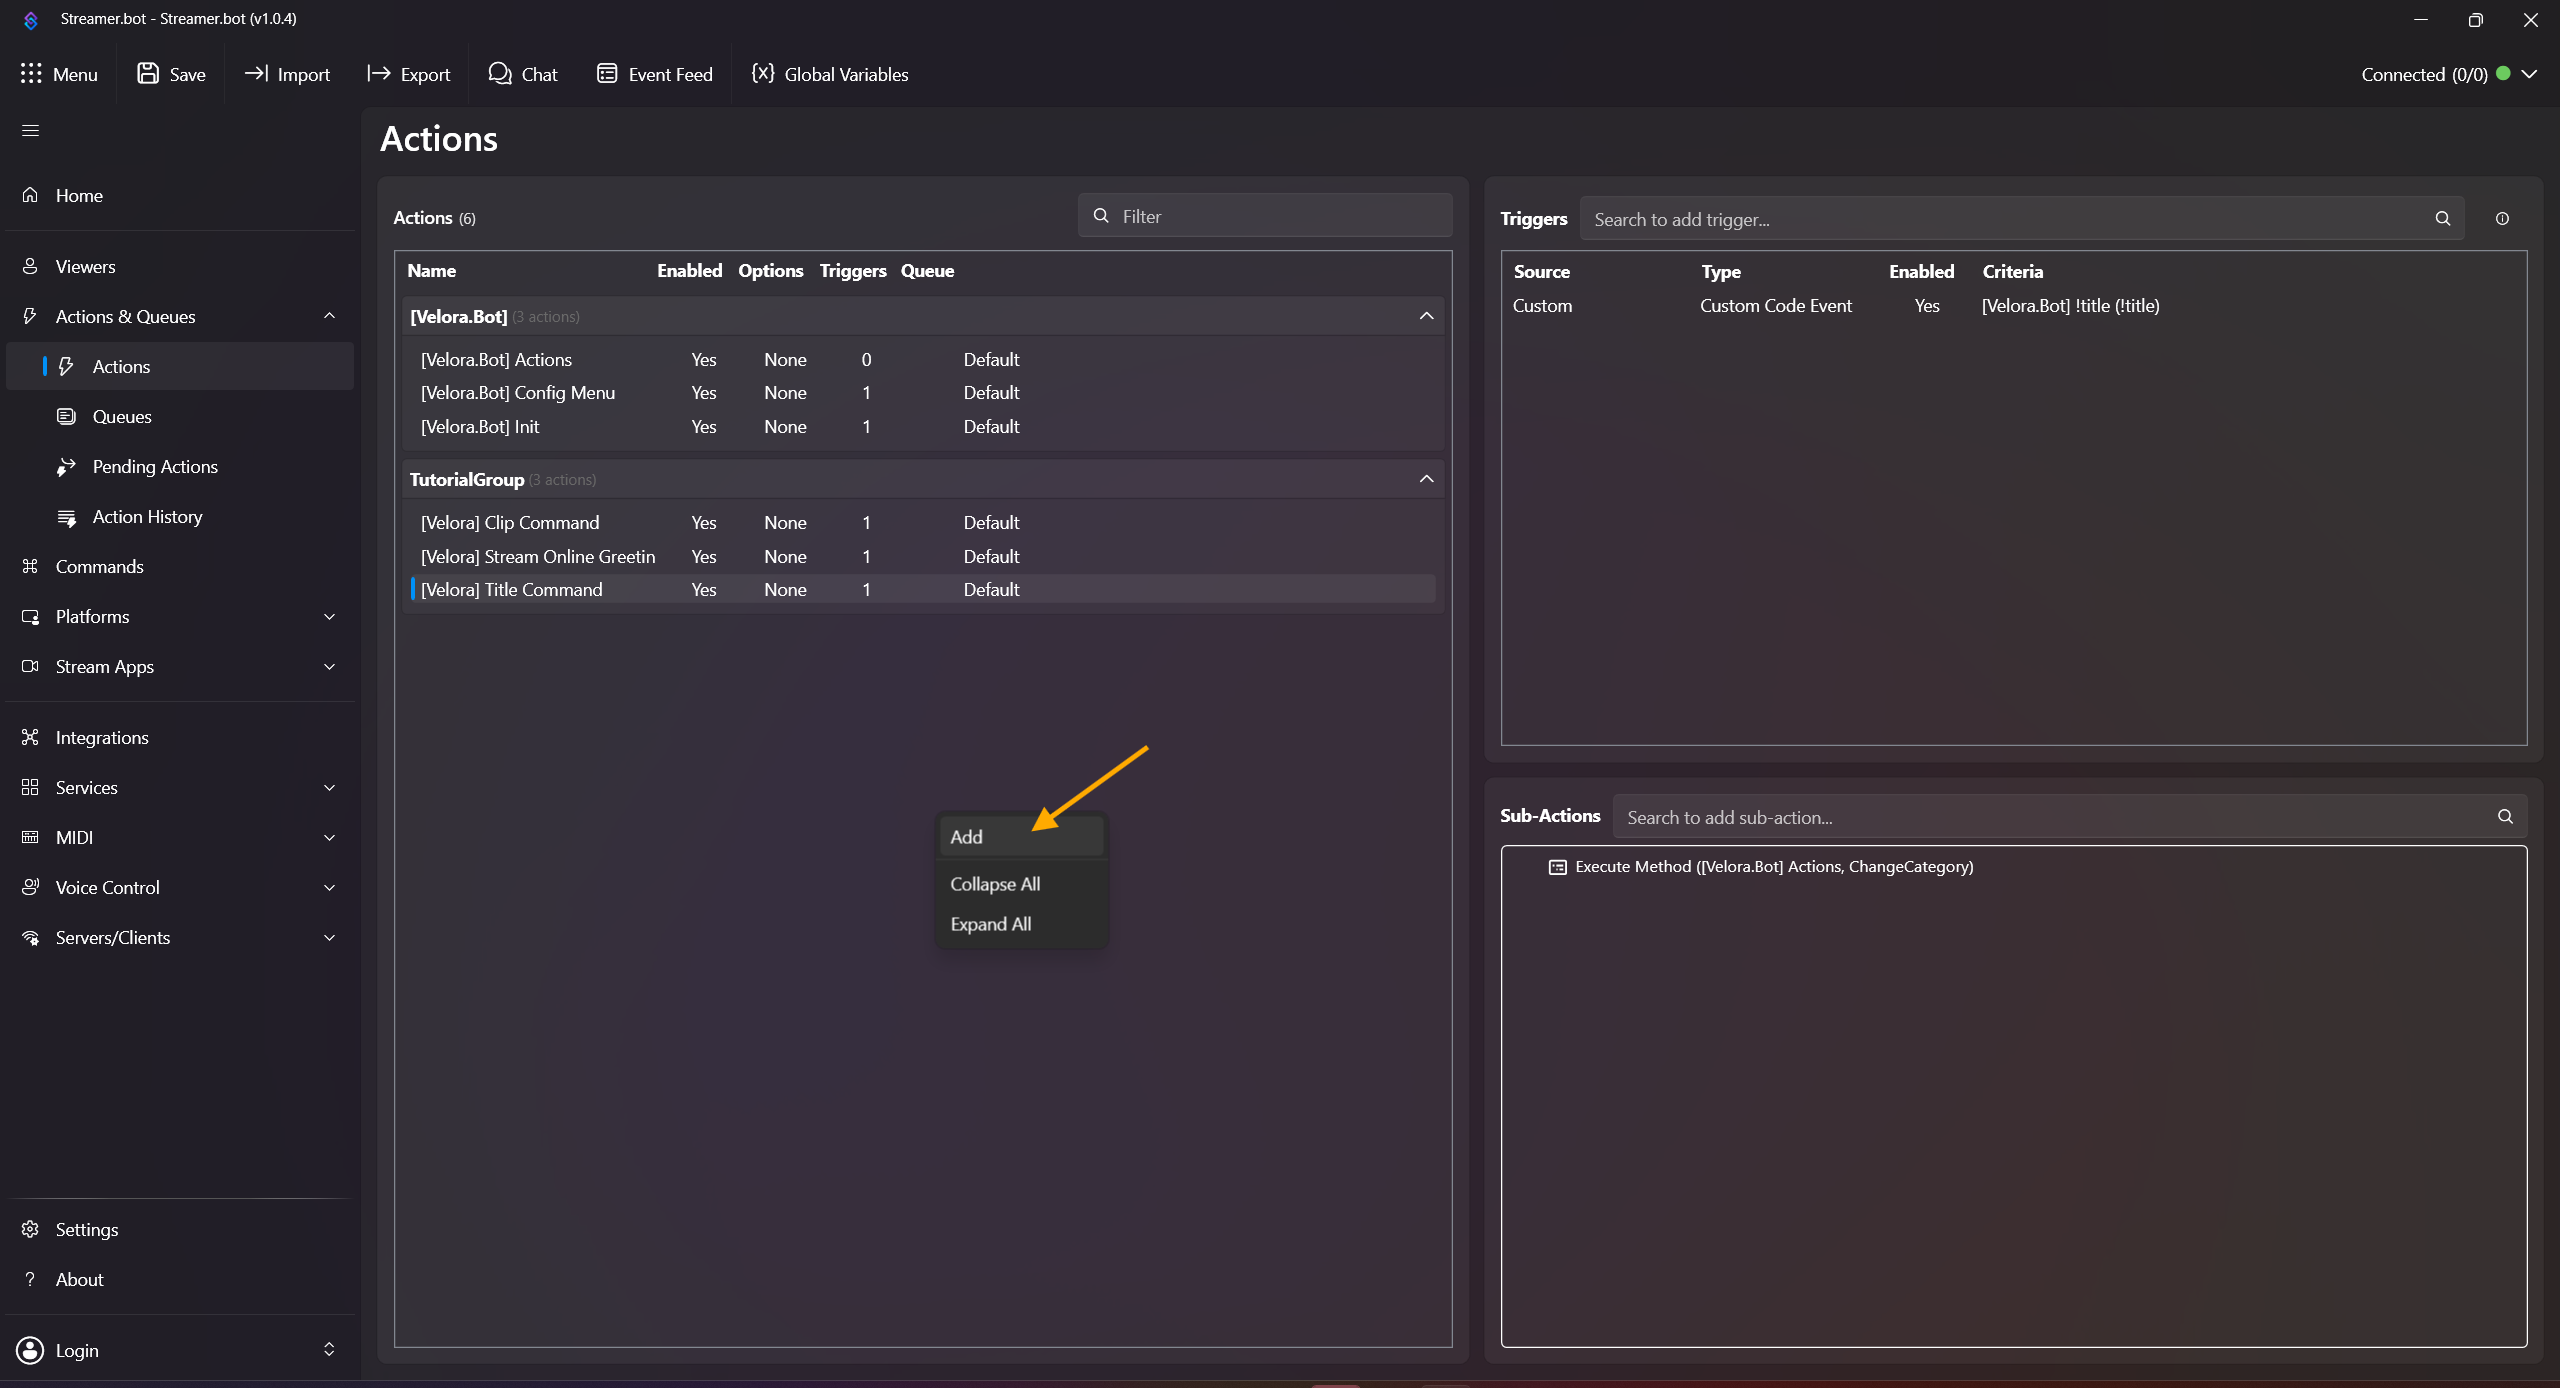
Right-click inside the Actions field, click Add Action, and name it e.g. [Velora] Title Command.

-
Open Commands, then right-click in the command list and click Add Command.

- Configure the command:
Name: !title
Command(s): !title
Set permissions to moderators (or your preferred role setup) and confirm with OK.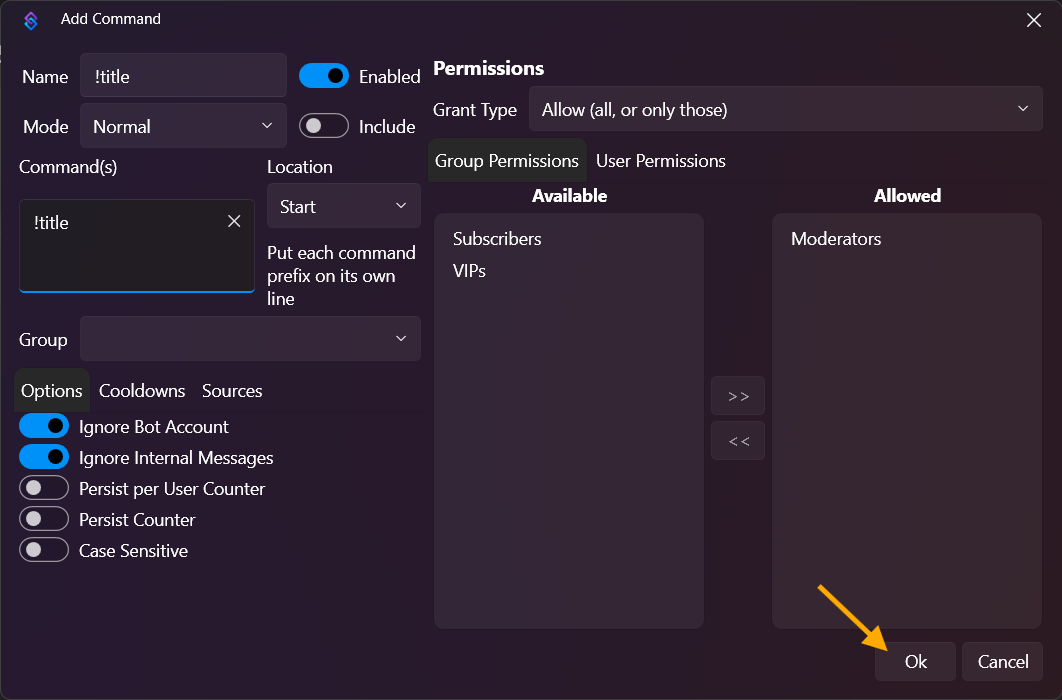
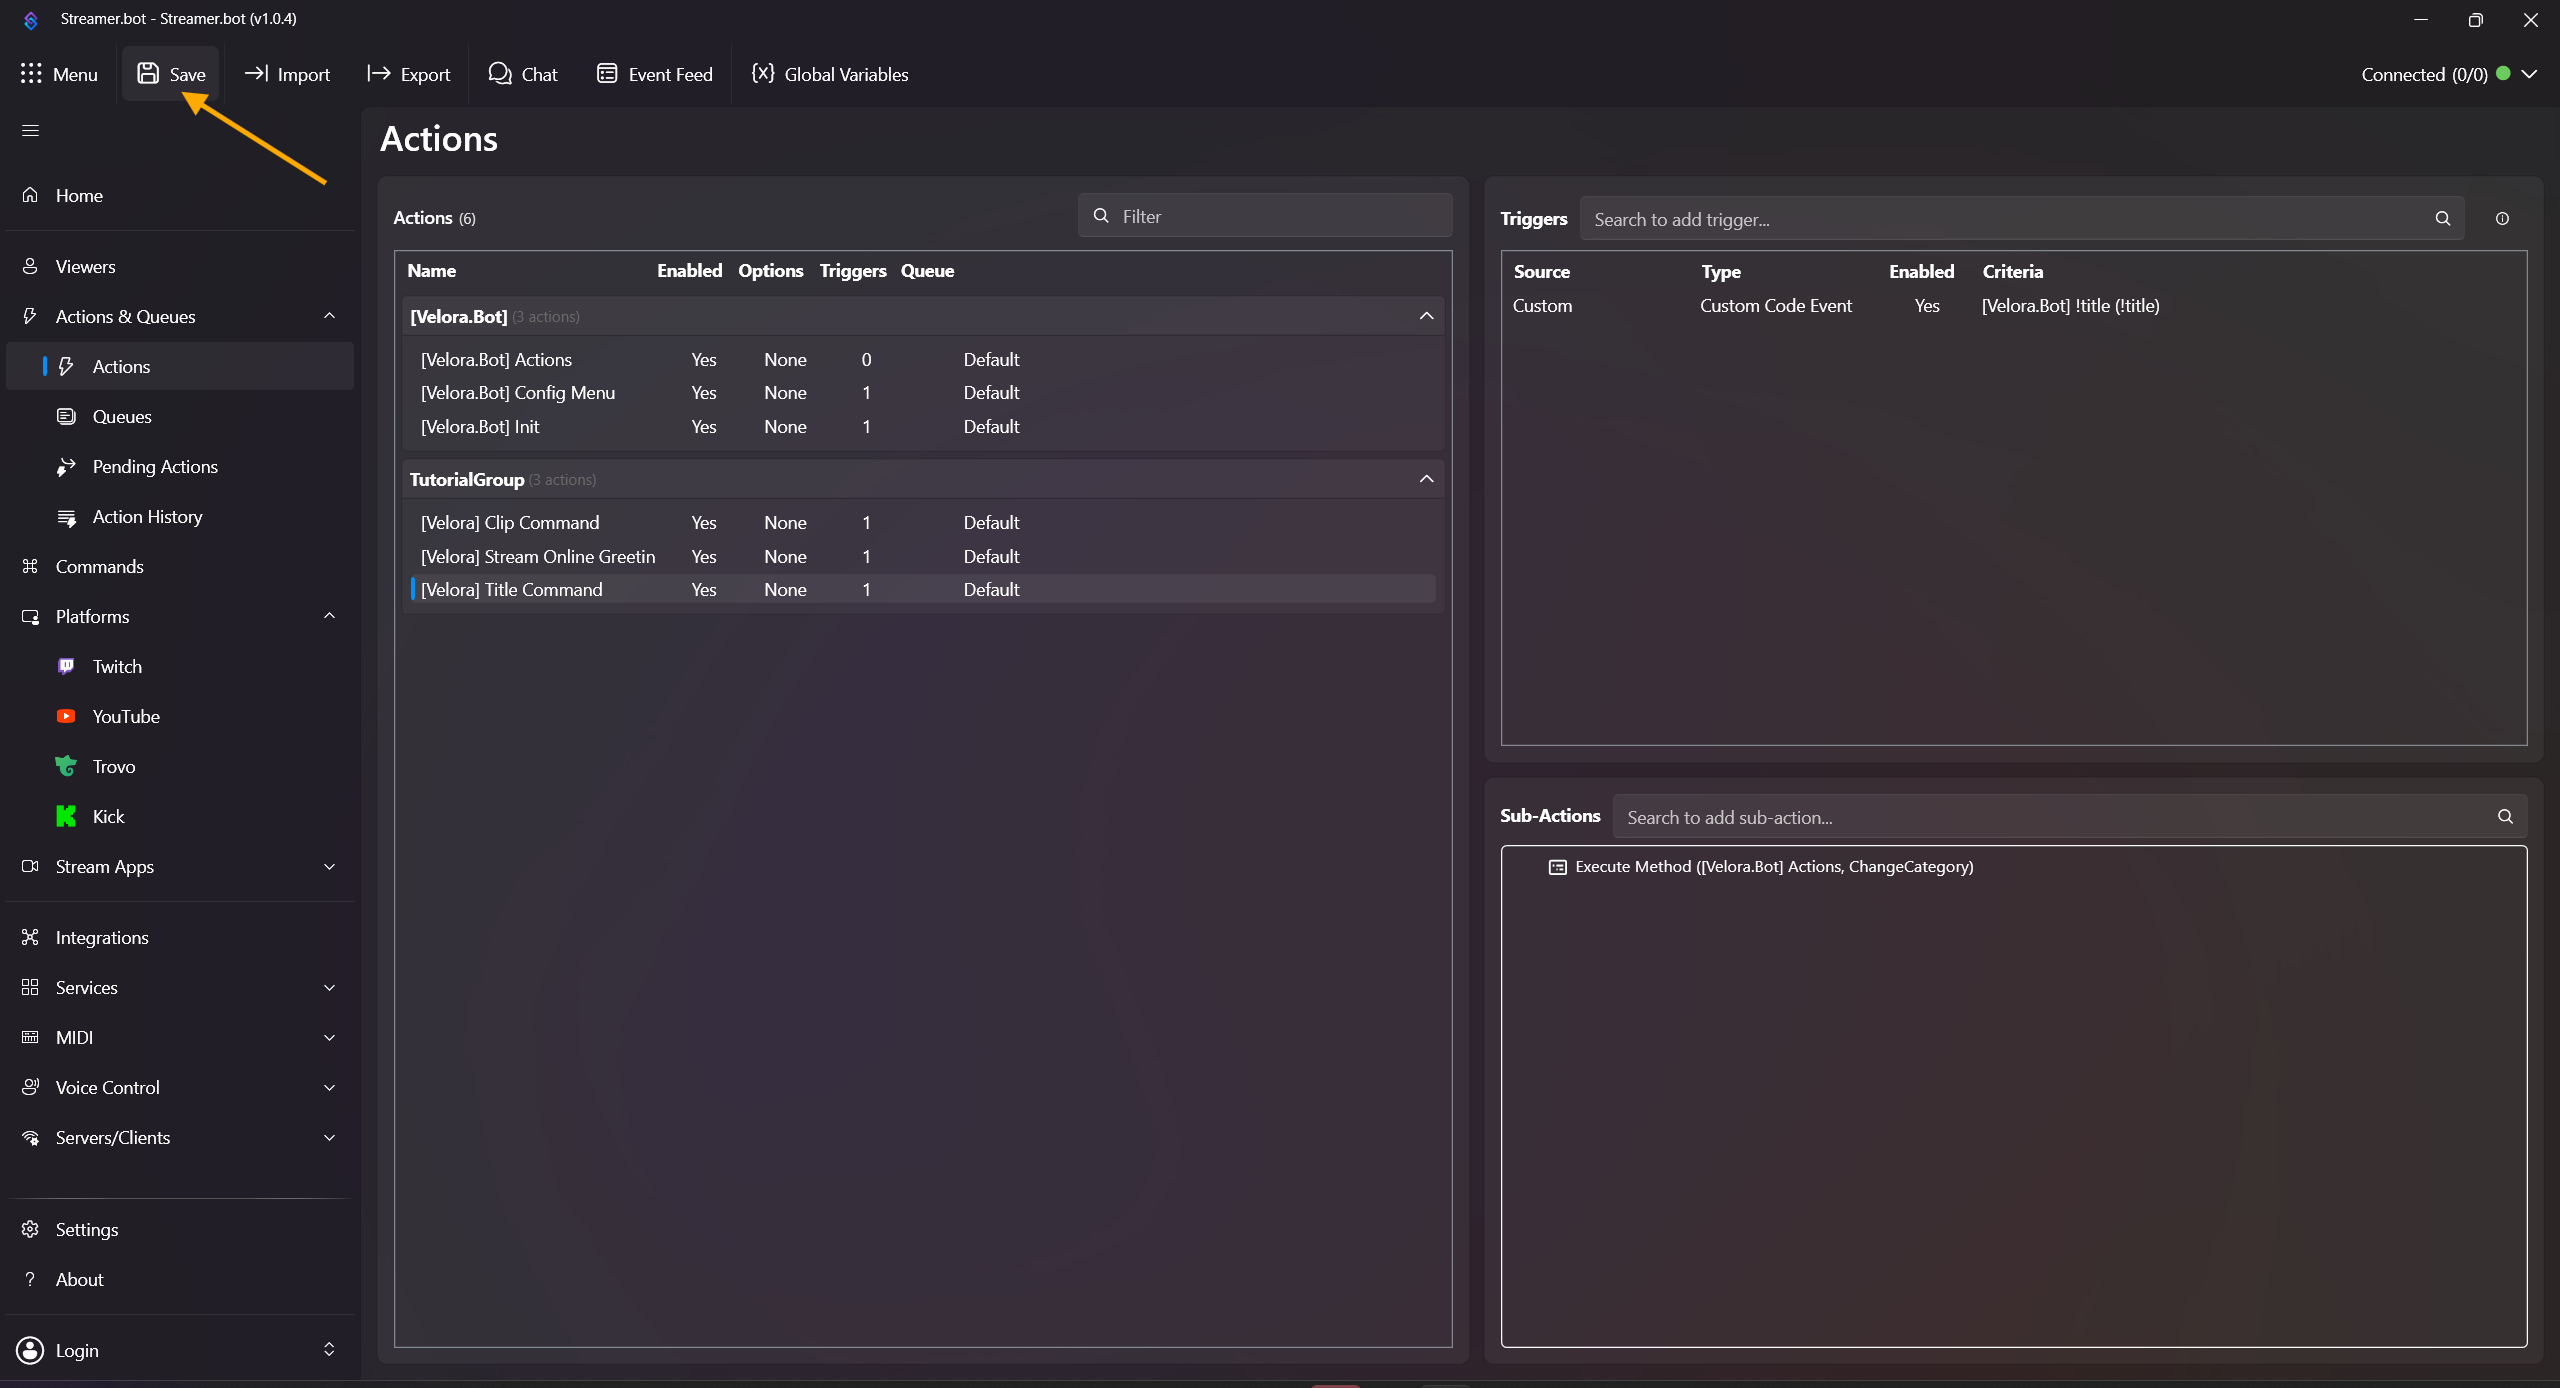
- Click Save in the top-left. (This is required so custom triggers for commands and rewards get added.)

- Back in Actions & Queues, make sure your newly created action is selected.
- Right-click in the Trigger field and add:
Add -> Custom -> Velora -> Commands -> [Velora.Bot] !title (!title)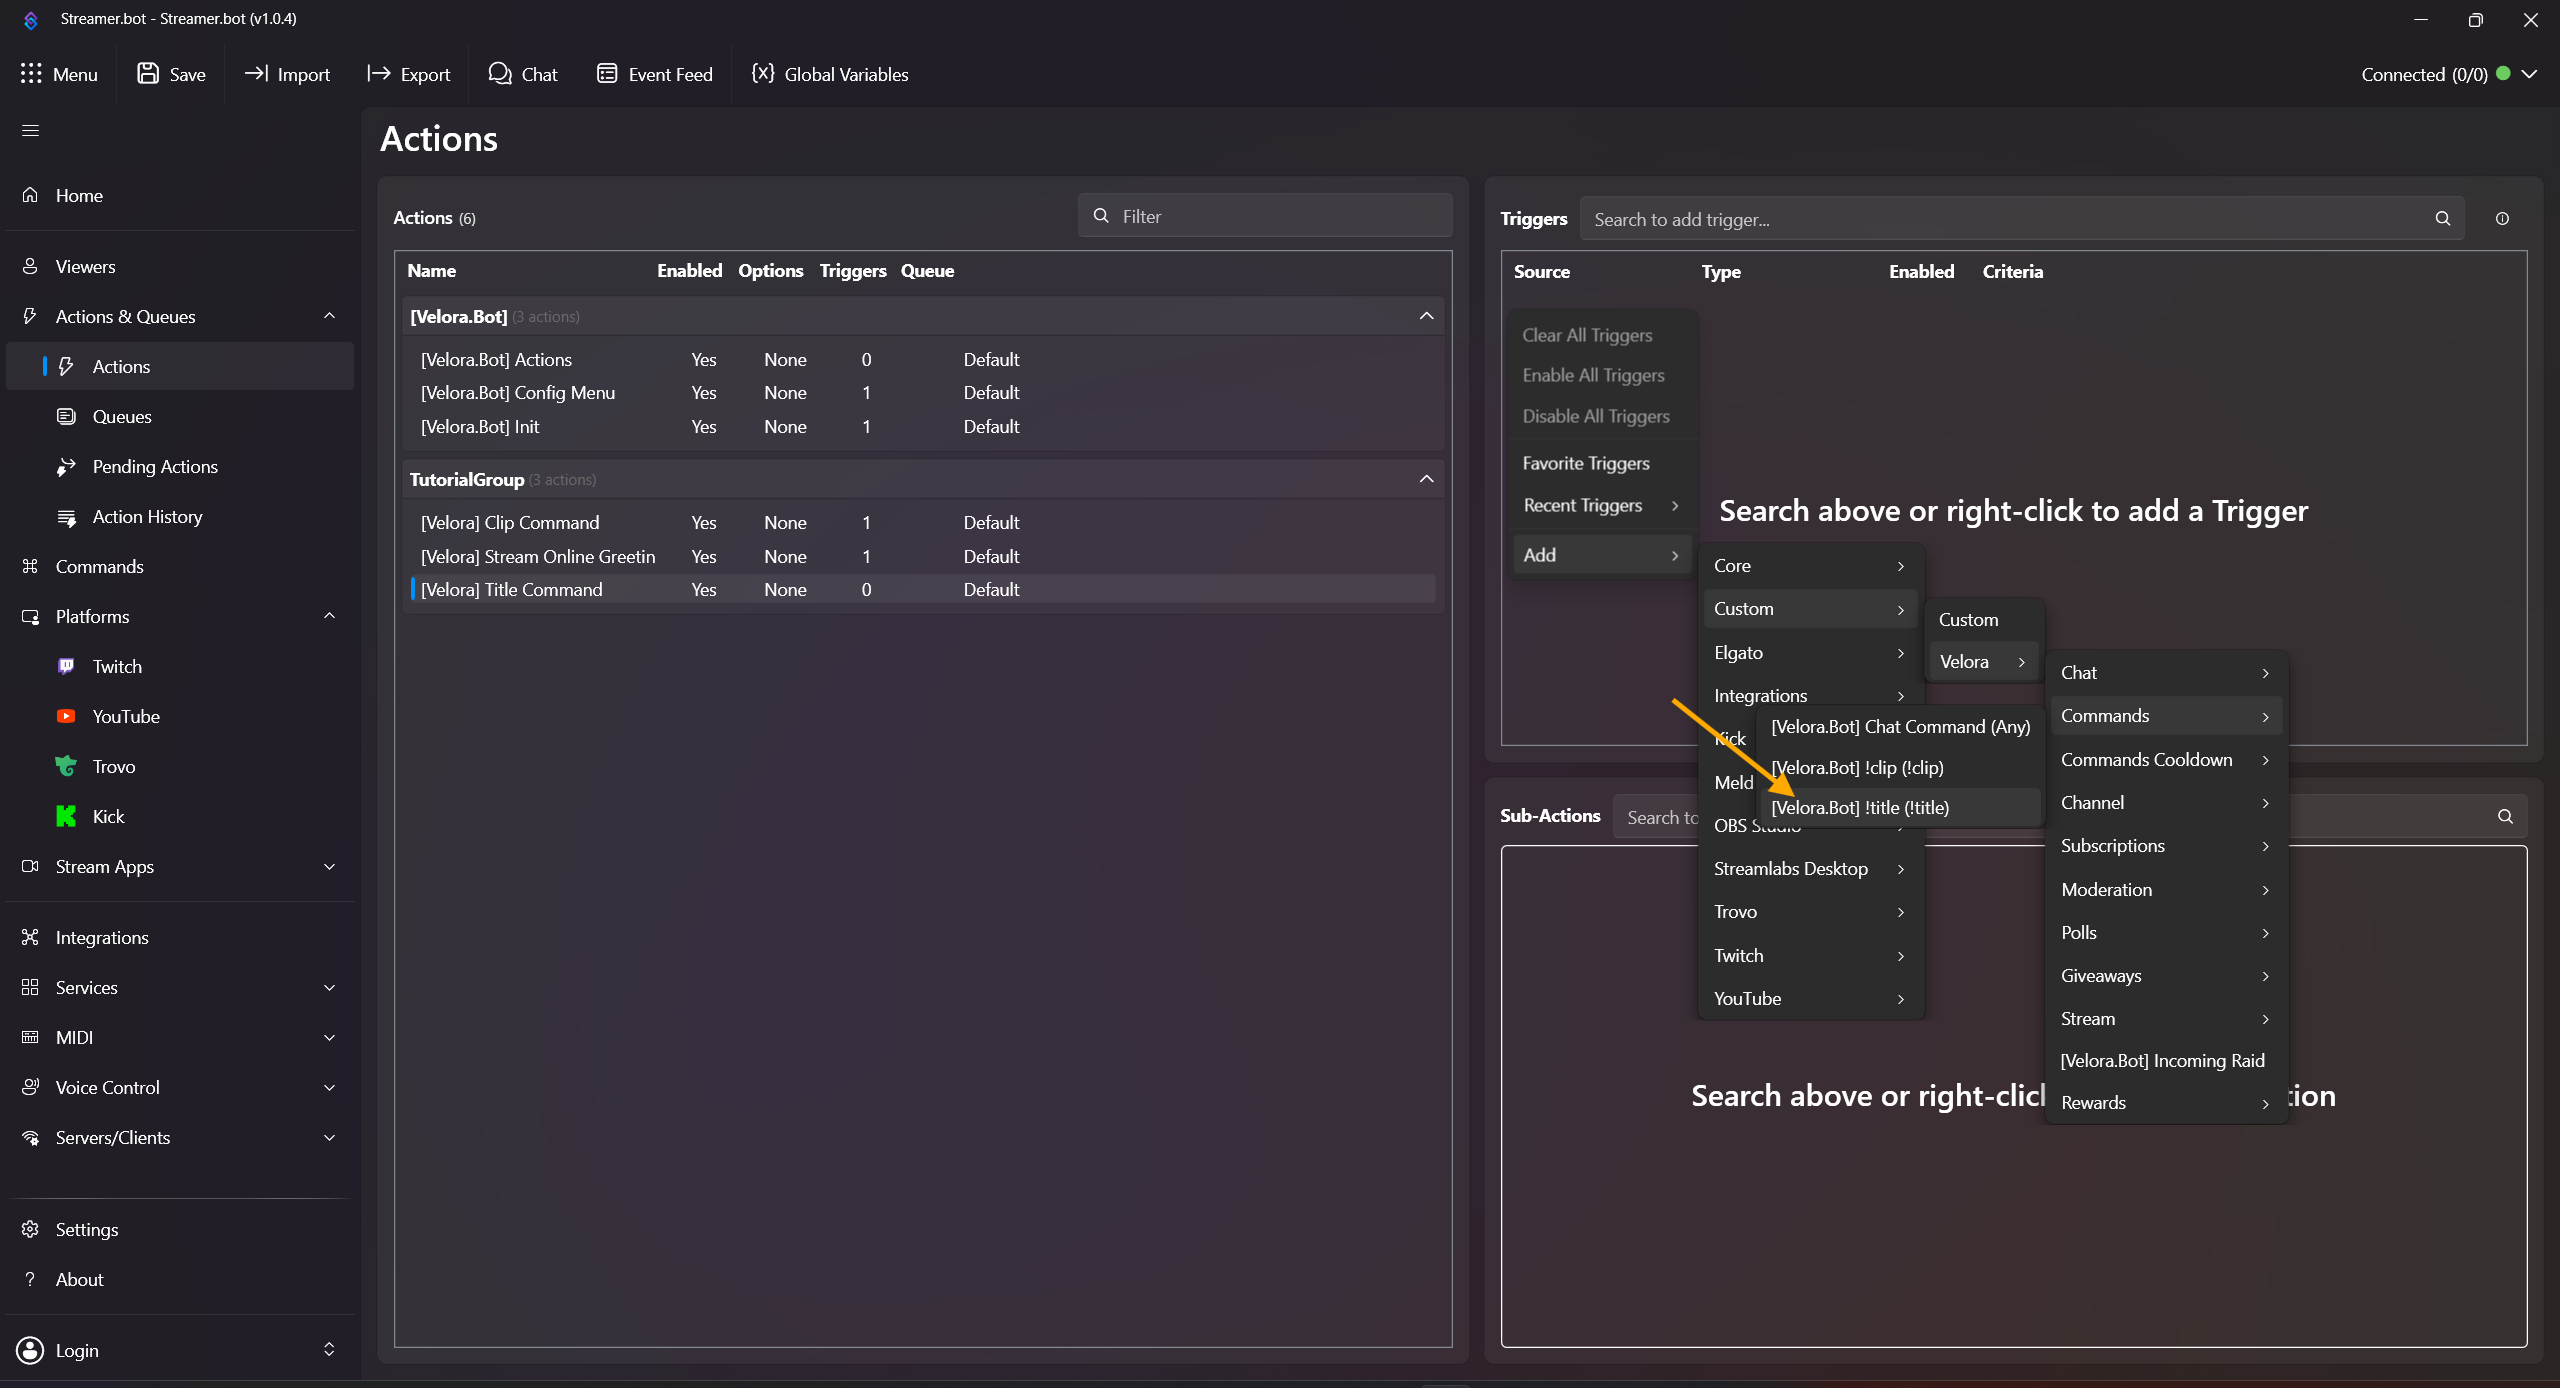
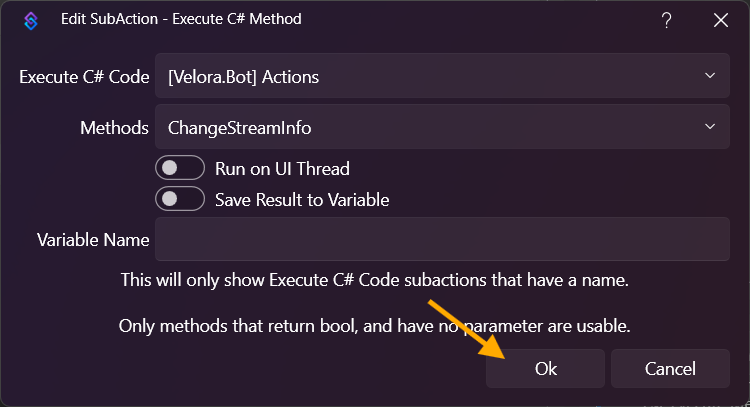
- Right-click in Sub Actions and add Add -> Core -> C# -> Execute C# Method
Code: [Velora.Bot] Actions
Method: ChangeStreamInfo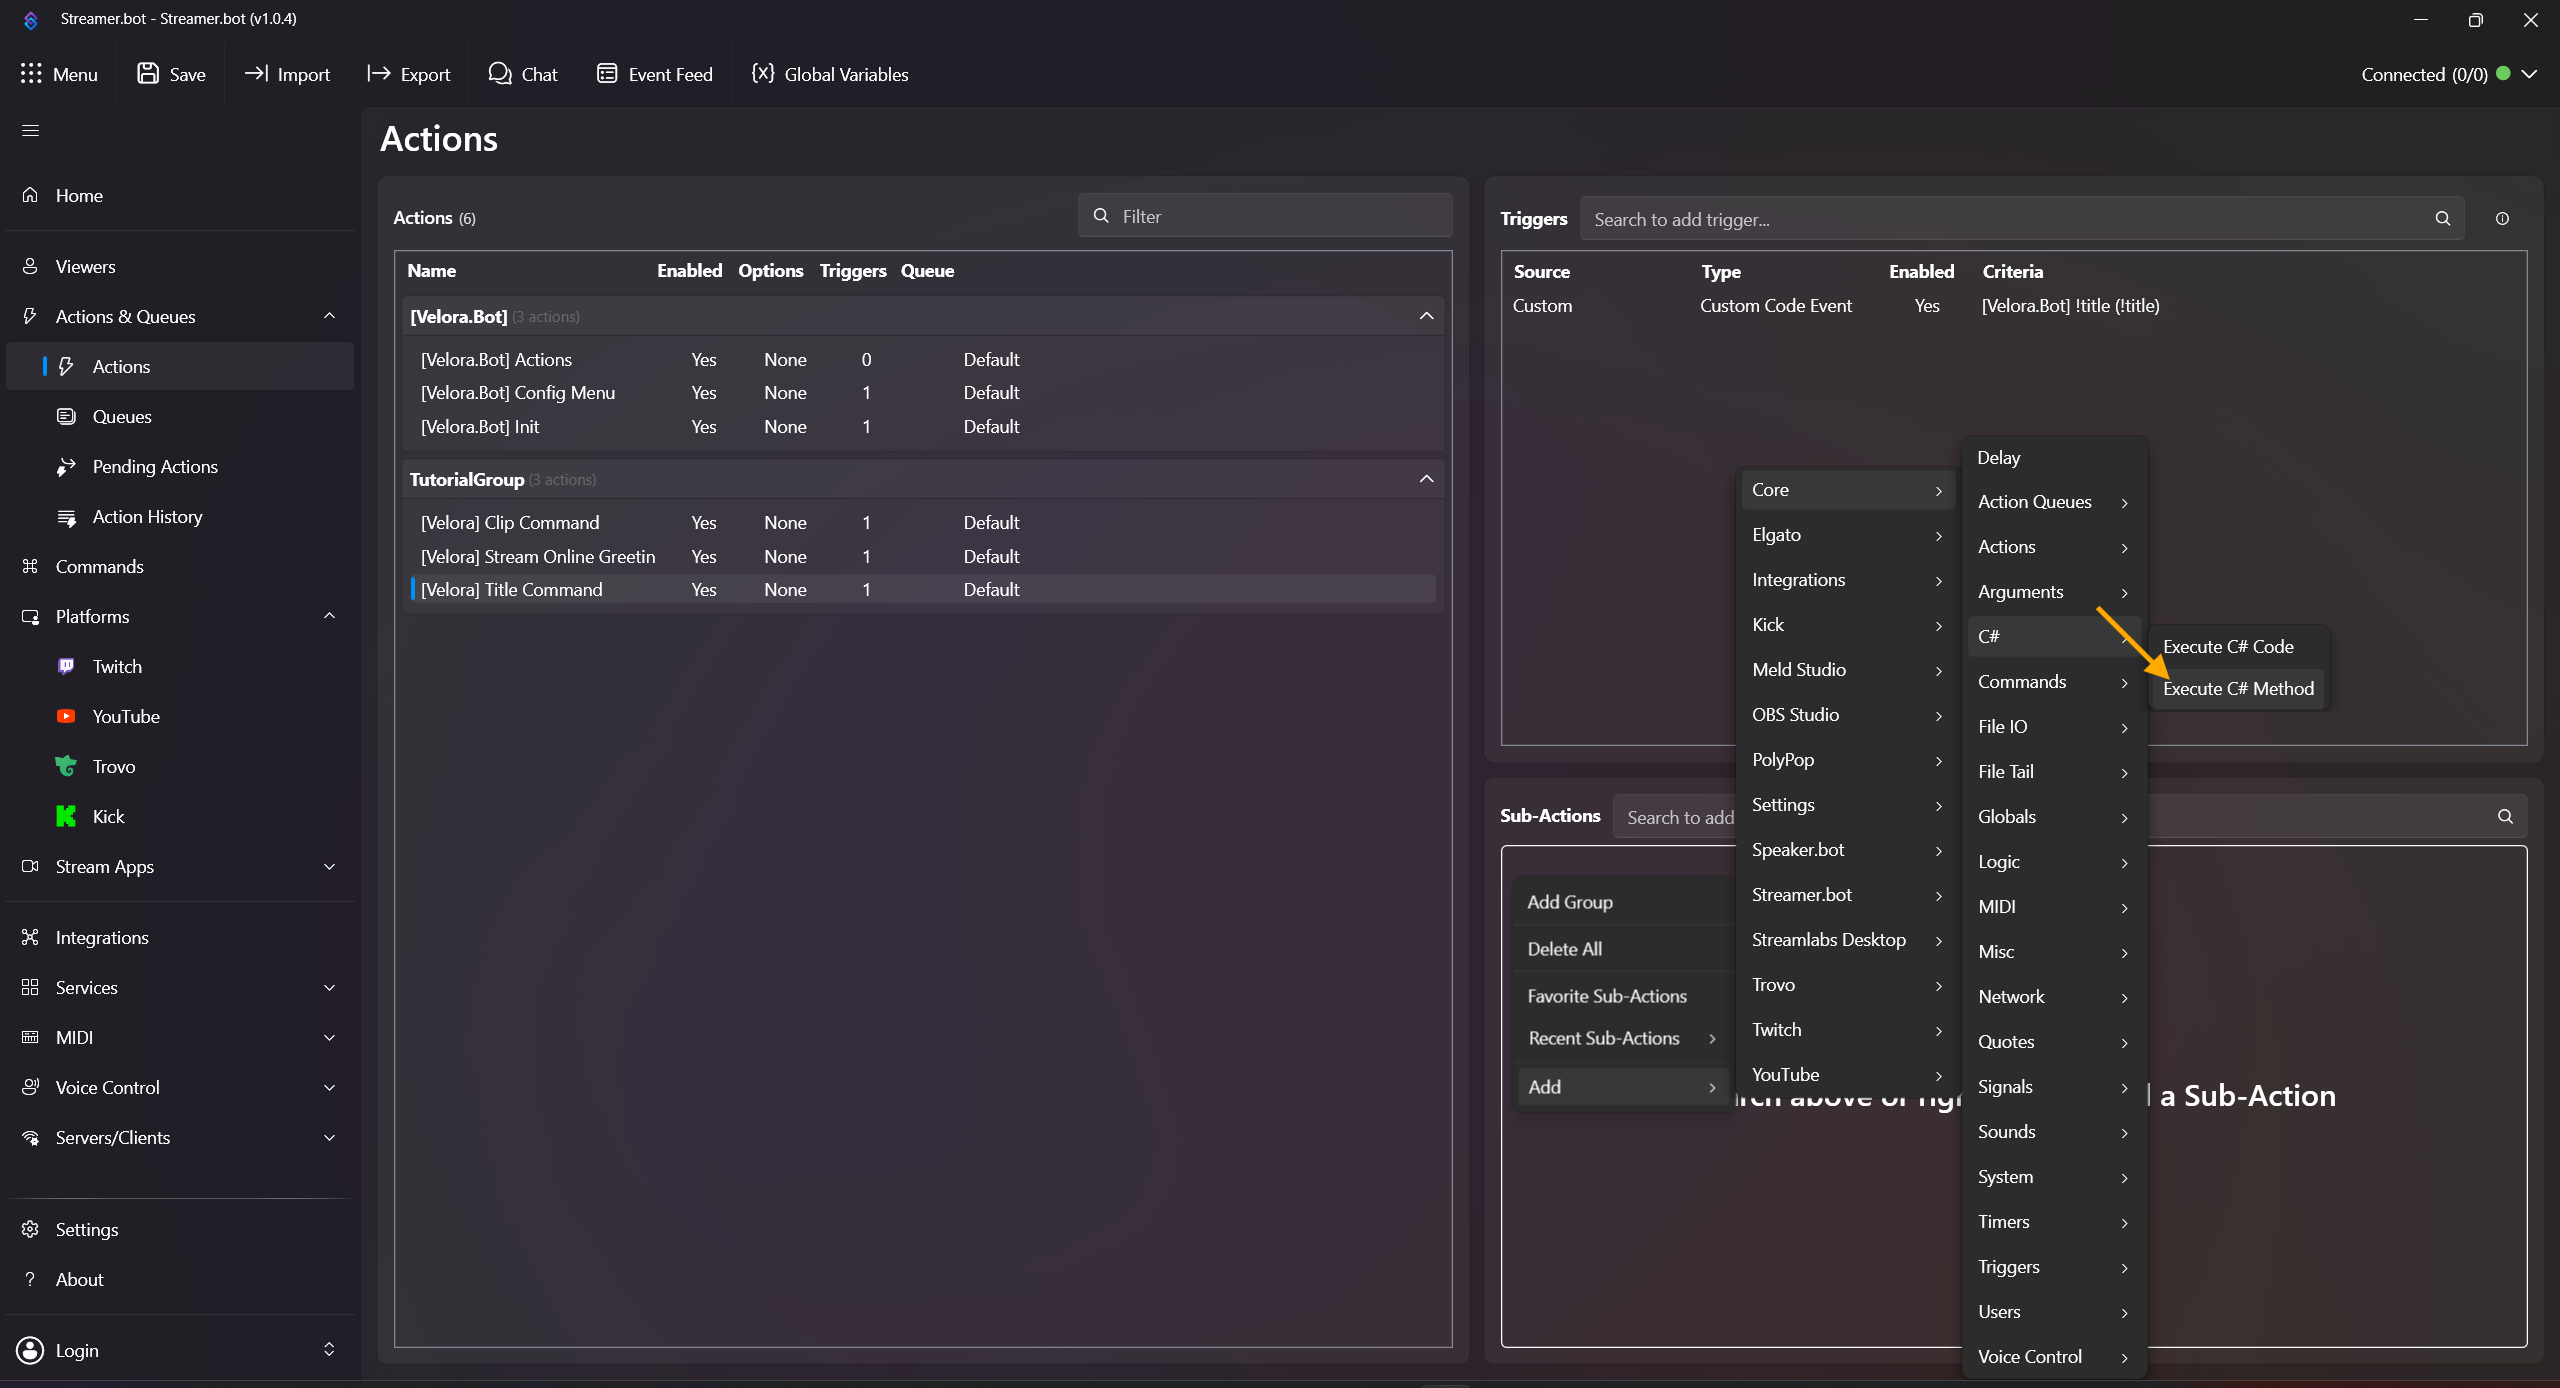
Done! Test directly in chat with !title Test title. This can currently only be tested live, and after entering the command you need to reload the page to see the updated title.
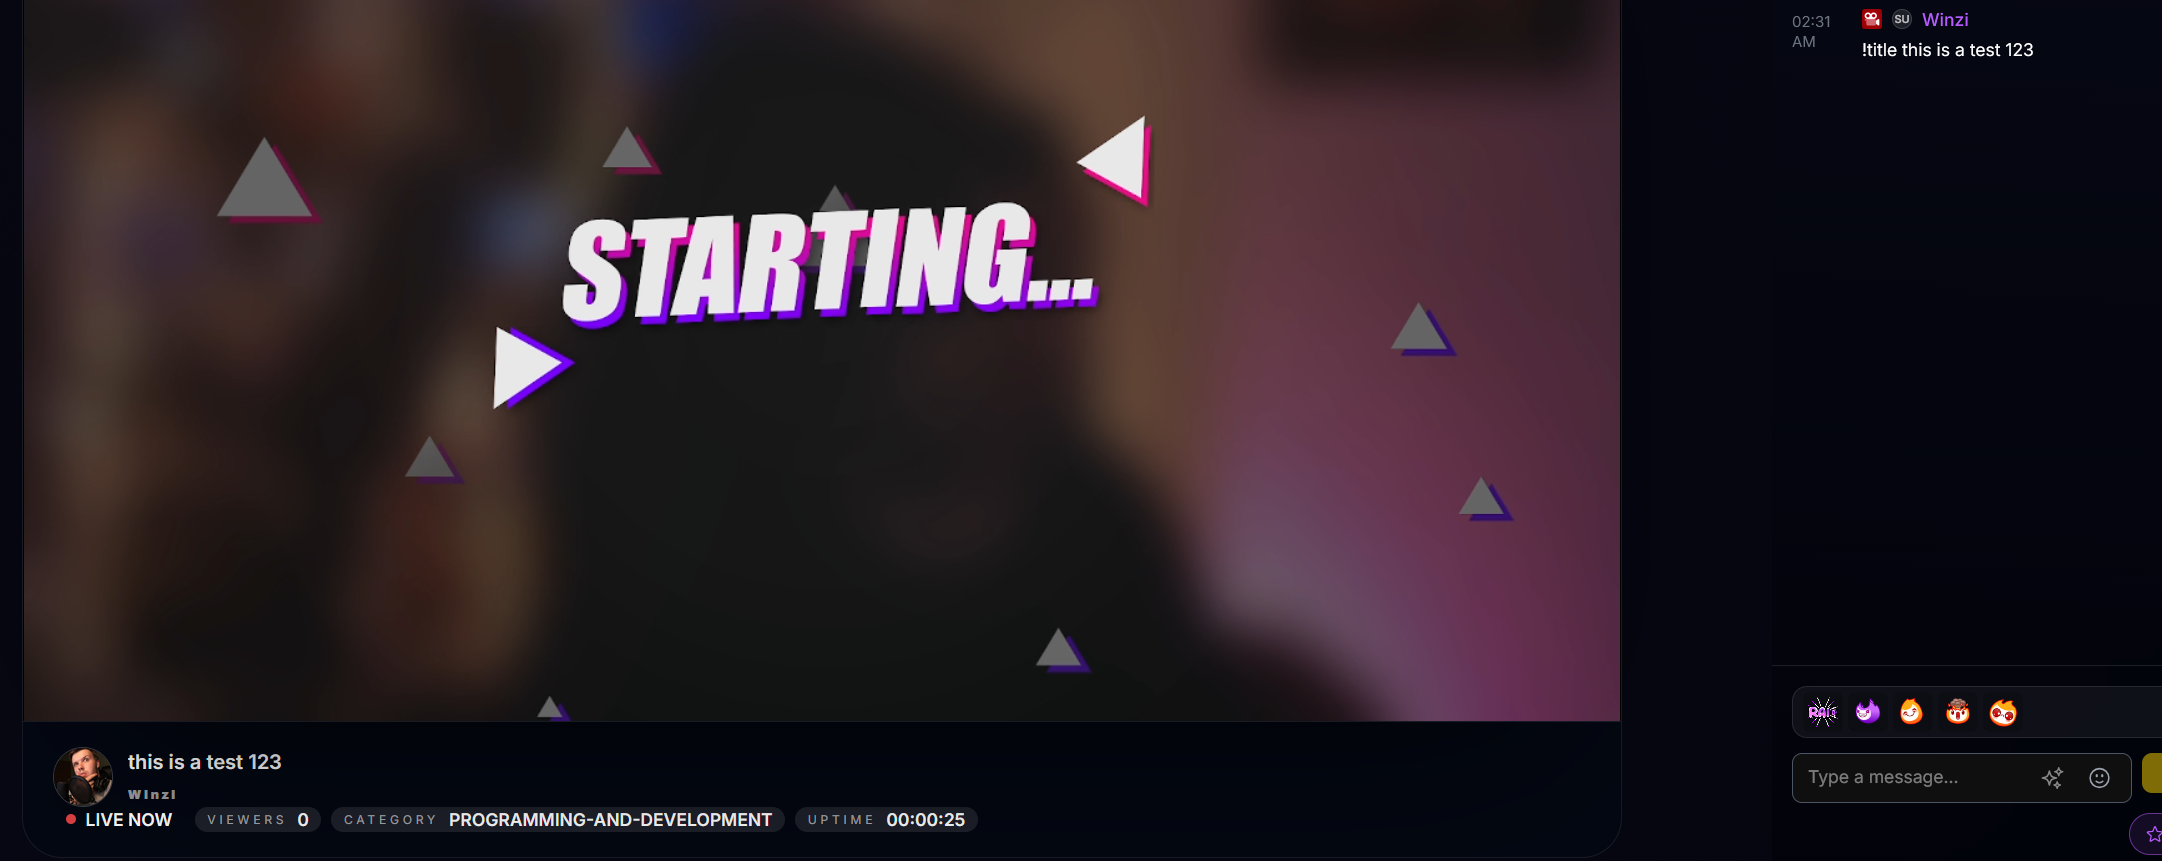
Everything after !title is used as the new stream title.
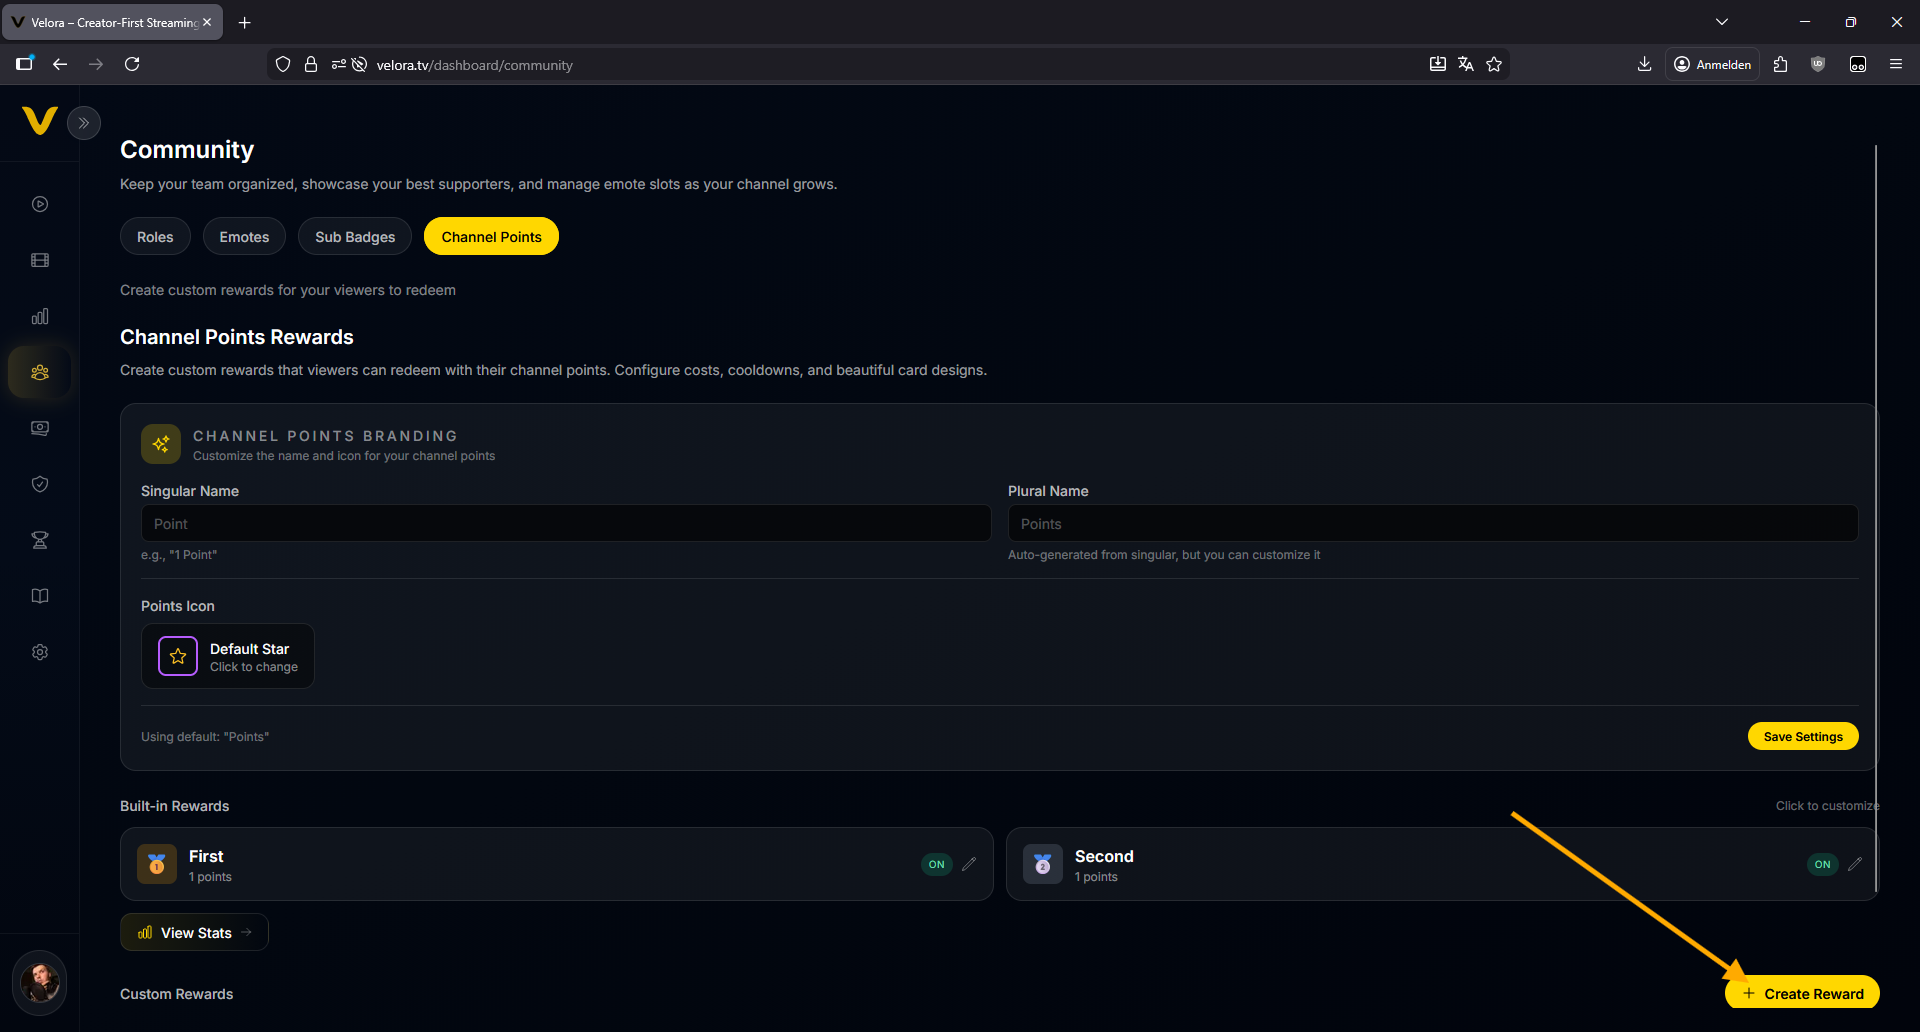
Reward Redemption -> Play Sound
Plays a sound when a reward is redeemed.
-
Create your rewards on Velora first at https://velora.tv/dashboard/community in the Channel Points tab.
-
In Streamer.bot, click Save in the top-left. This ensures new custom triggers are added.
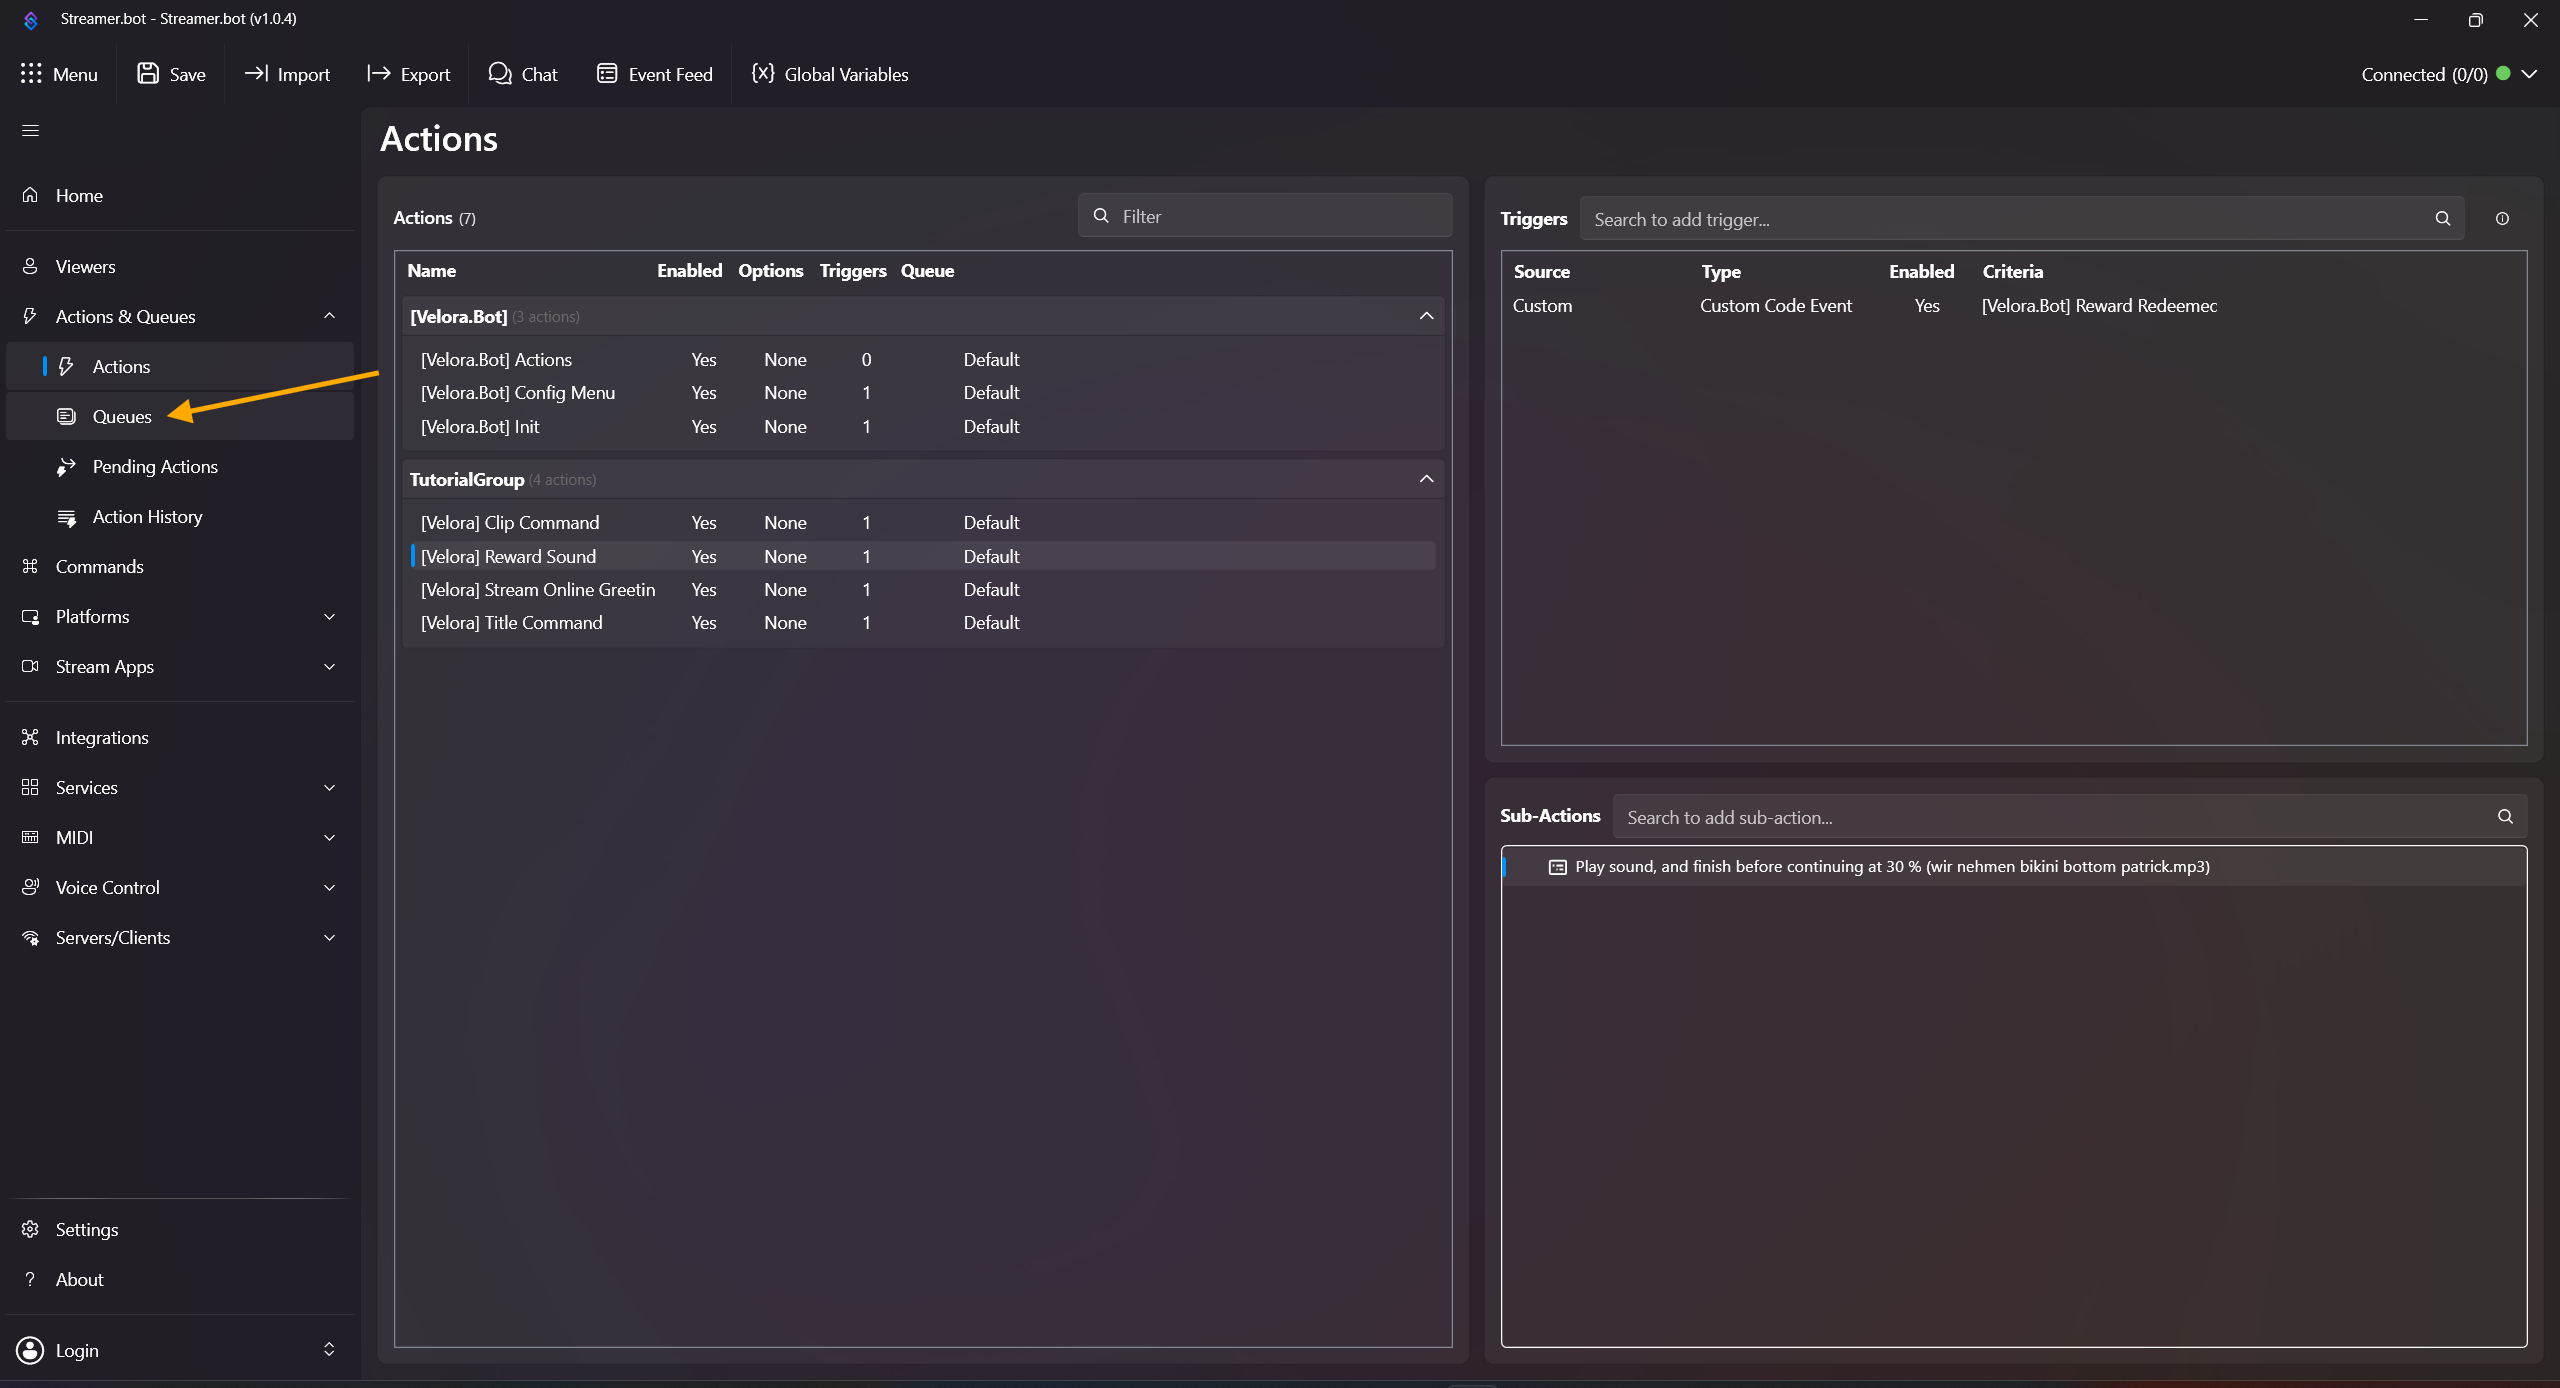
- Open Actions & Queues -> Actions.
-
Right-click inside the Actions field, click Add Action, and name it e.g. [Velora] Reward Sound.
-
Right-click inside the Triggers field and choose:
Add -> Custom -> Velora -> Rewards -> [Velora.Bot] Reward Redeemed
or choose a reward-specific trigger like [Velora.Bot] Reward Redeemed - <Reward Name>.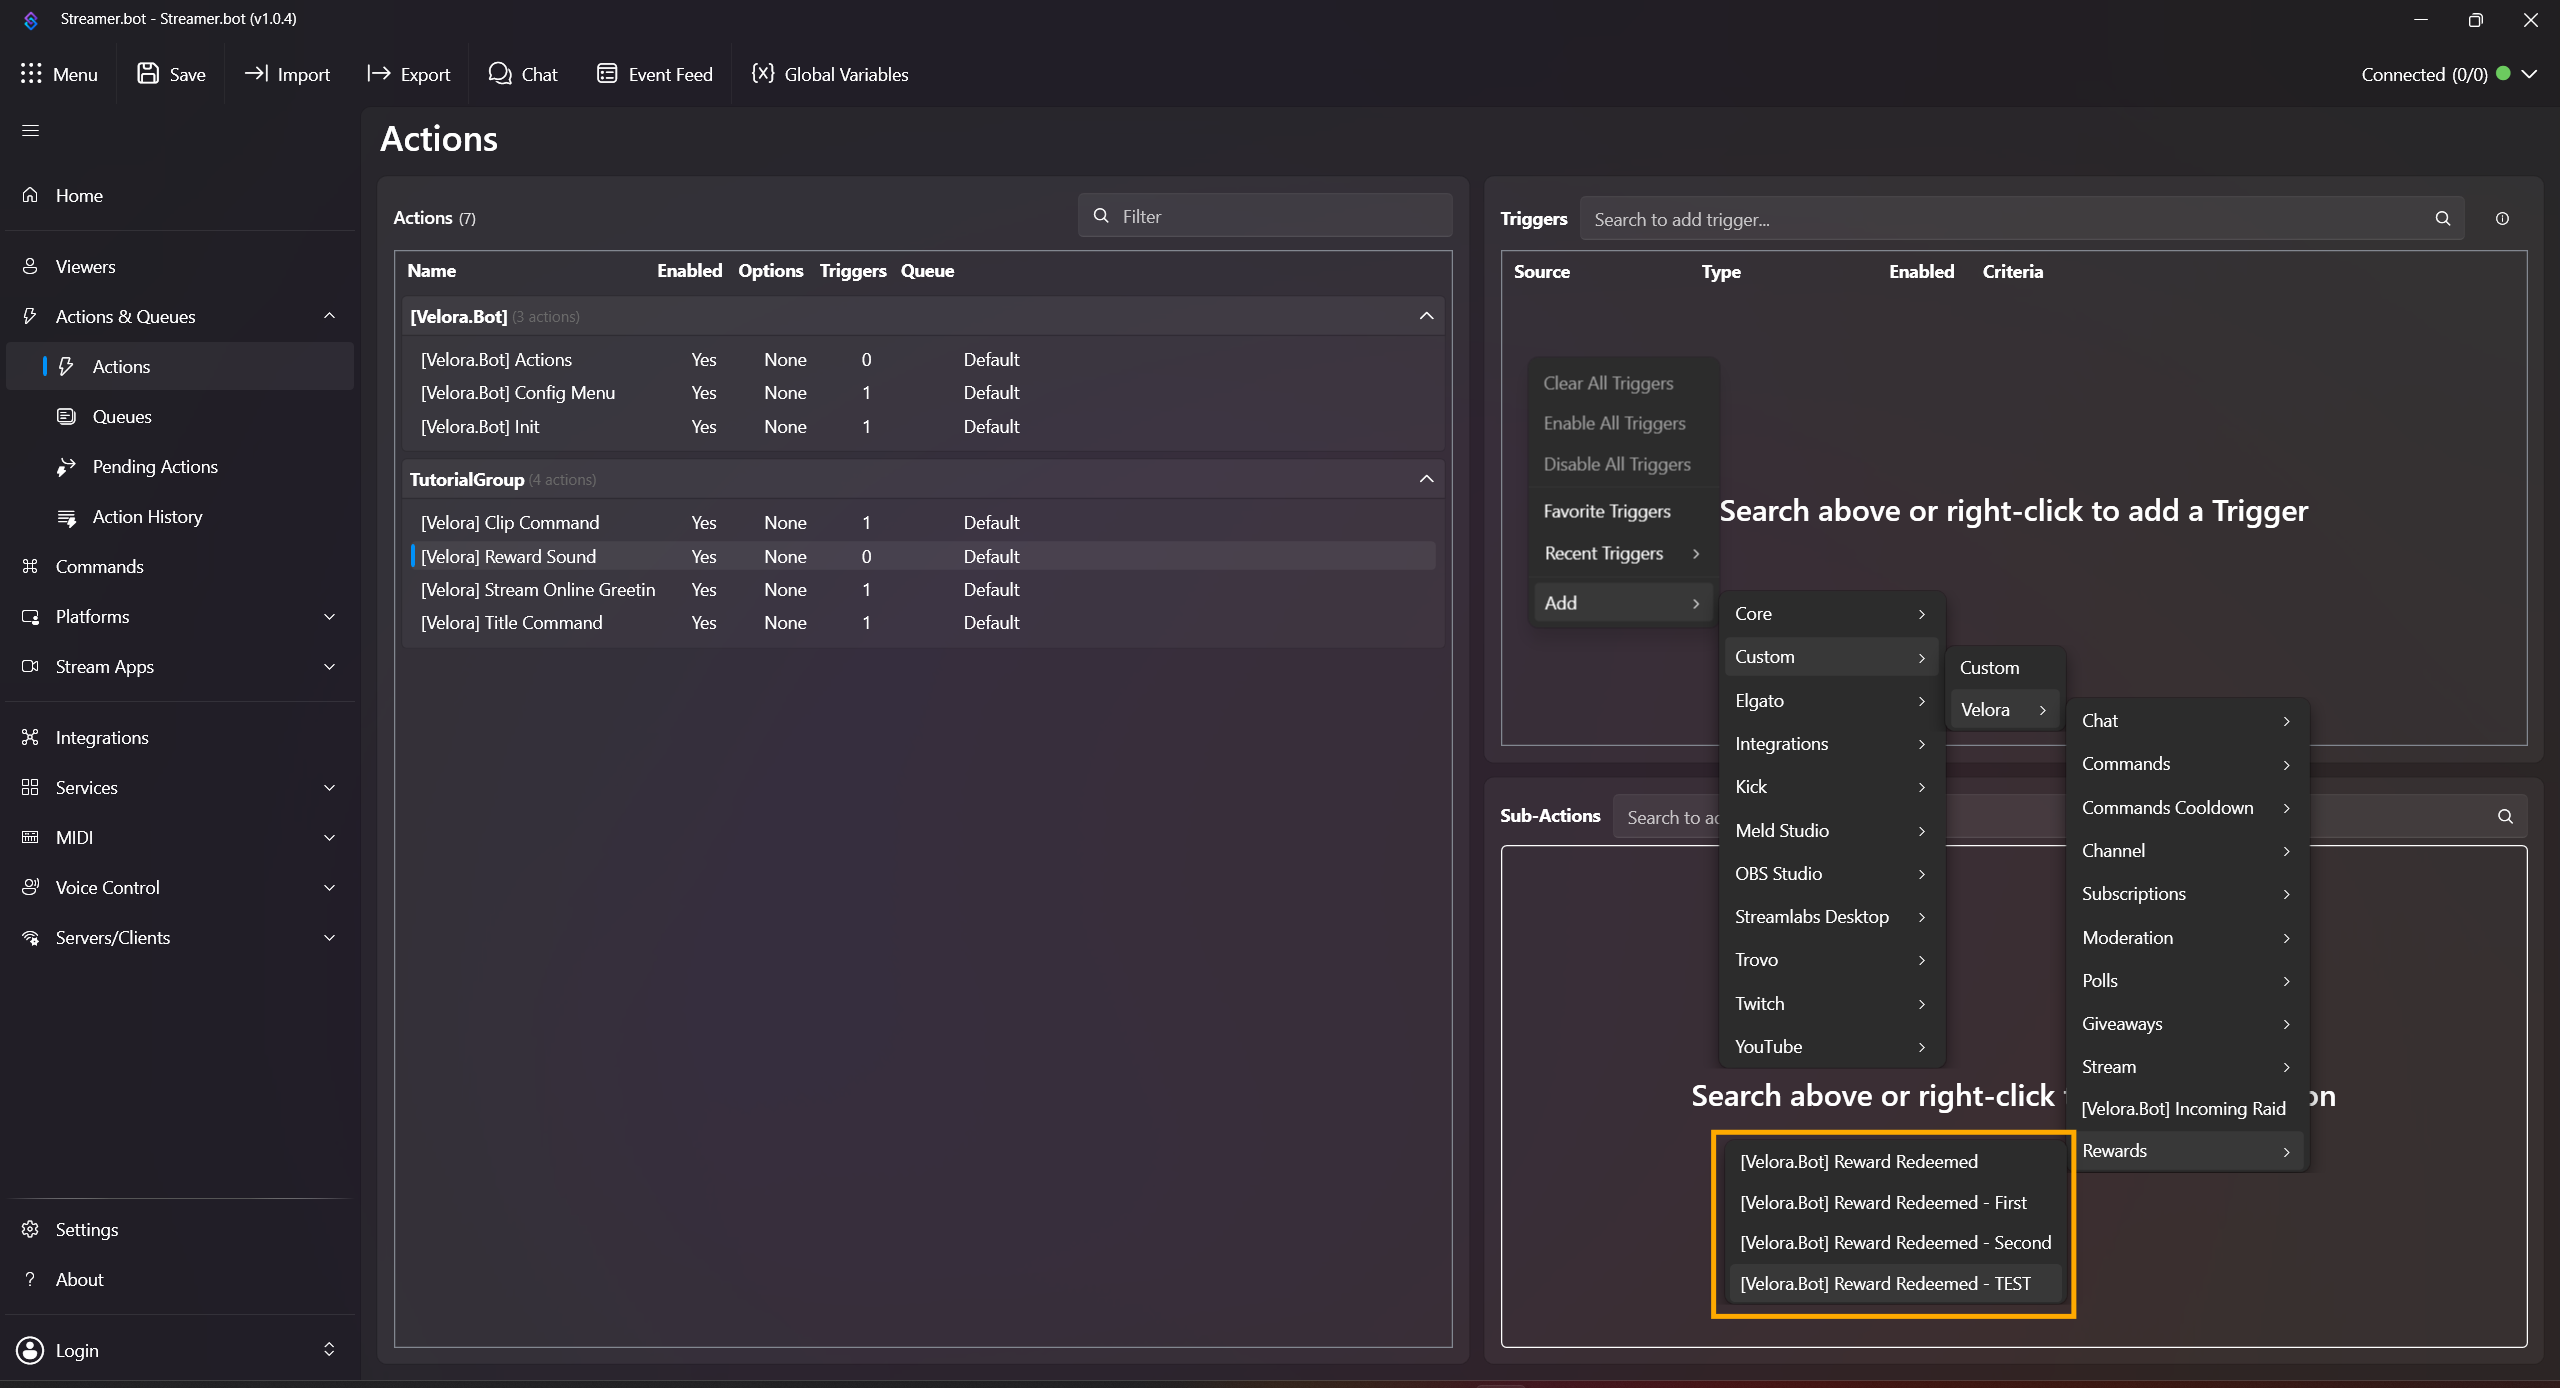
- Right-click in Sub-Actions and add:
Add -> Core -> Sounds -> Play Sound
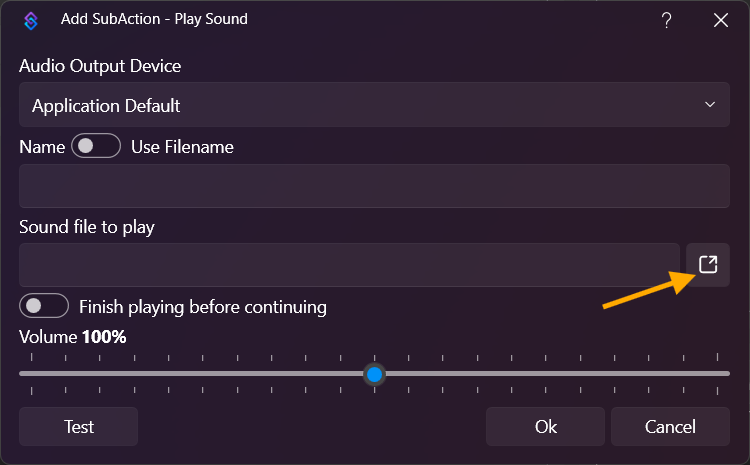
Audio Output Device: Leave on Application Default or select an output device of your choice.
Name: Leave empty, we use a local file path.
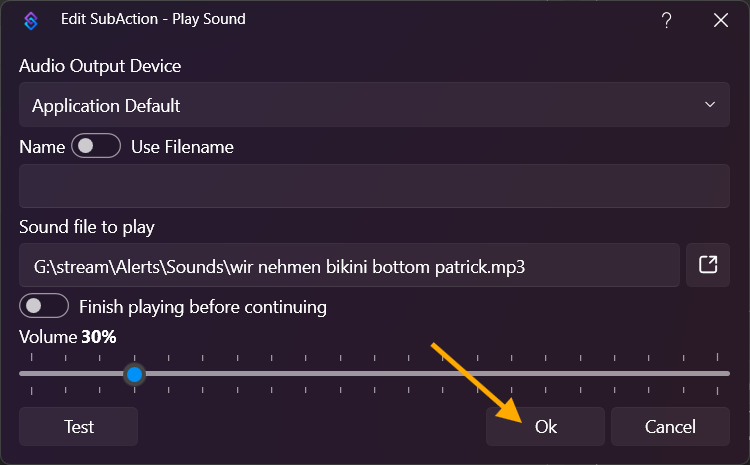
Sound file to play: Click the icon next to the text field and select your file.
Then confirm with OK.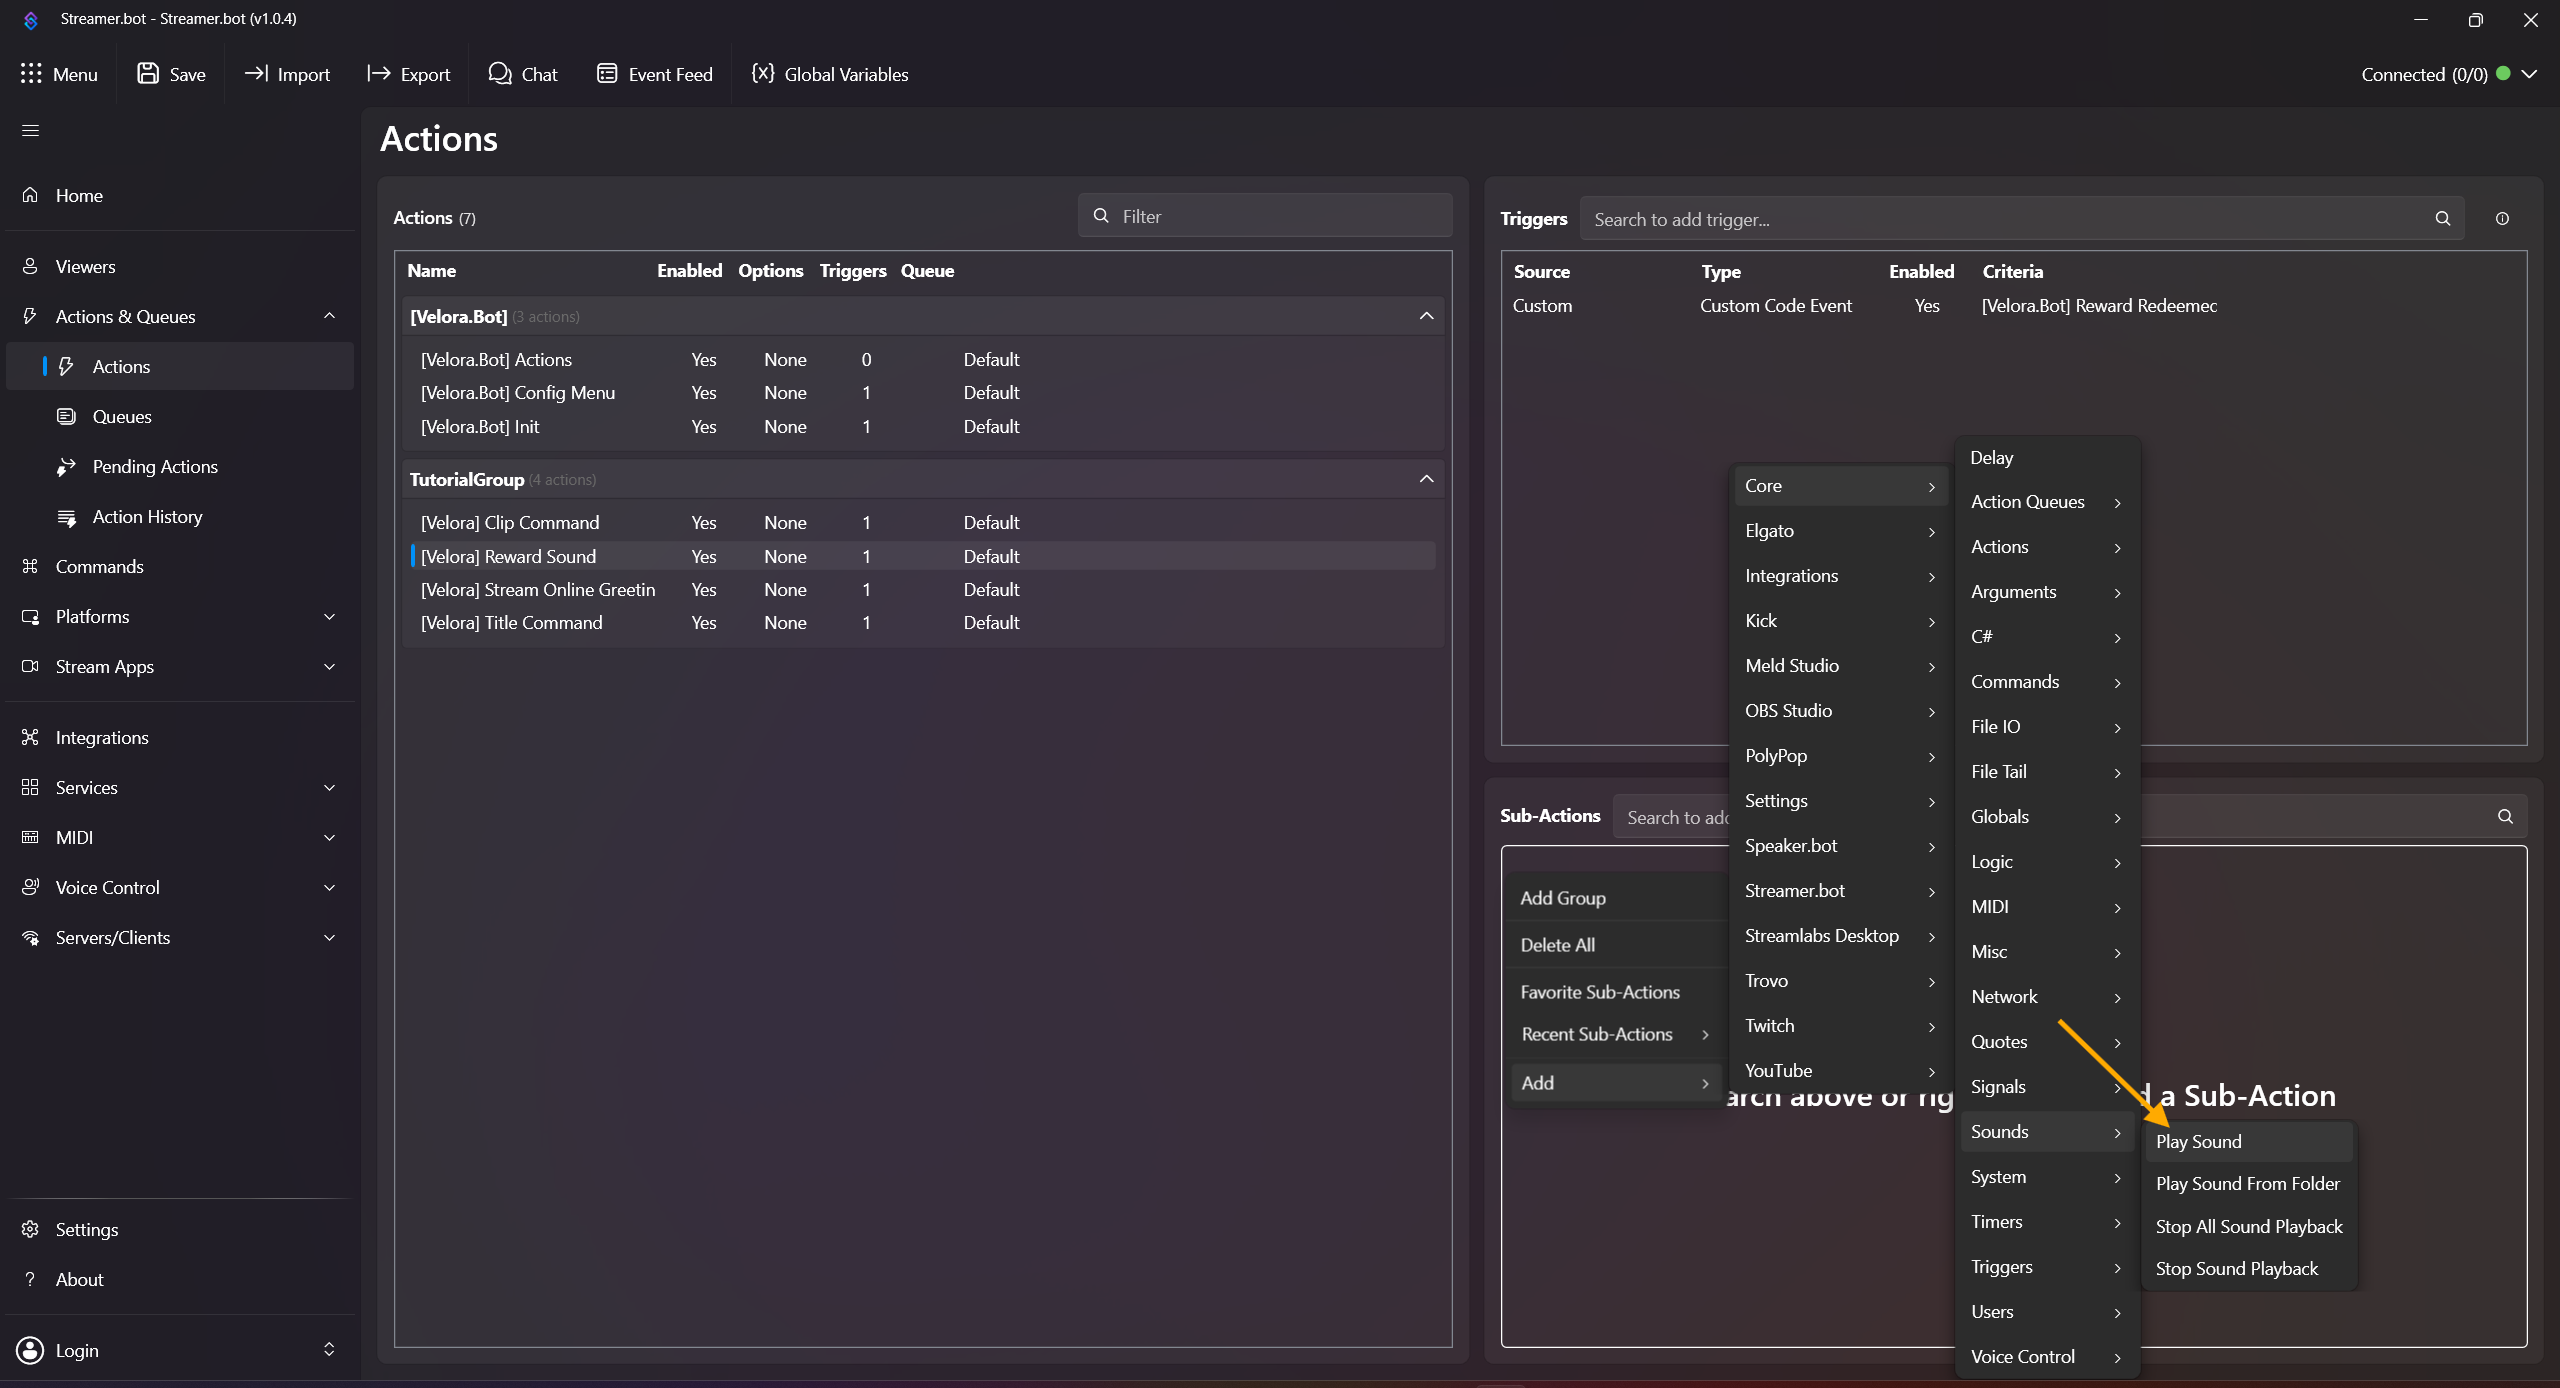
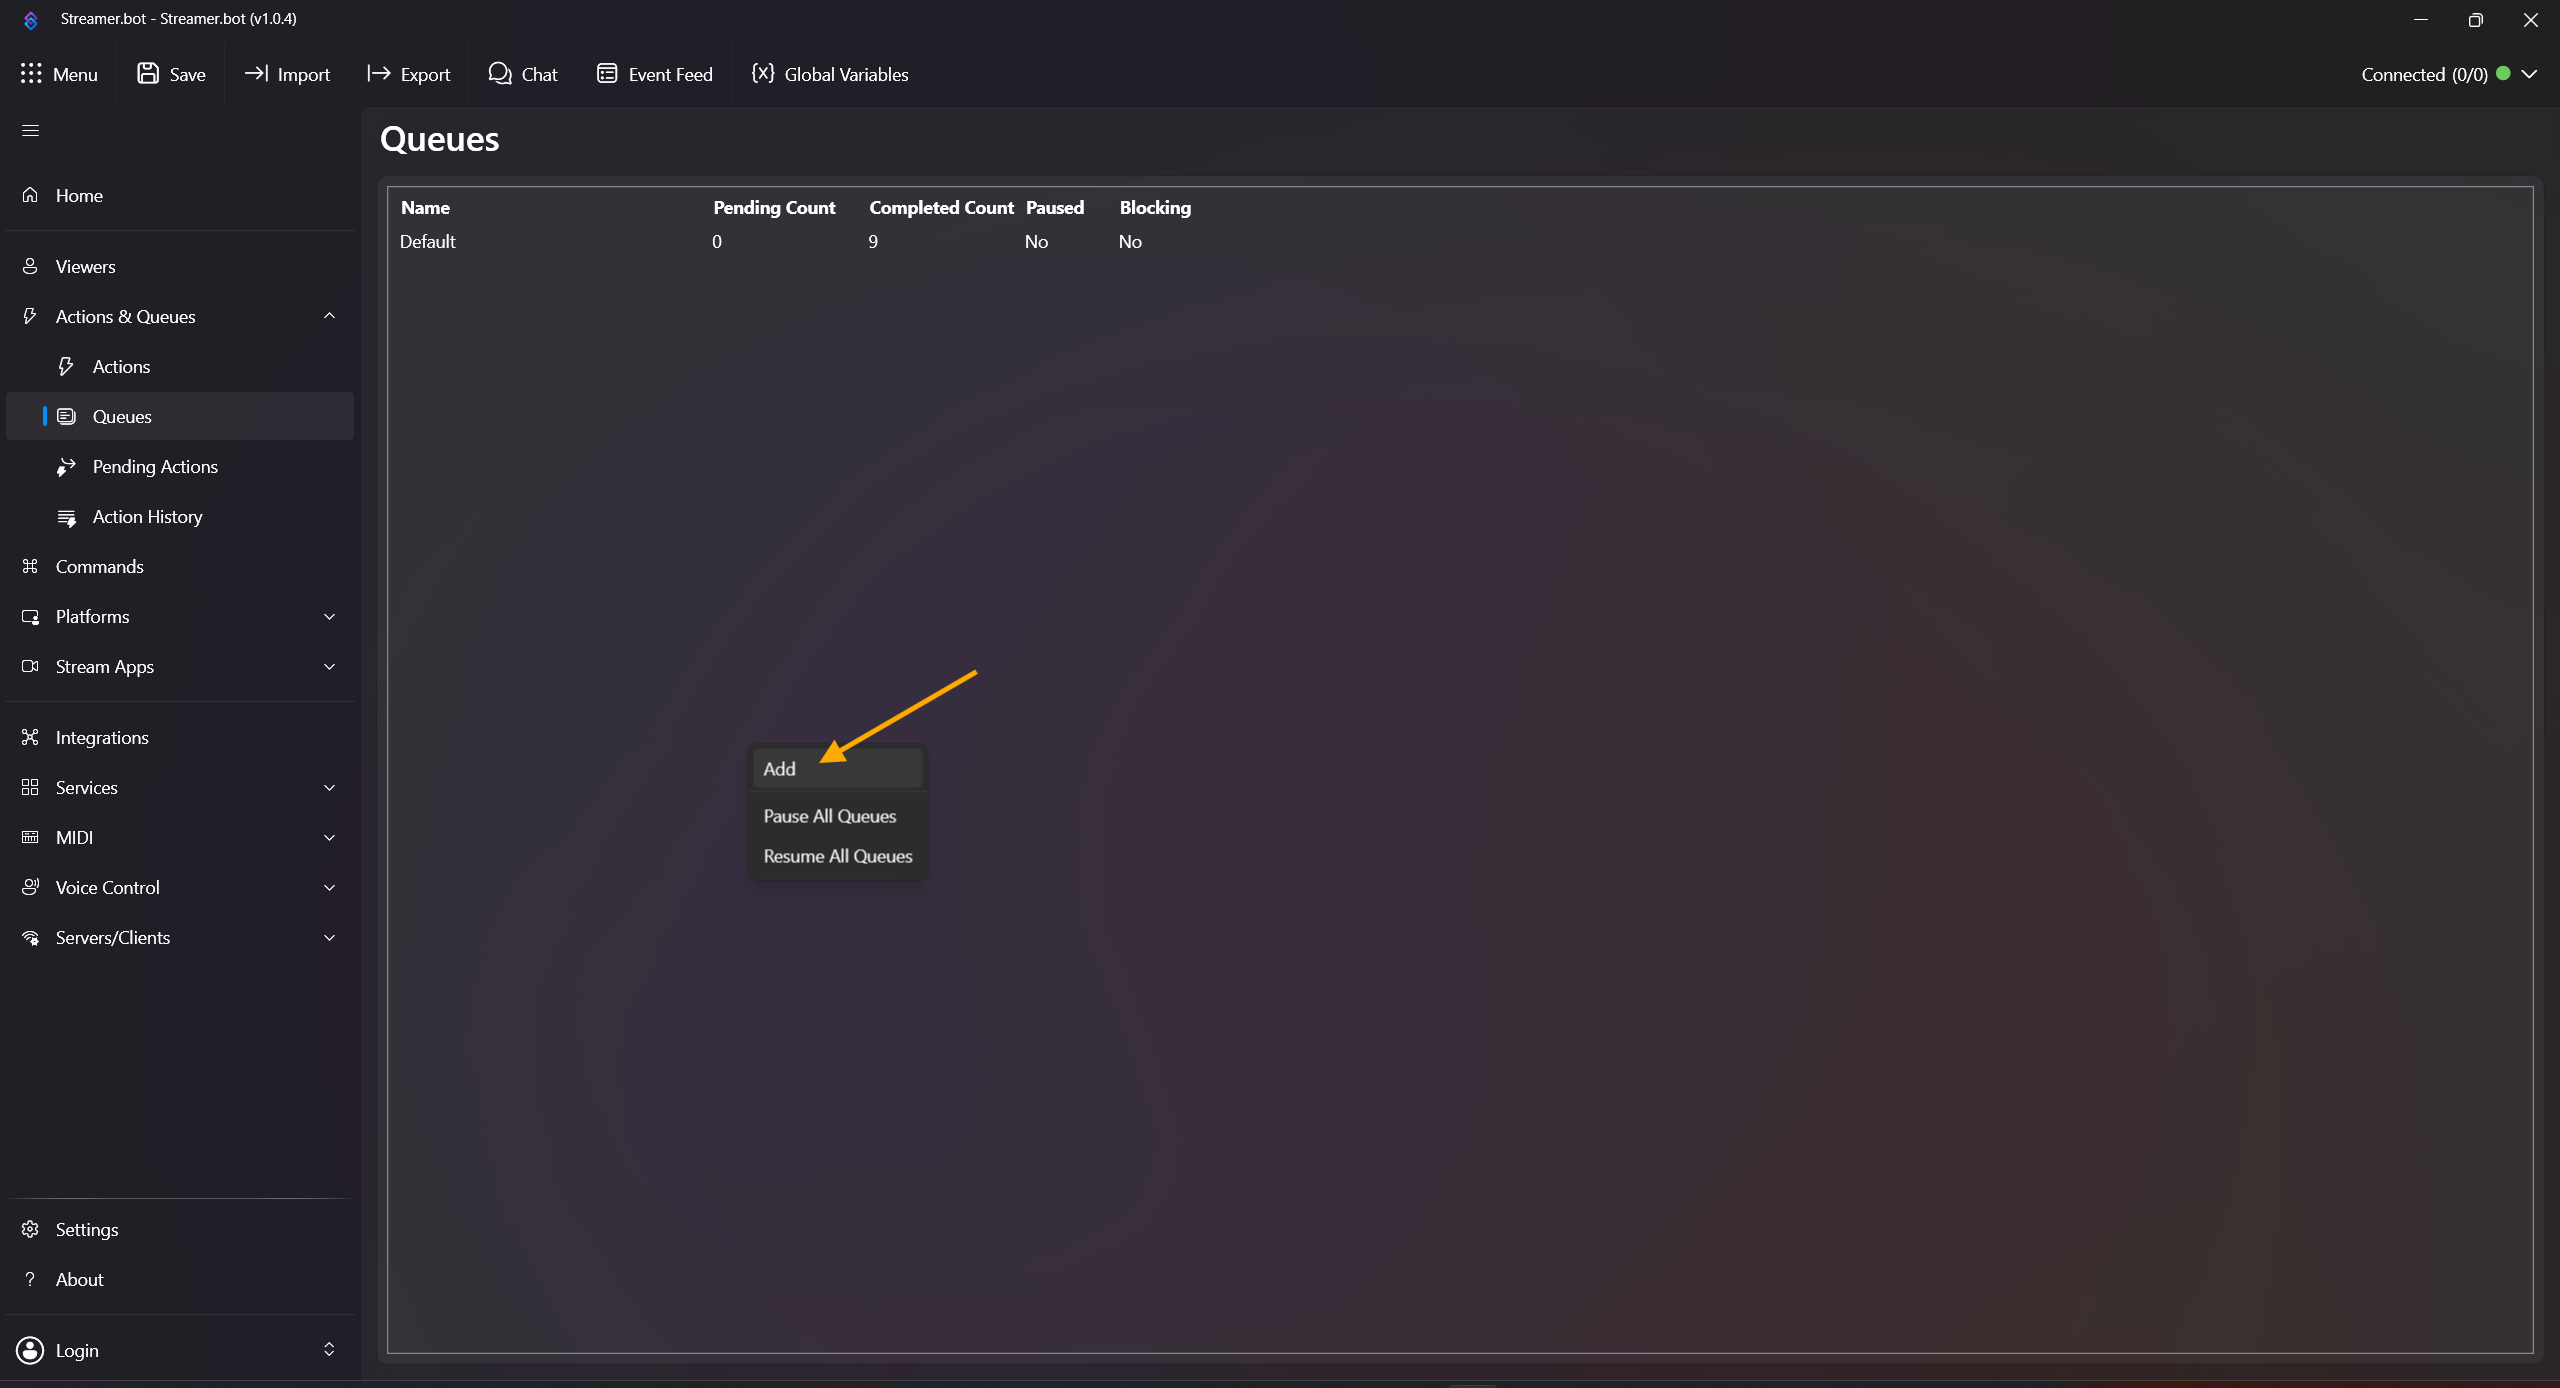
-
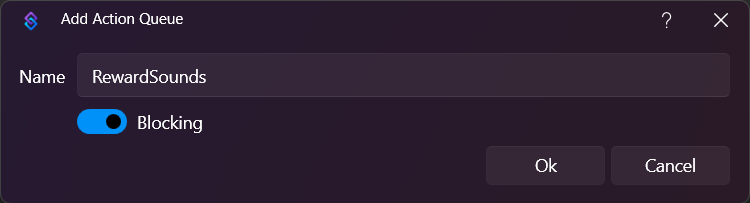
Open Queues, right-click inside the queue field, choose Add, name it e.g. RewardSounds, and enable Blocking.
-
In Actions, right-click your reward action, click Edit, and set Queue to the queue you just created.
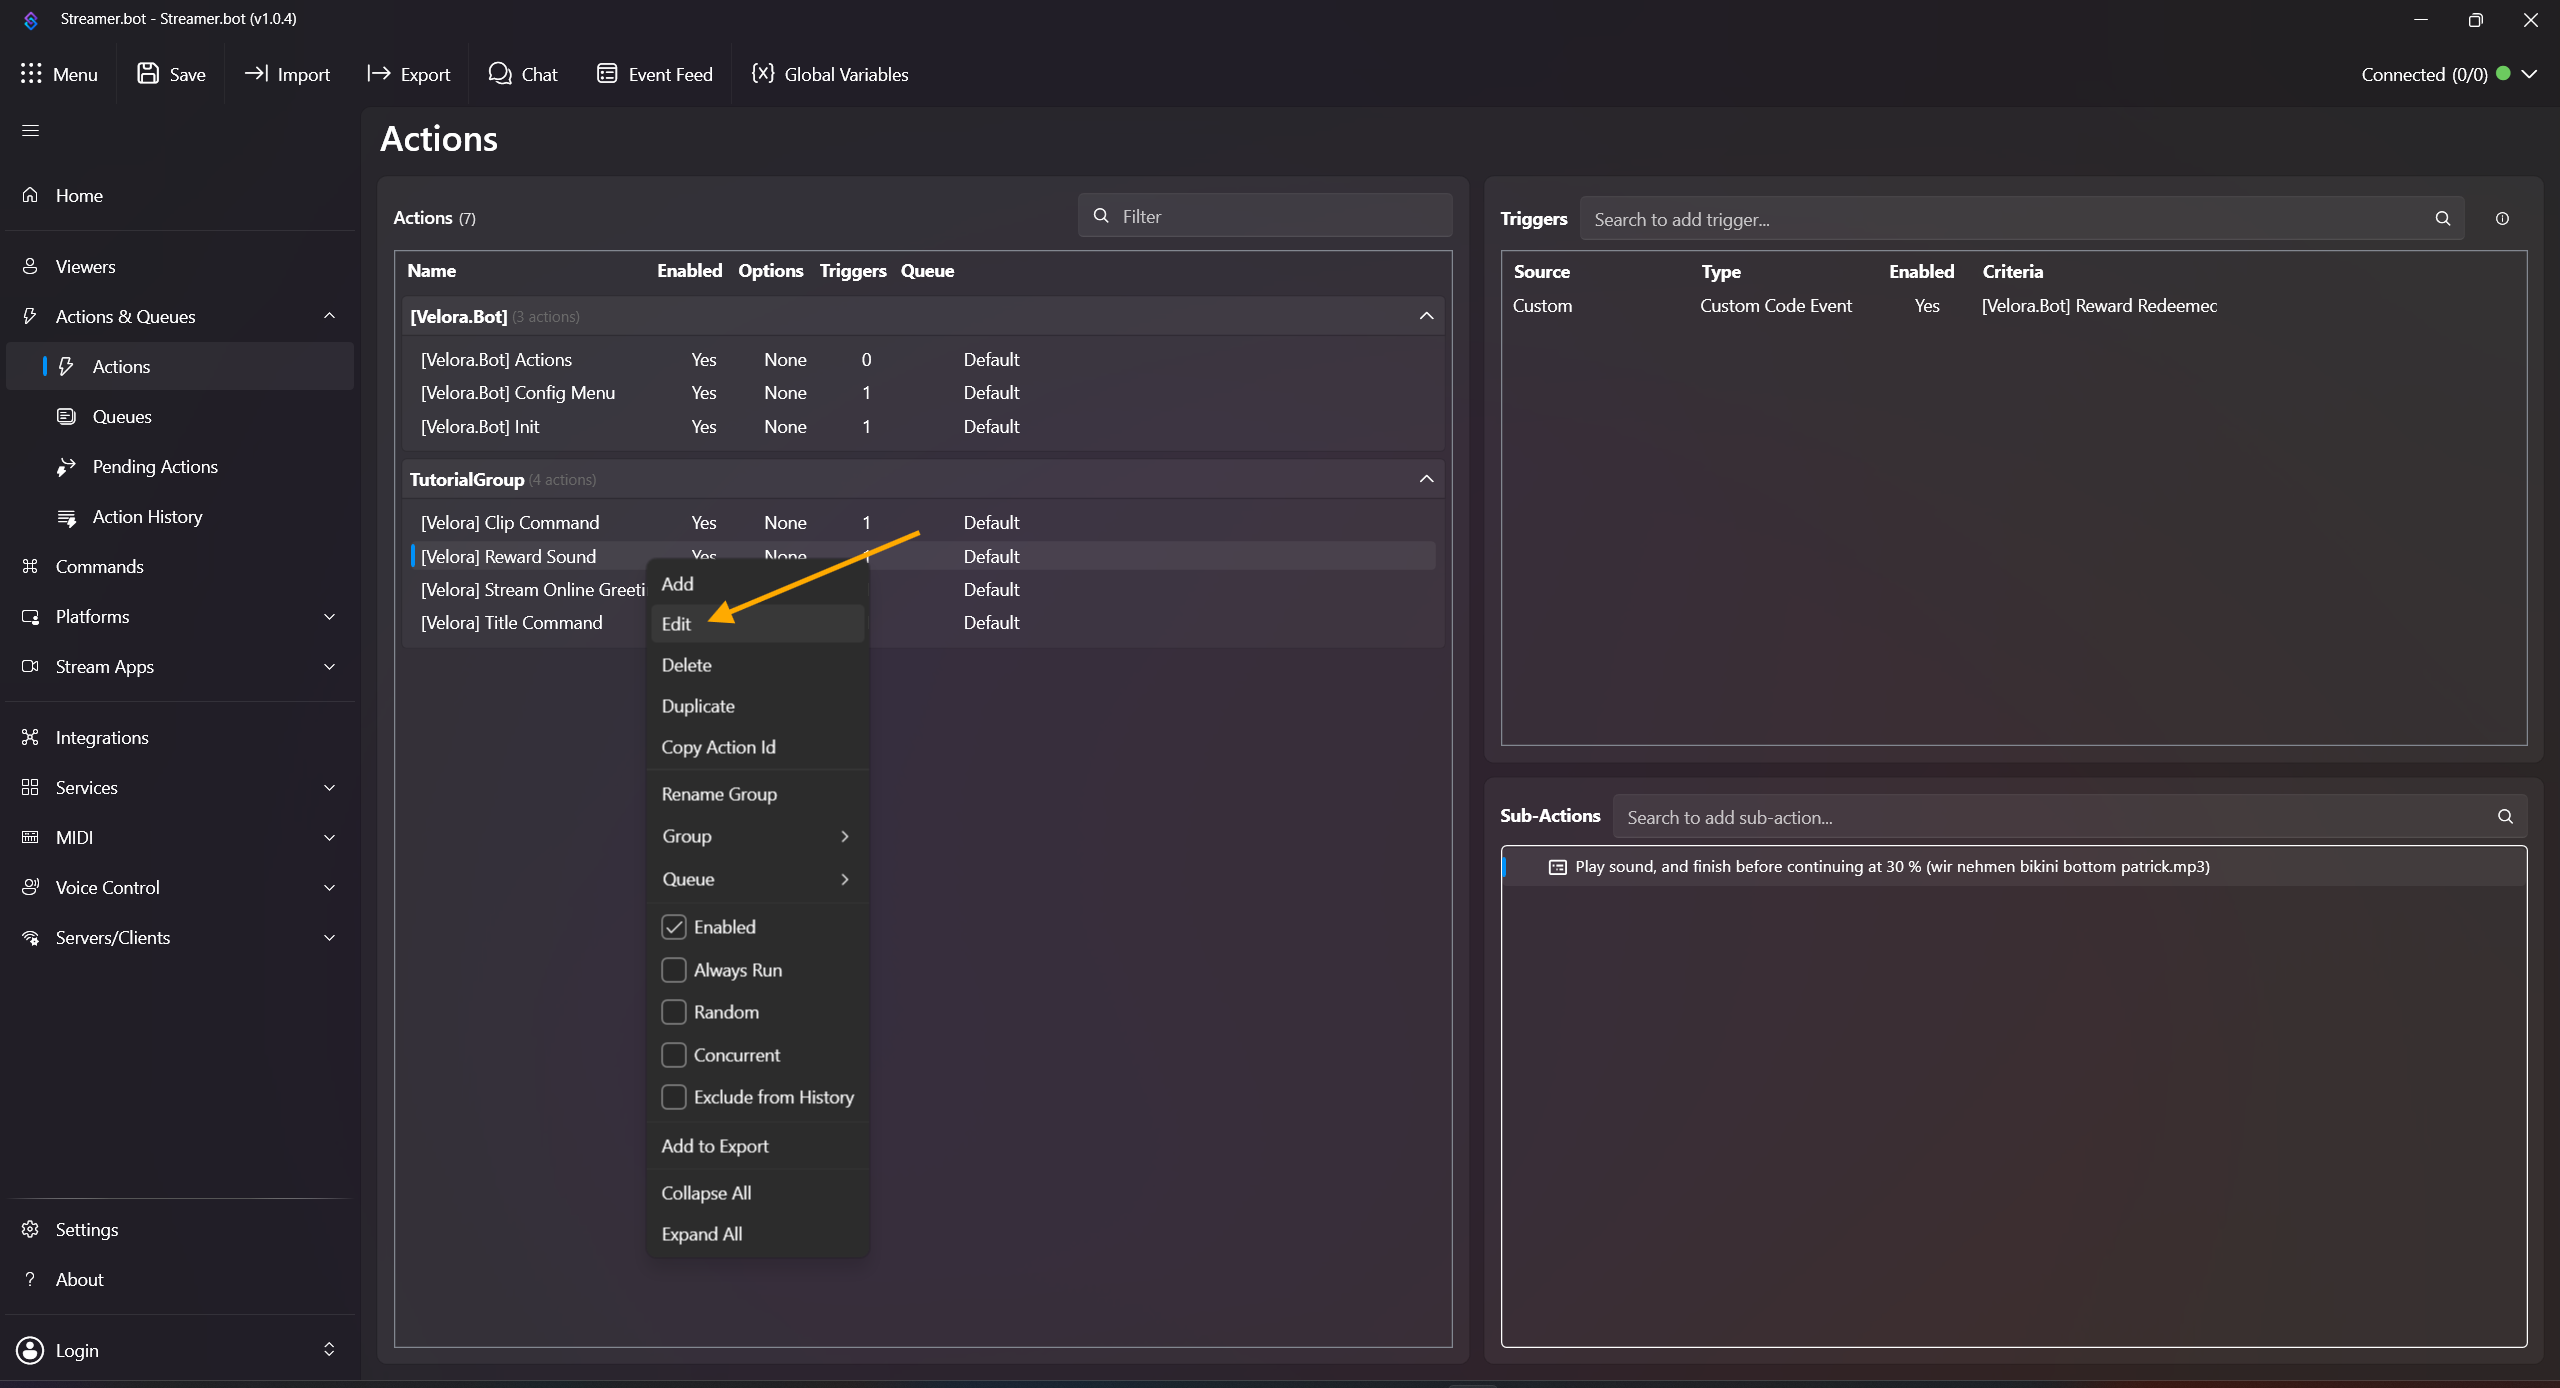
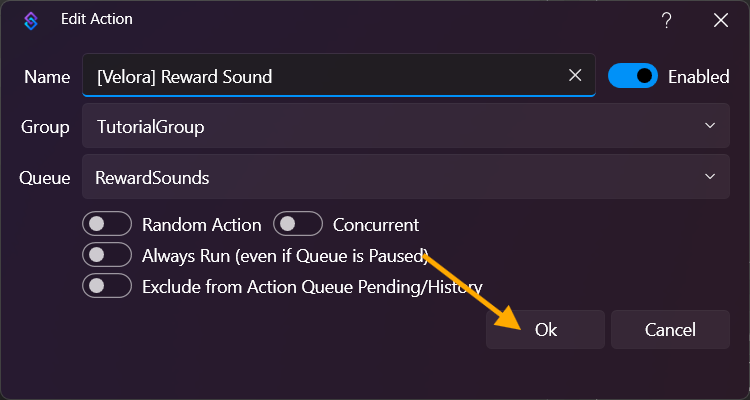
Done! Test by redeeming the reward on Velora.
Useful variables: %rewardId%, %rewardTitle%, %rewardUserInput%, %user%.
Follow Alert (Sound + OBS Text + GIF Fade)
Builds a full follow alert workflow with sound, text, and GIF fade for OBS.
-
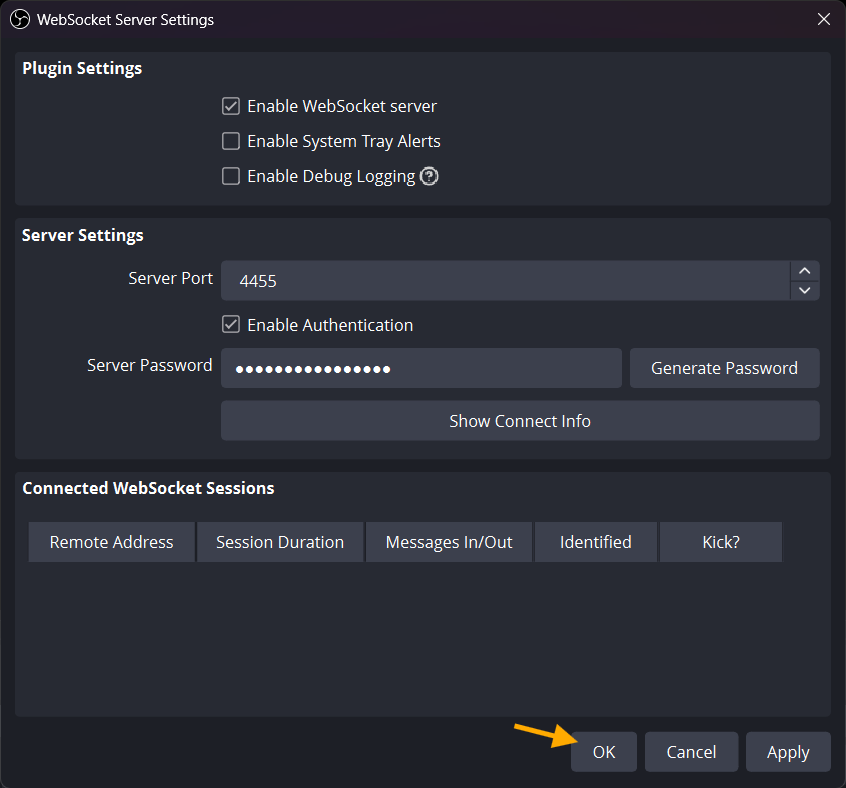
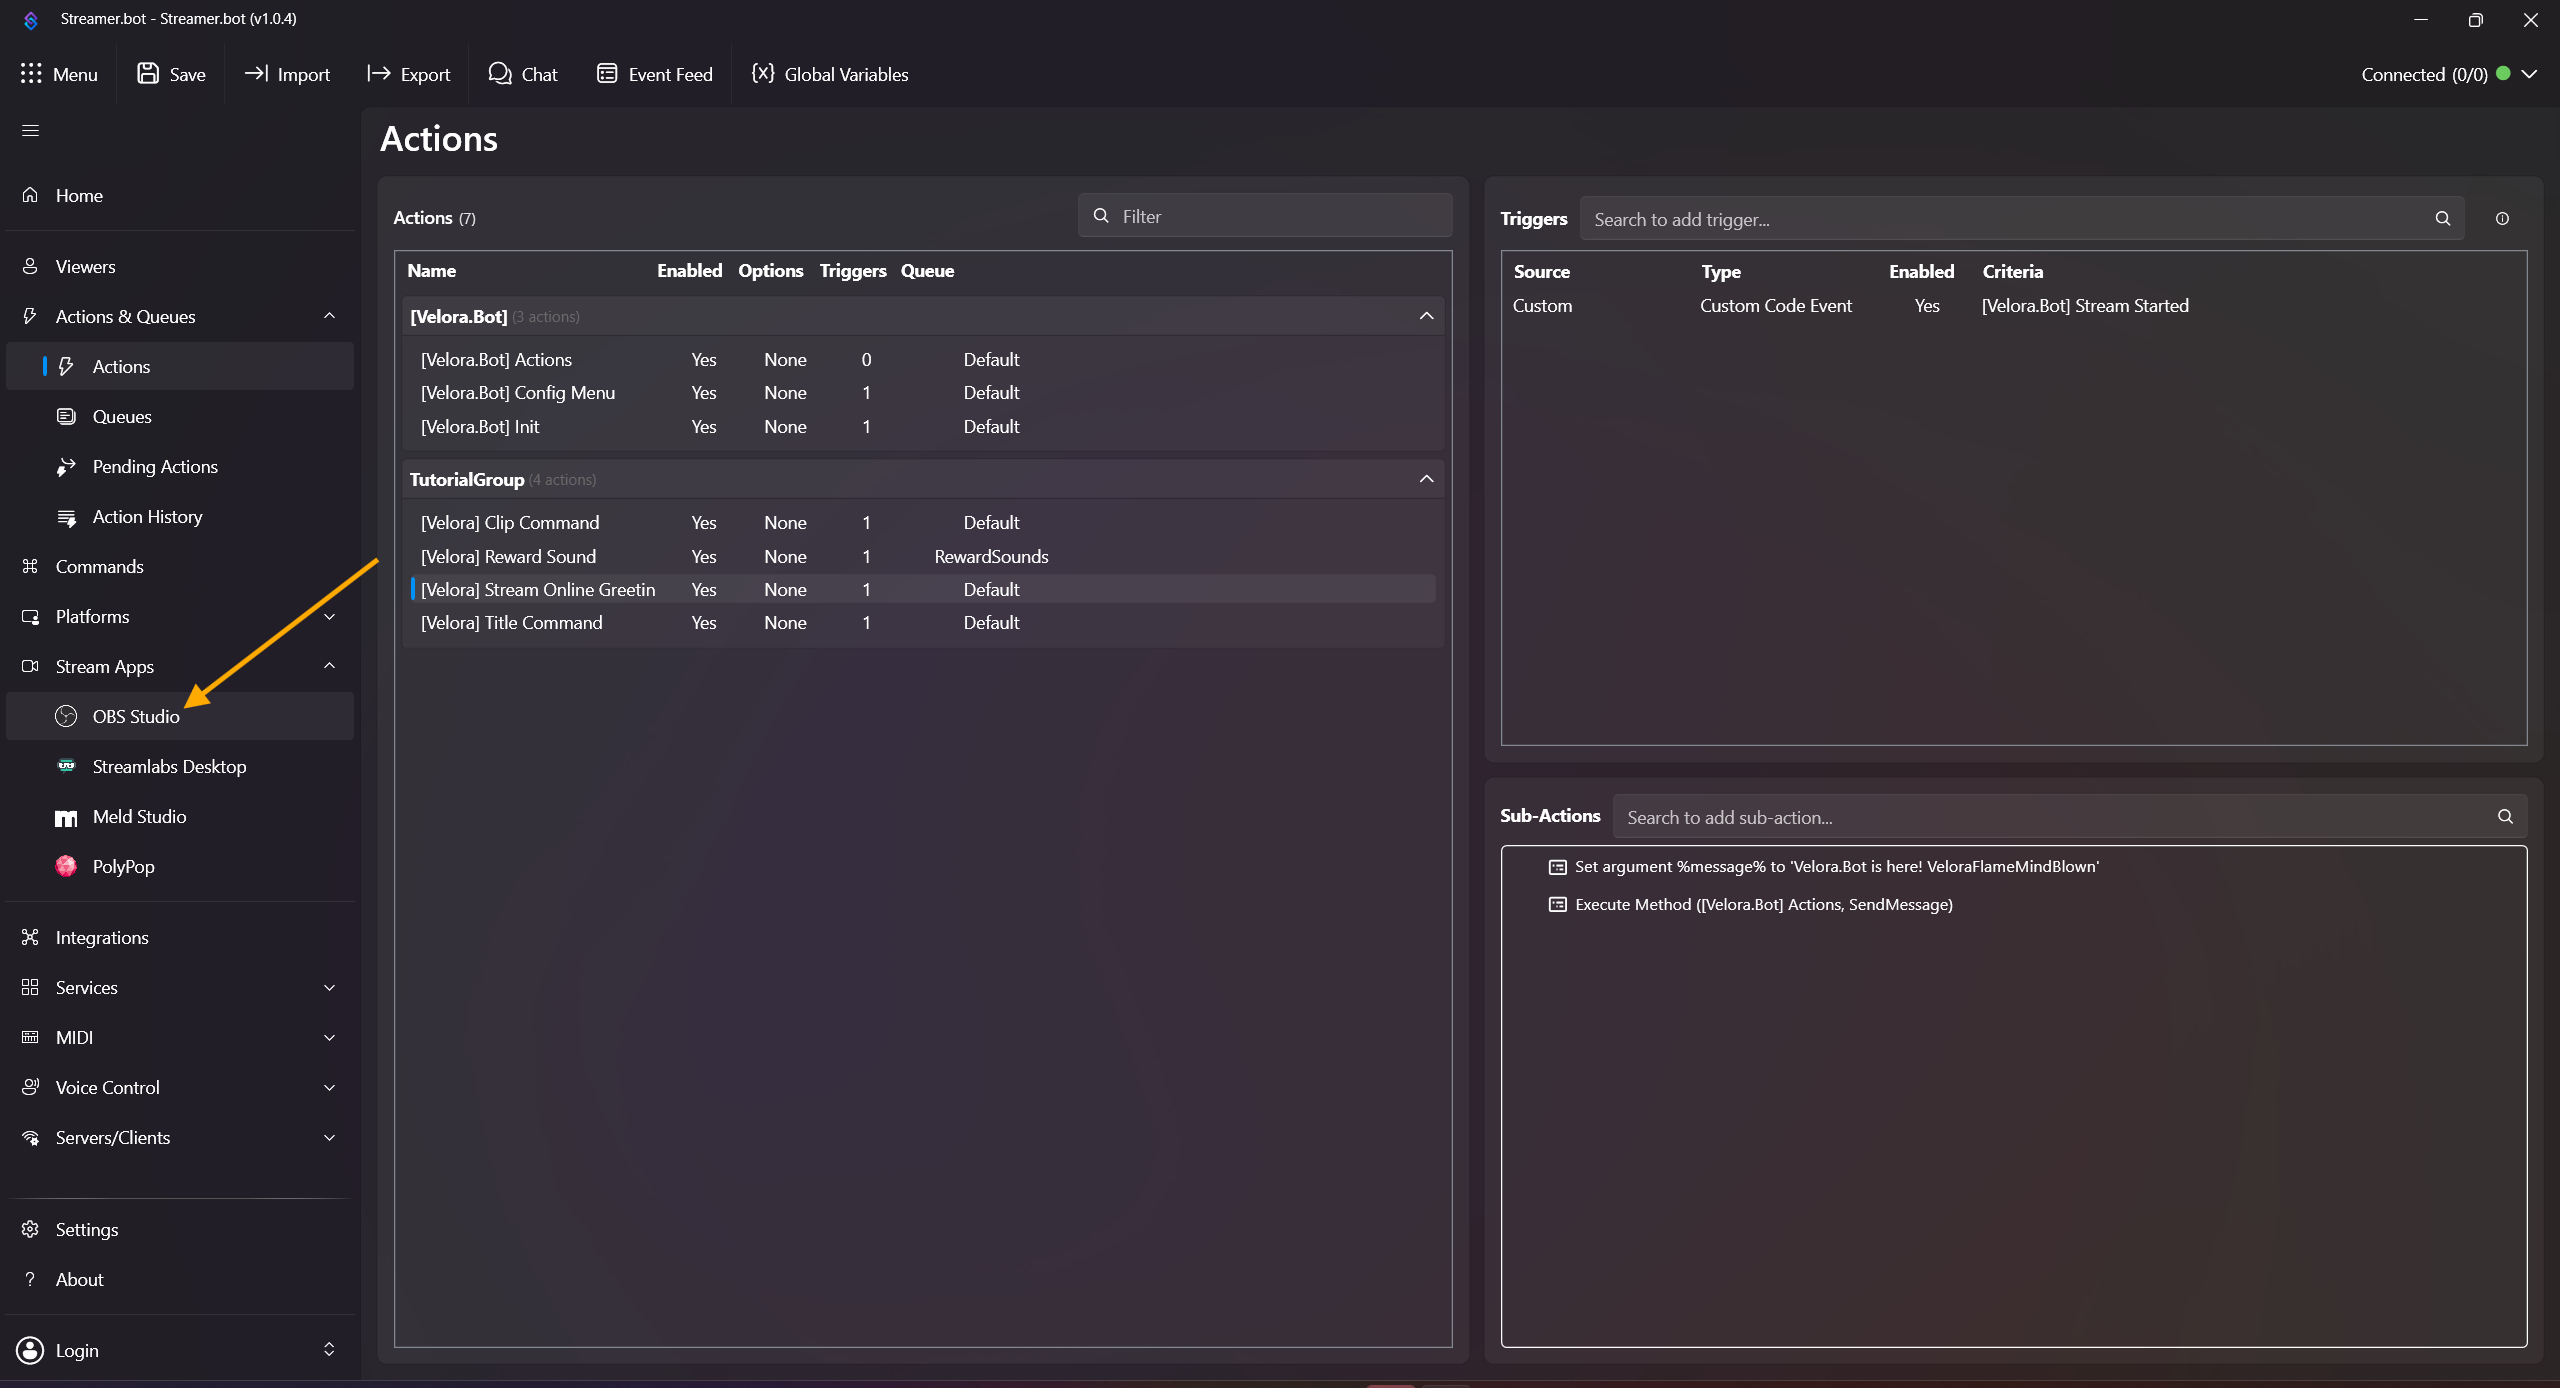
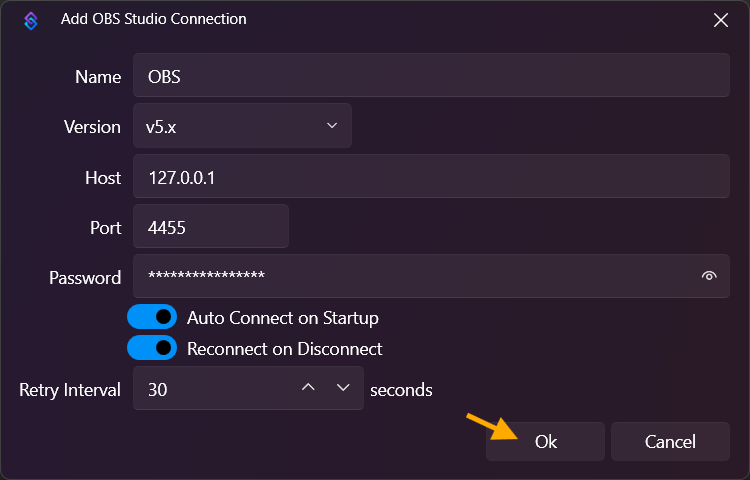
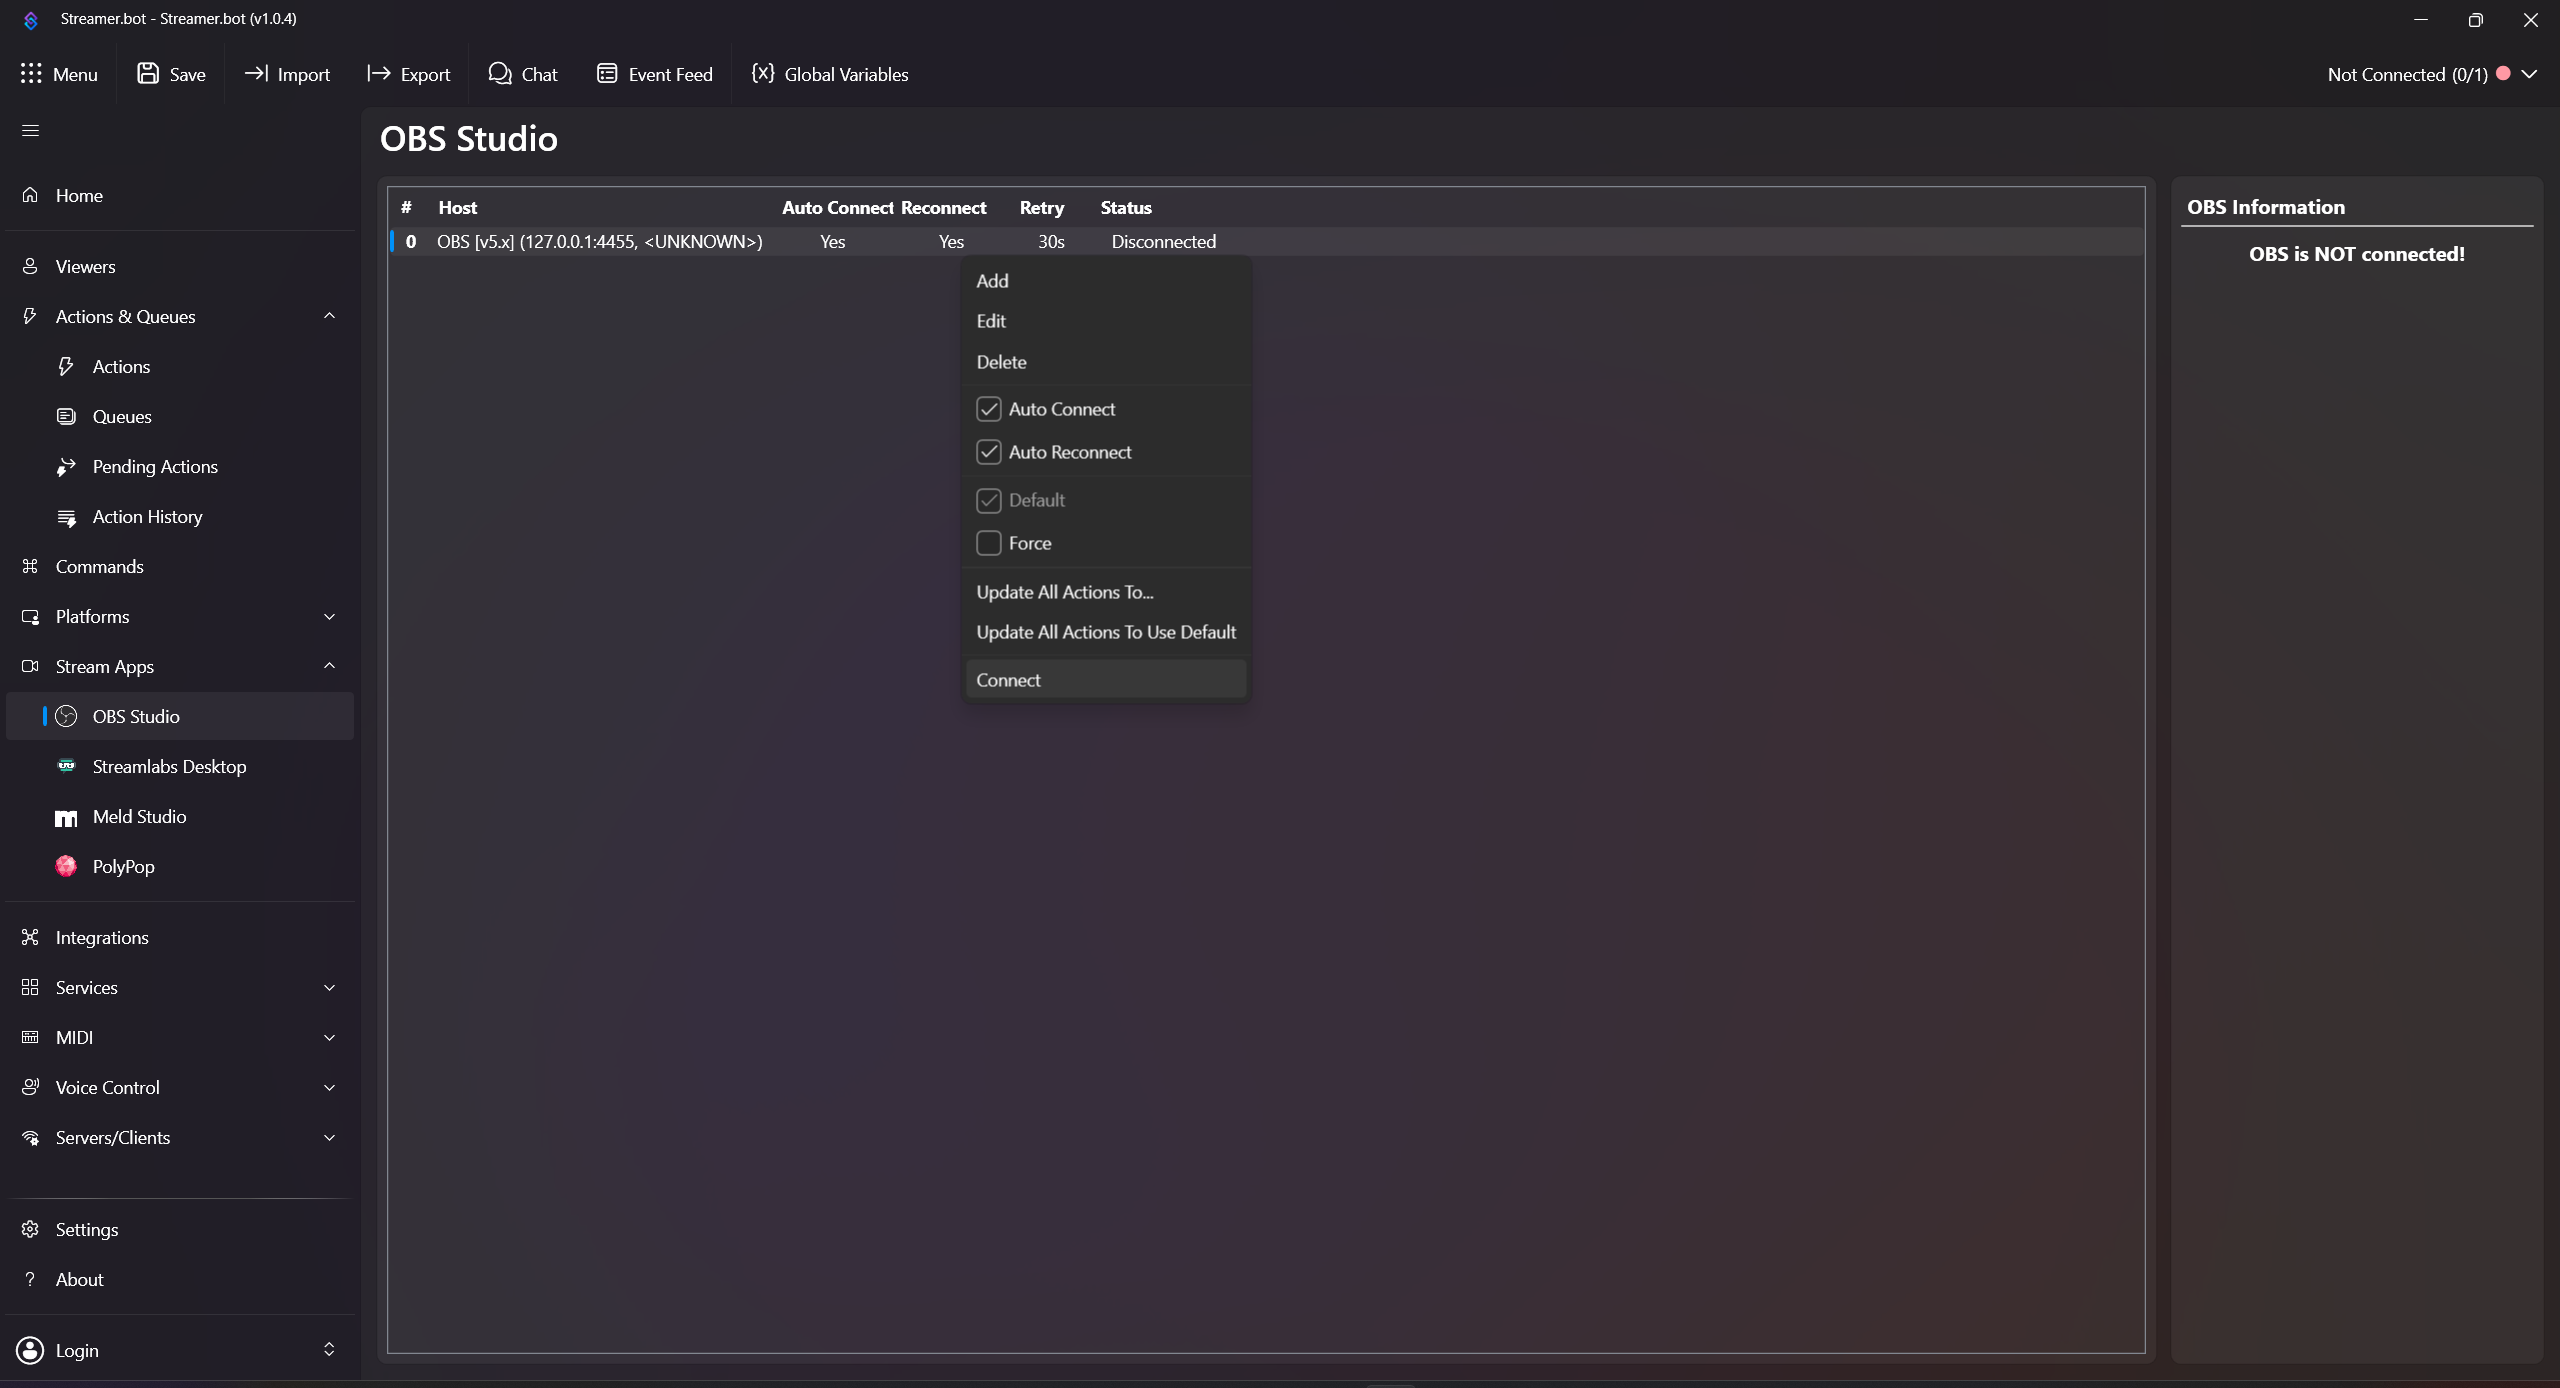
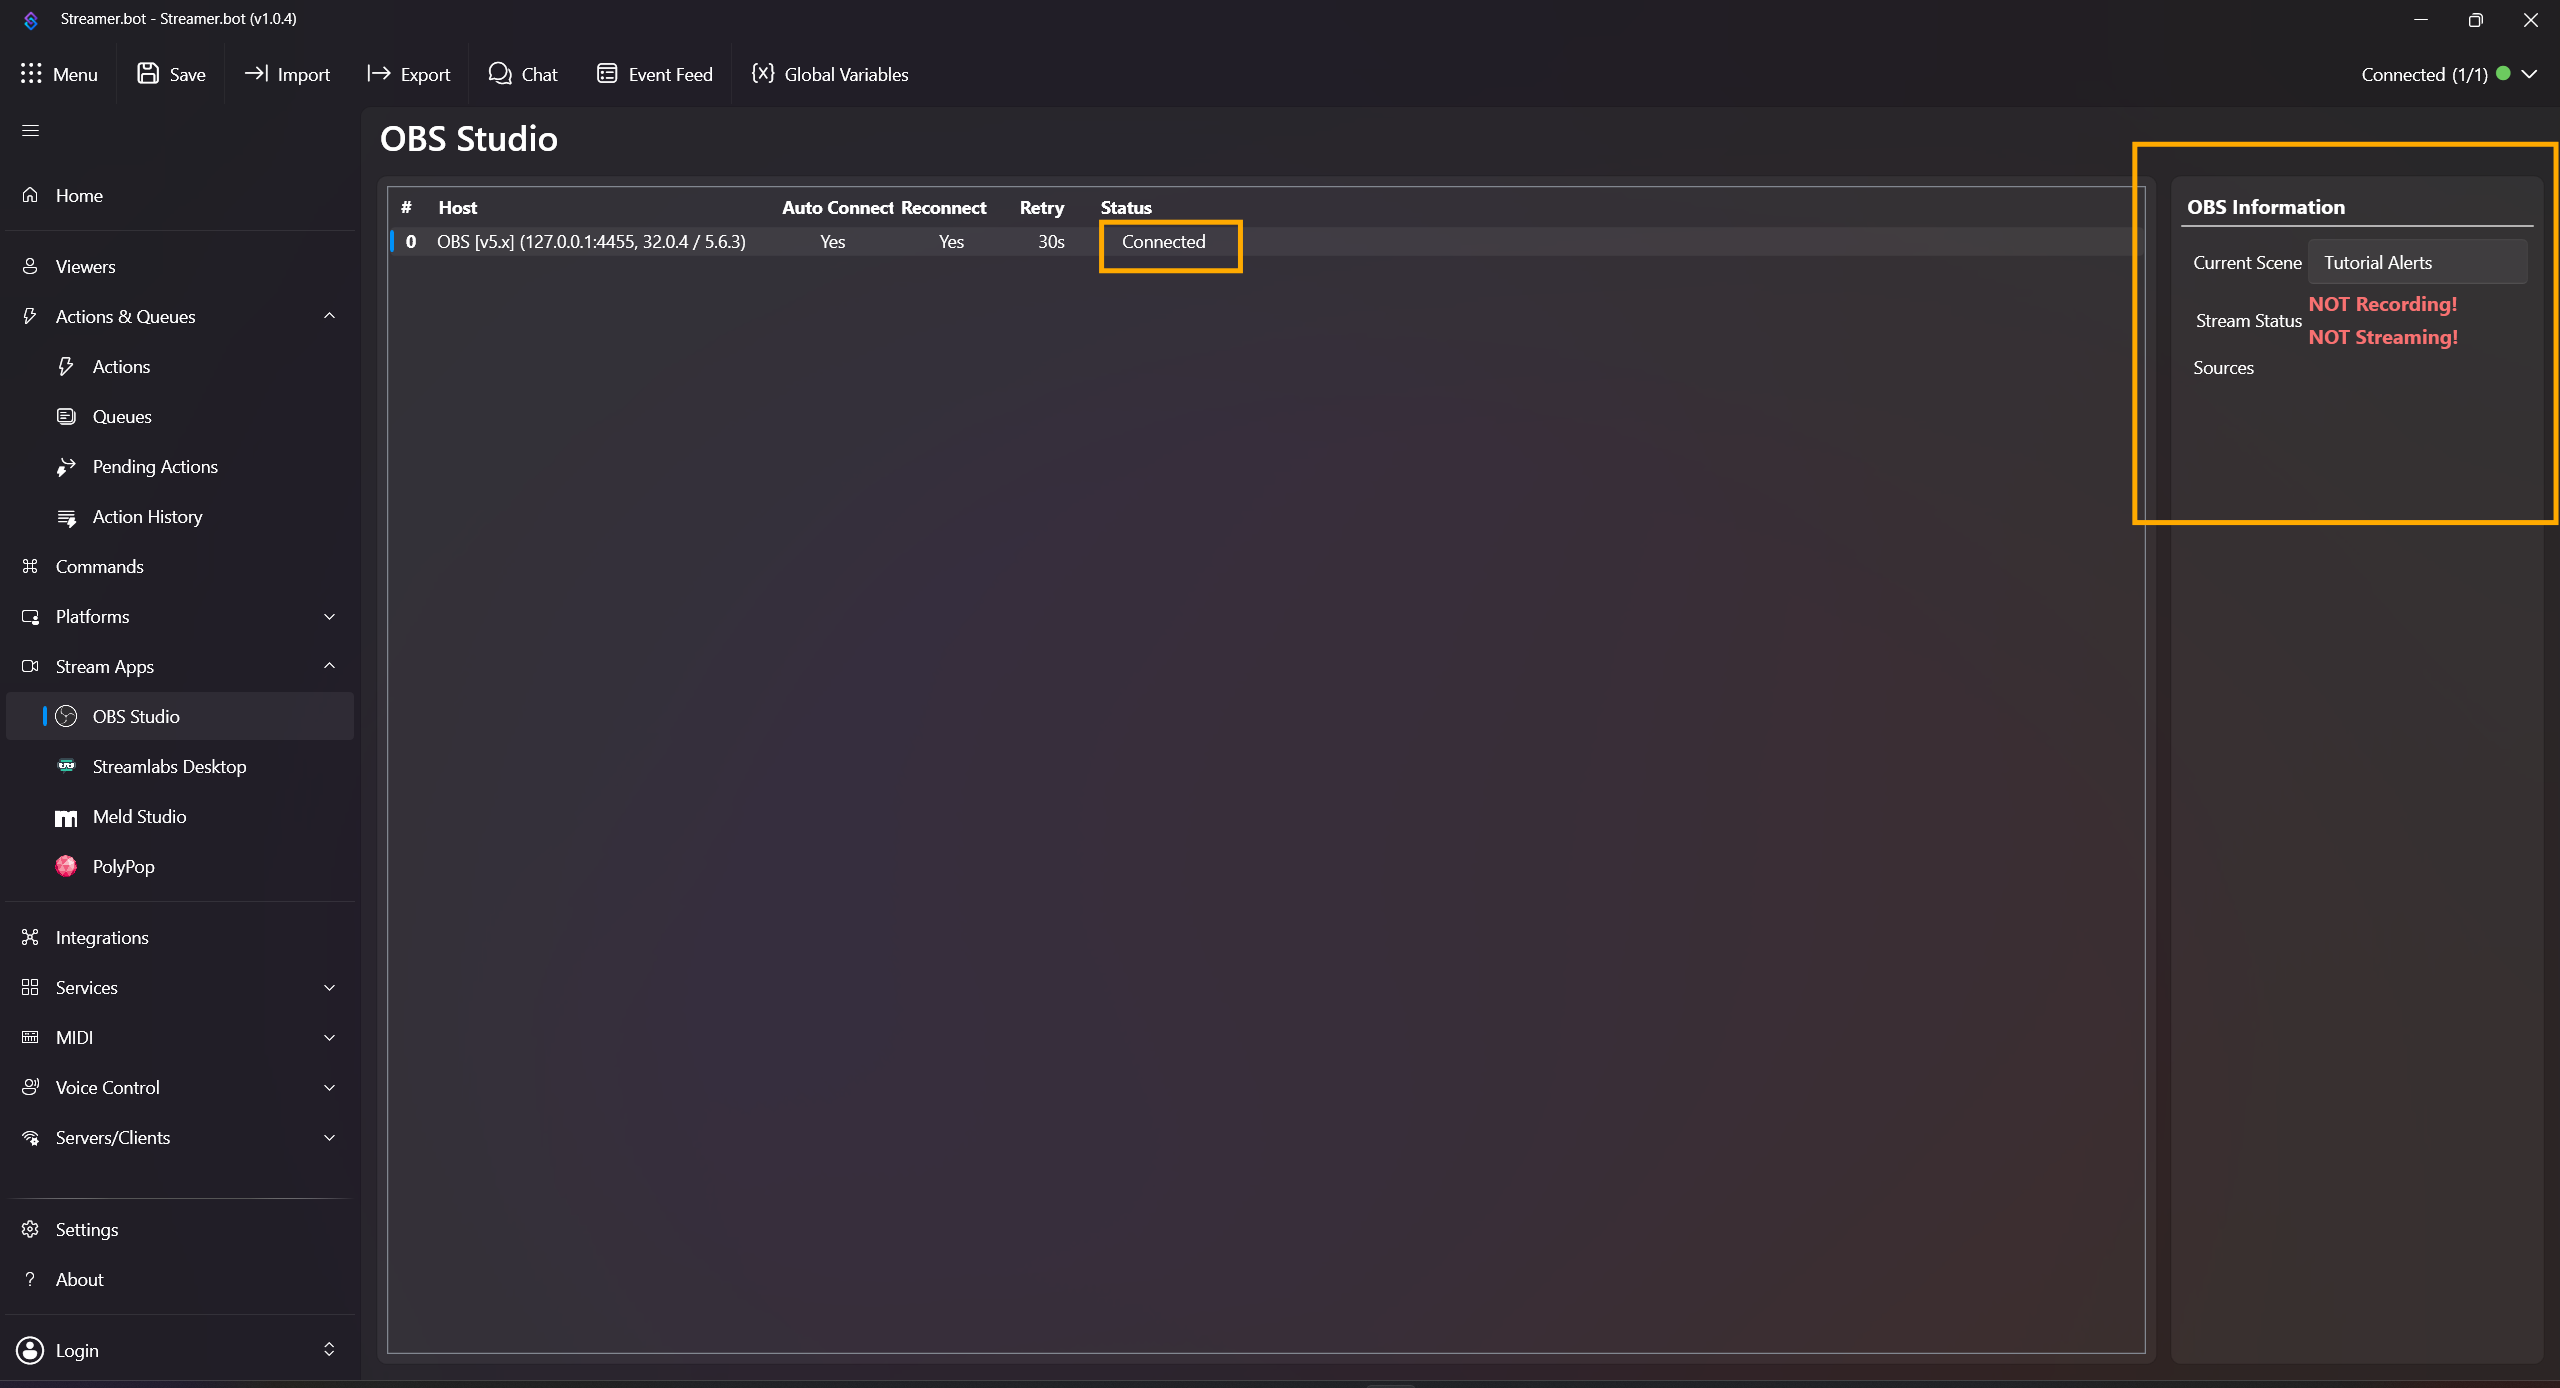
First add your streaming software under Stream Apps (in this example OBS). Right-click inside the Stream Apps field and add a new entry, e.g. OBS. Make sure WebSocket is enabled in OBS. If your WebSocket uses a password, set it here. Enable Auto Connect on Startup, Reconnect, and Disconnect. Then right-click the created WebSocket connection in Streamer.bot and click Connect. The connection is successful once you see an active OBS state on the right under OBS Information and Status: Connected in the center.

- Open Actions & Queues -> Actions.
-
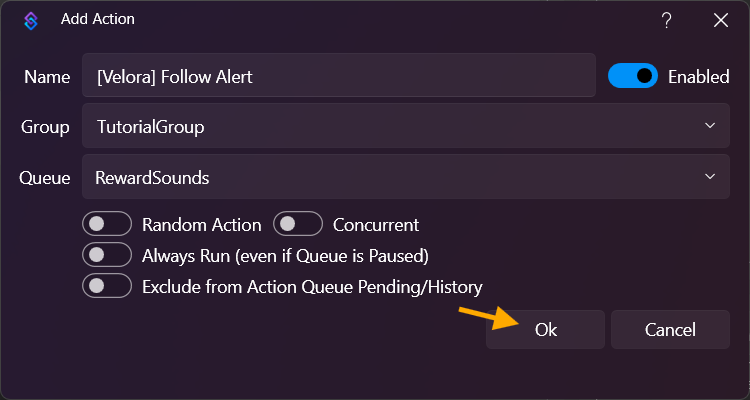
Right-click inside the Actions field, click Add Action, and name it e.g. [Velora] Follow Alert. As with Channel Point sound alerts (see Reward Sound from step 7), it is recommended to use a dedicated queue with Blocking enabled, or use exactly the same queue, so reward sounds and follow alerts do not overlap.
-
Right-click inside the Triggers field and choose:
Add -> Custom -> Velora -> Channel -> [Velora.Bot] Follow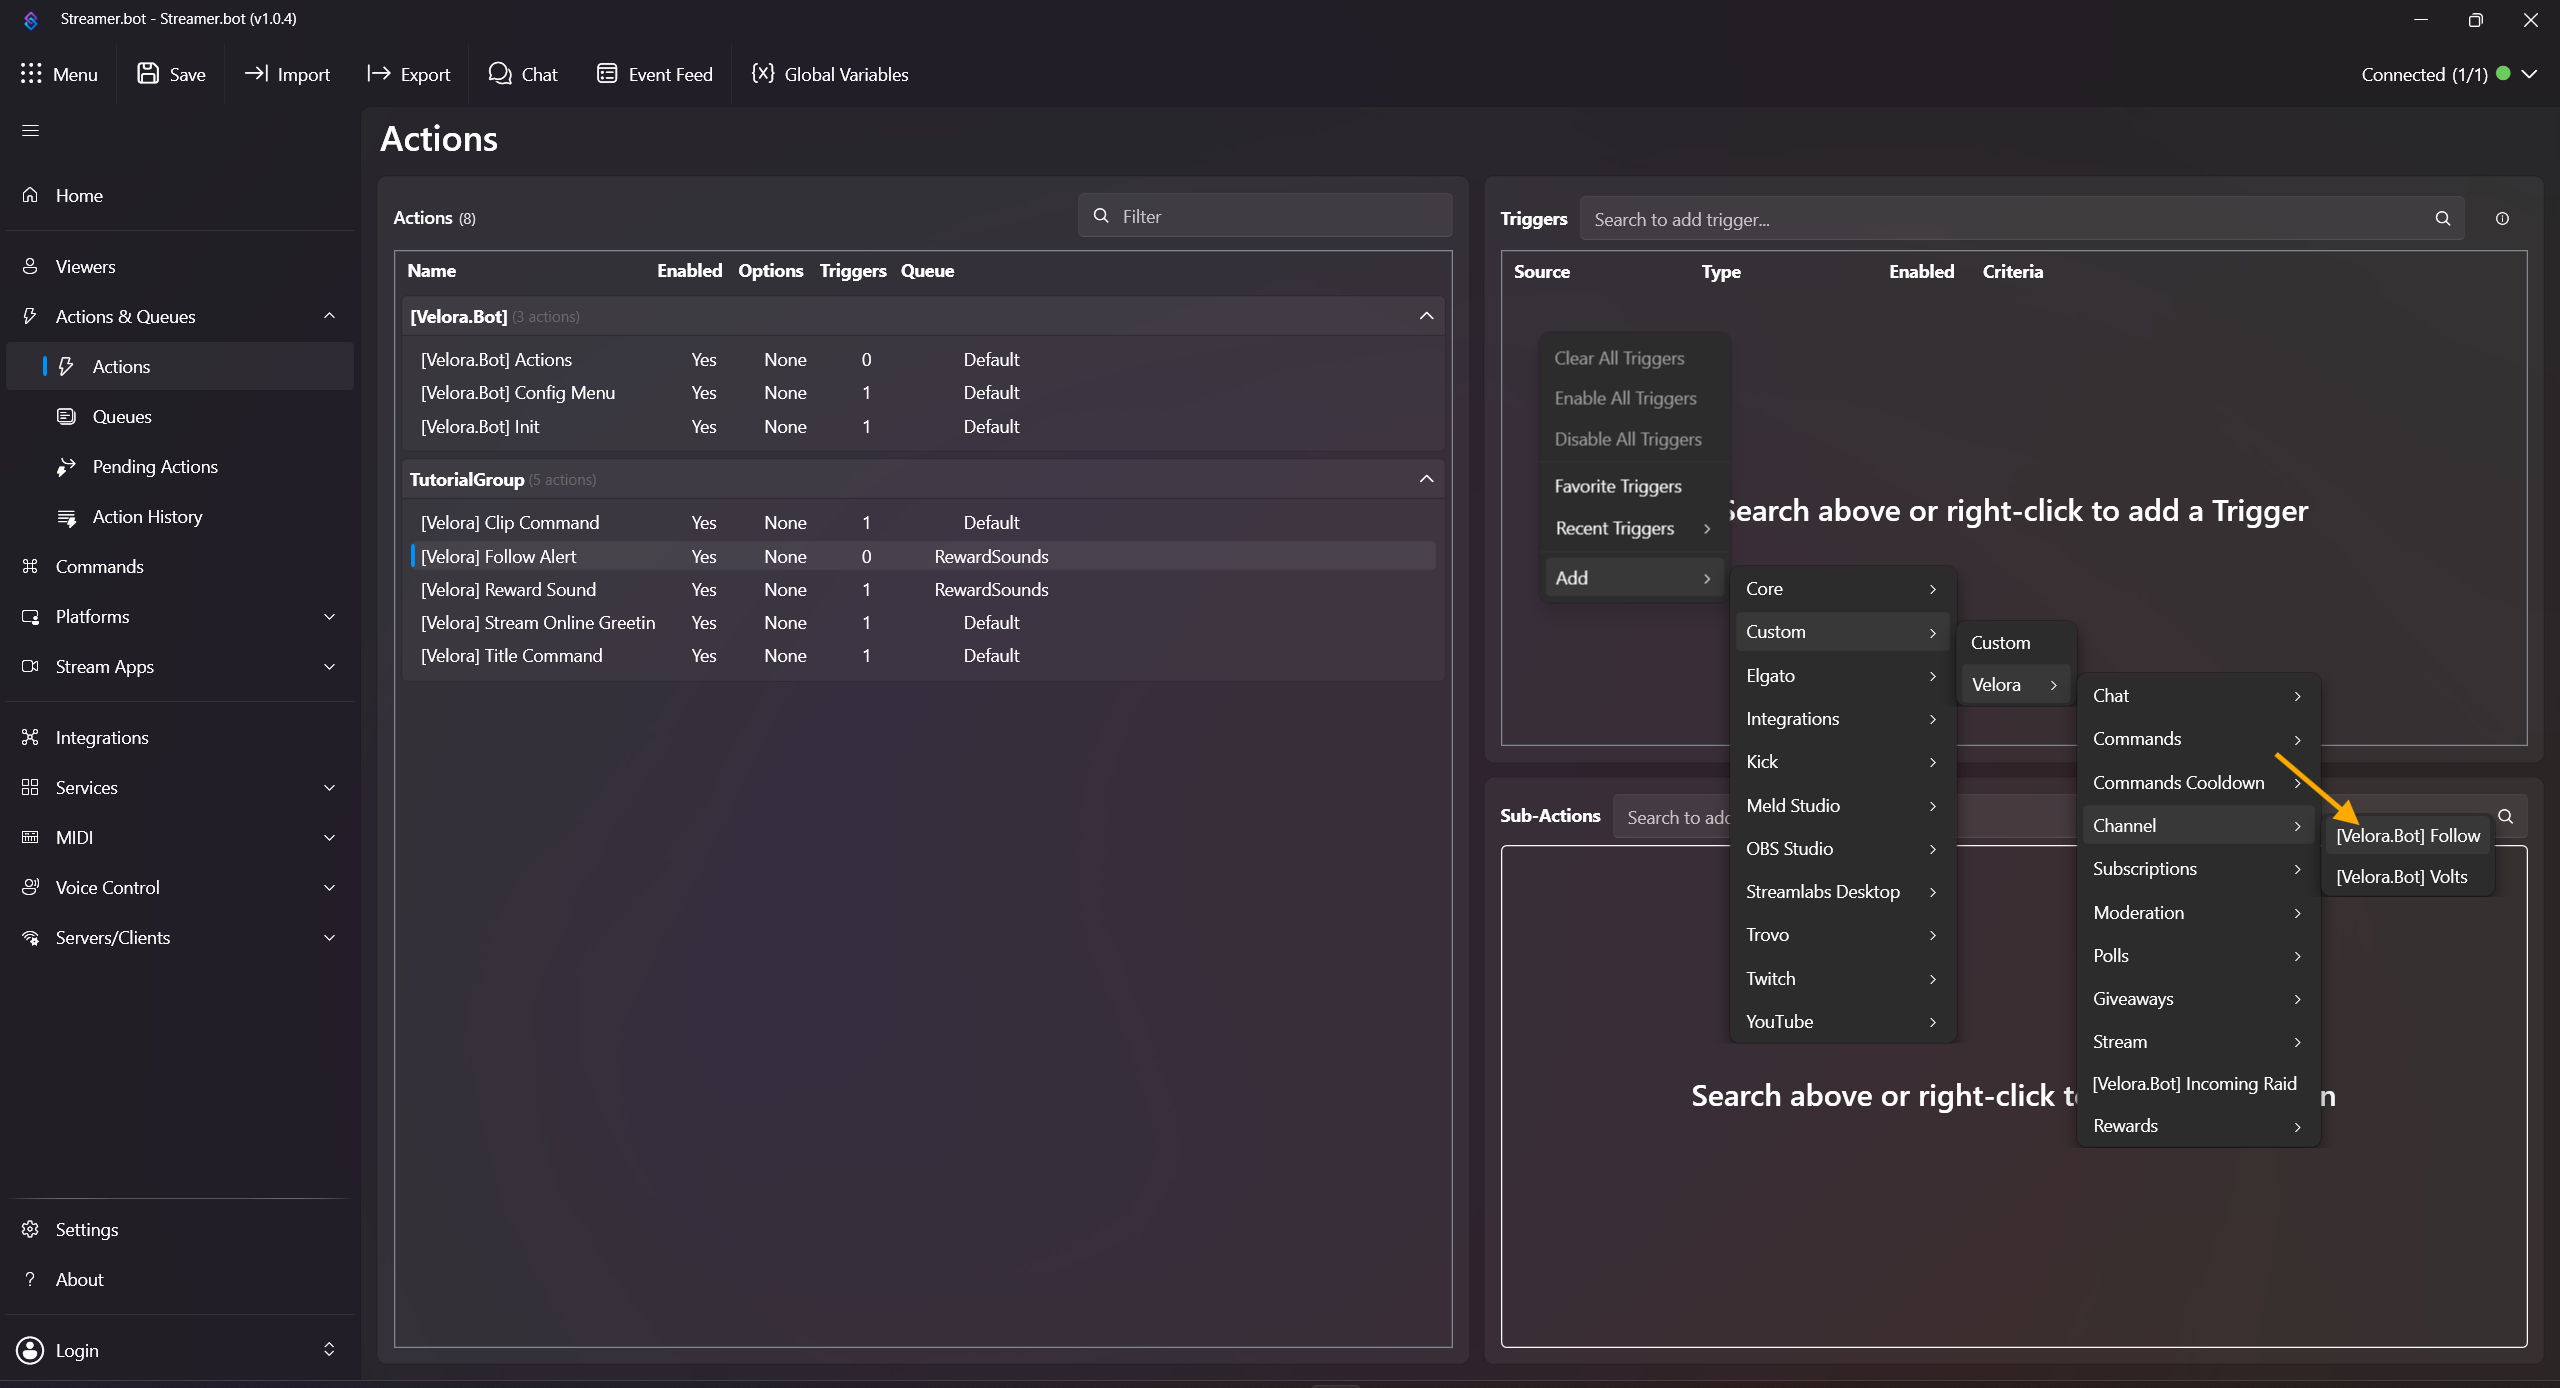
-
Right-click in Sub-Actions and add:
Add -> Core -> Sounds -> Play Sound
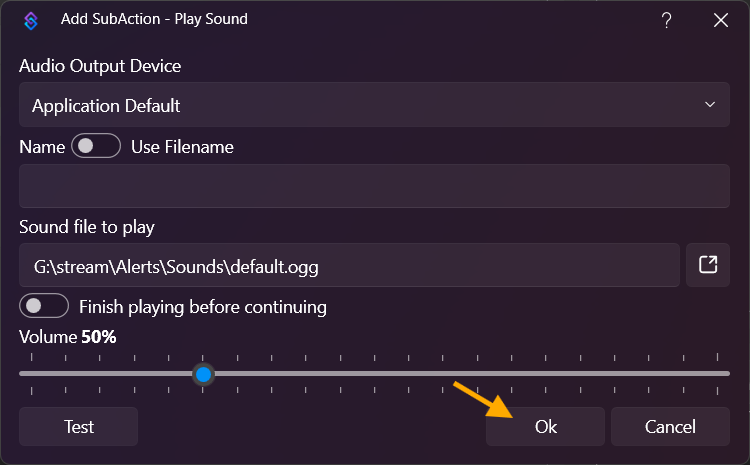
Audio Output Device: Leave on Application Default or select an output device of your choice.
Name: Leave empty, we use a local file path.
Sound file to play: Click the icon next to the text field and select your file.
Then confirm with OK.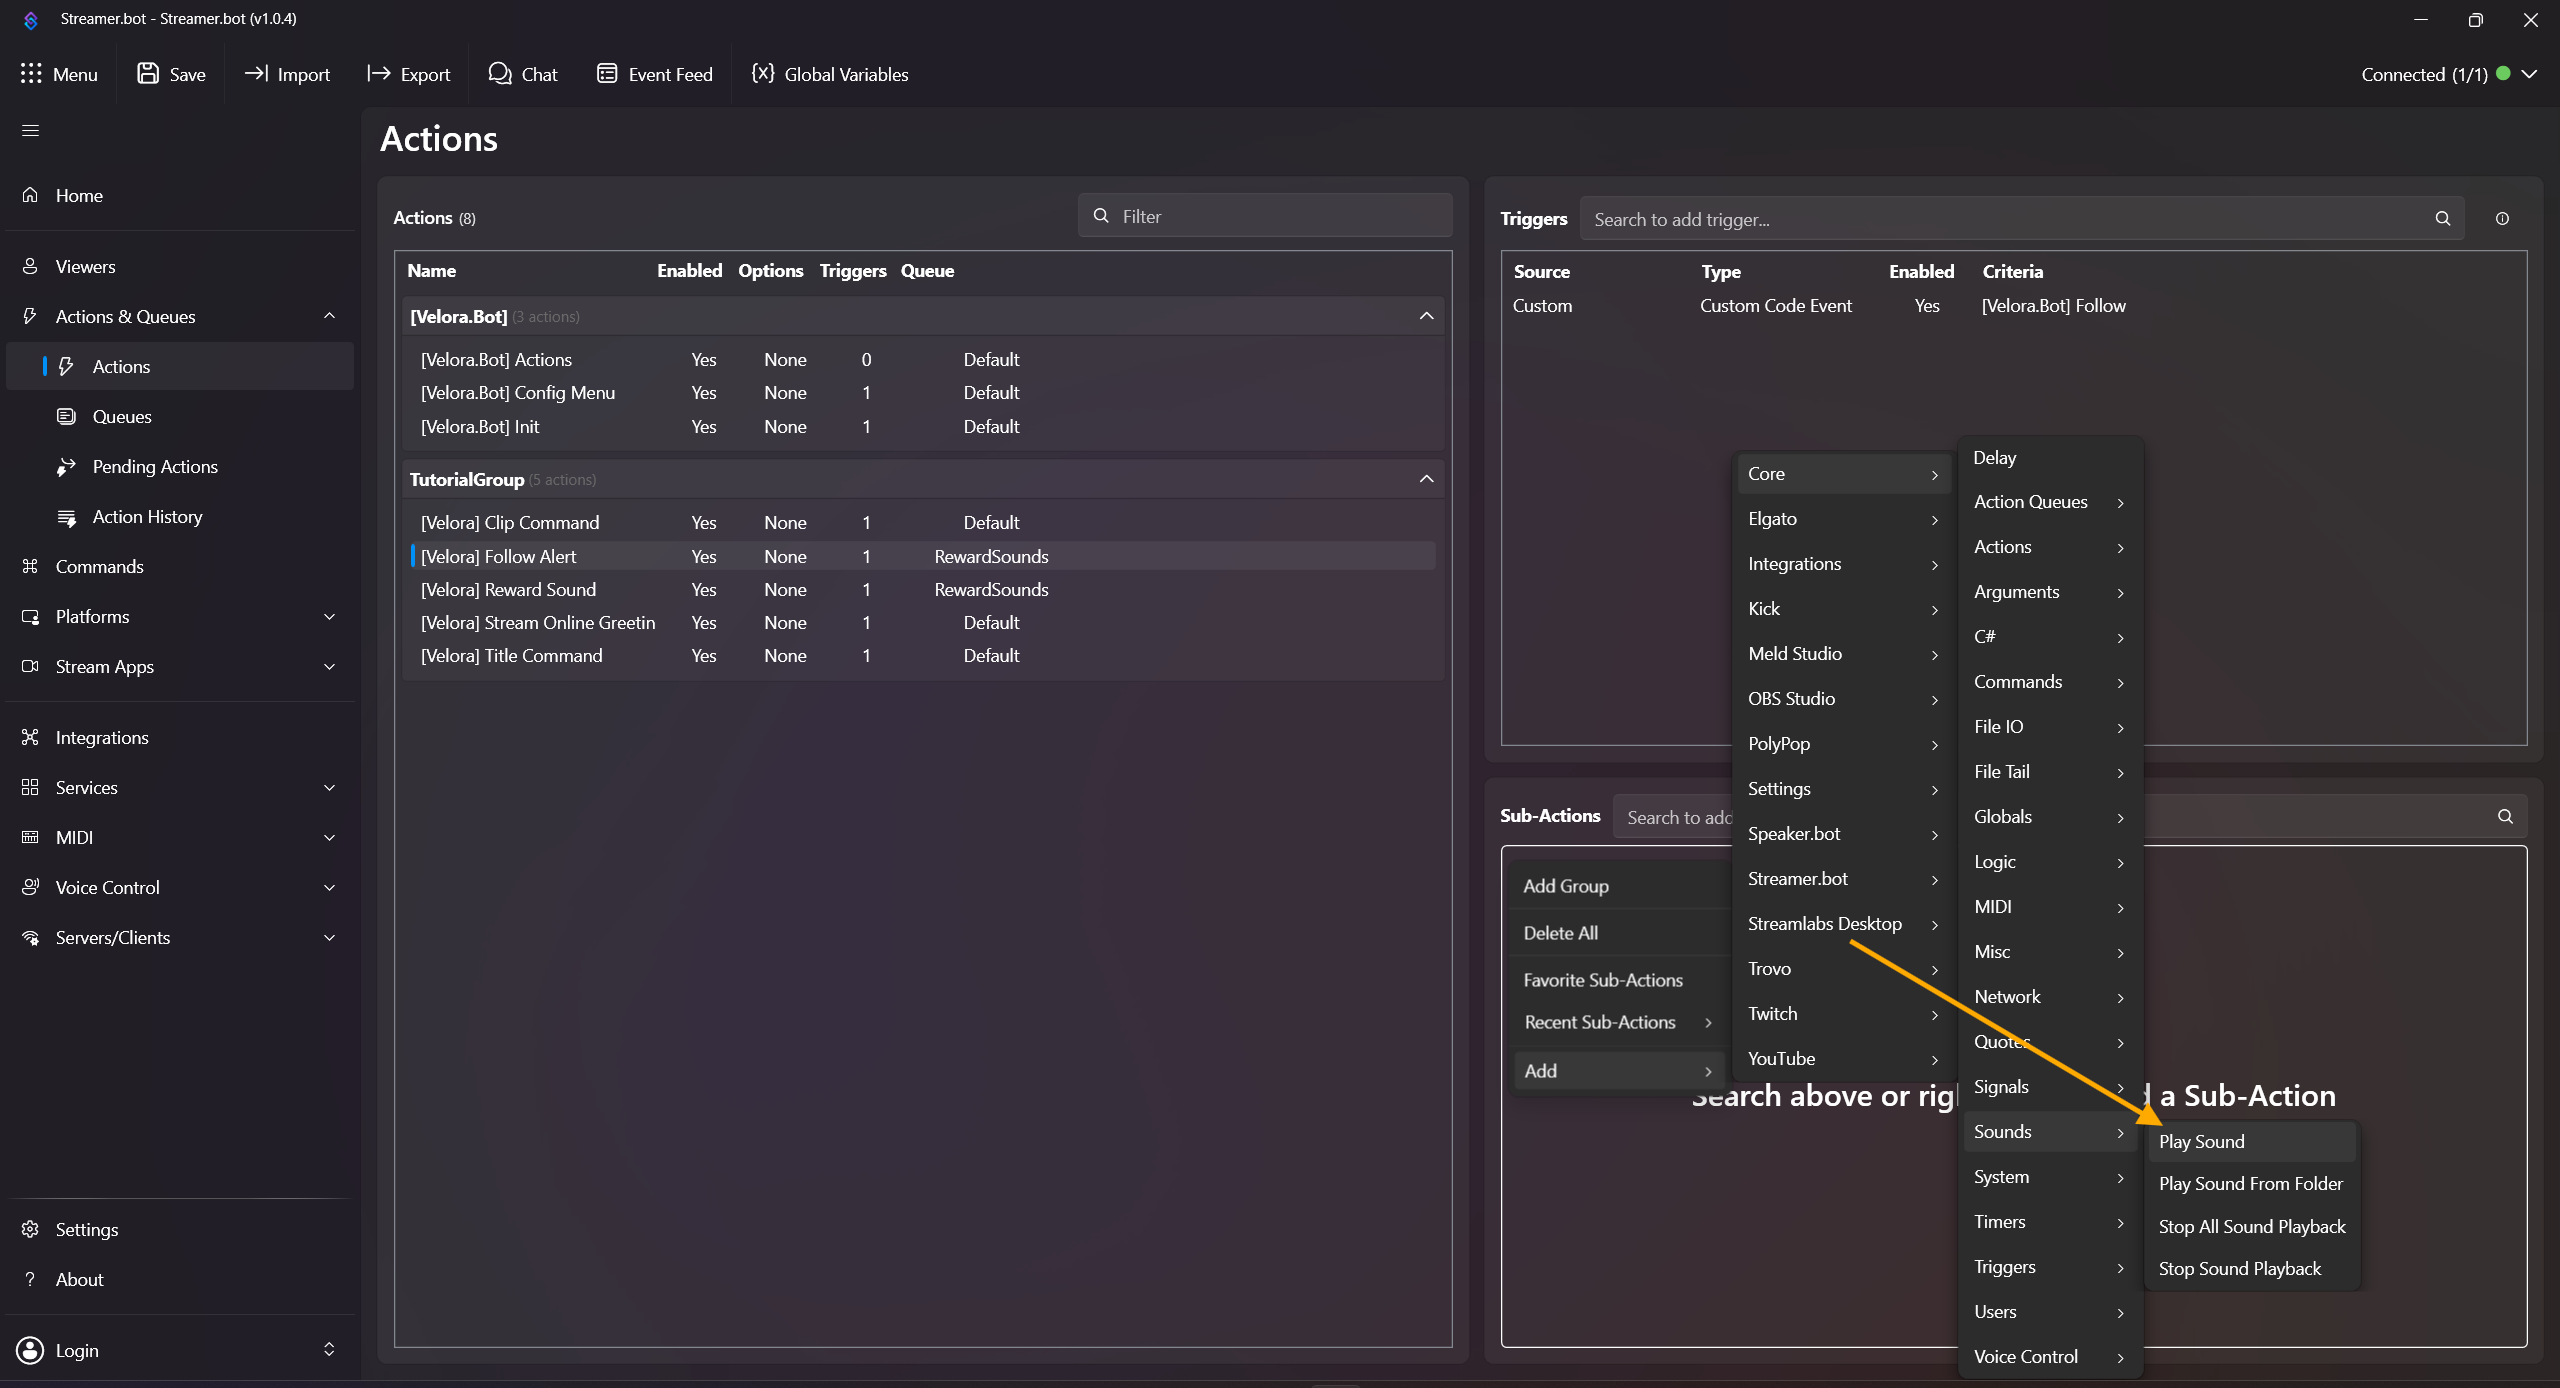
-
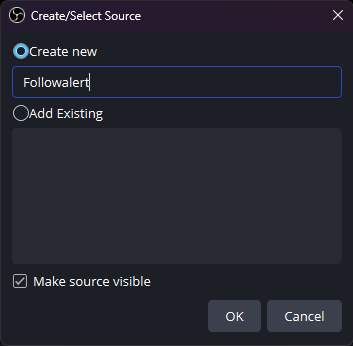
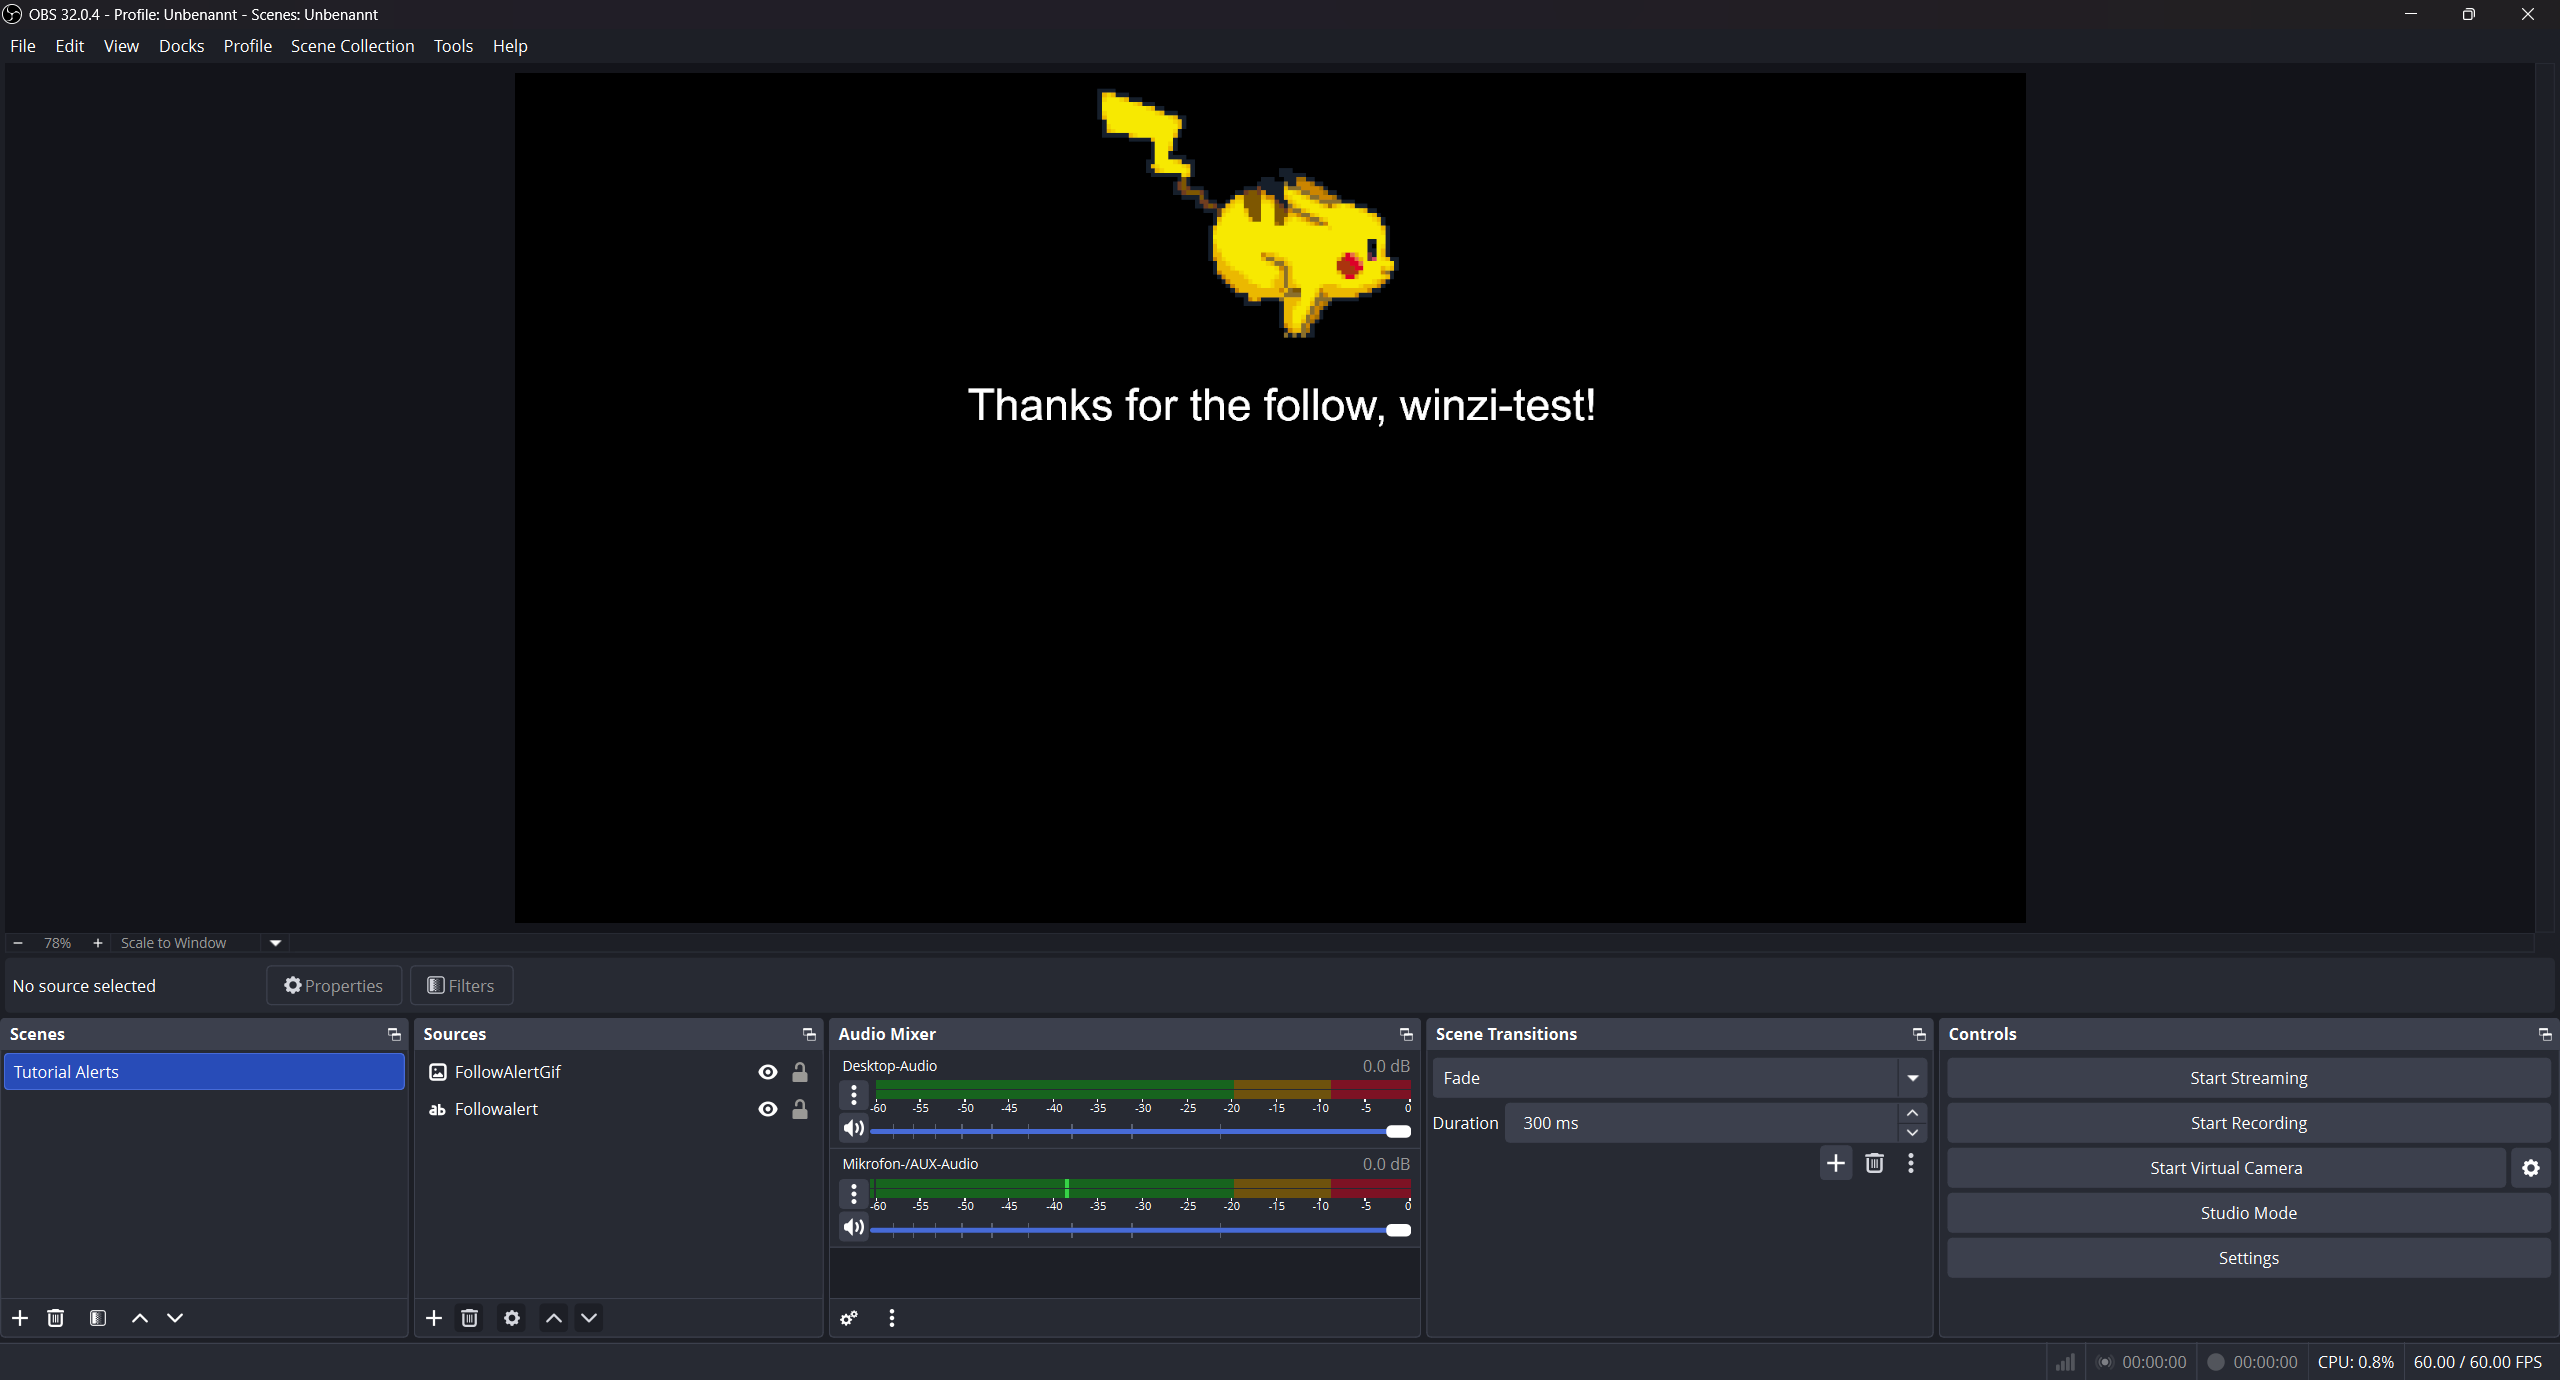
Go back to OBS and add a new source named TextGDI.
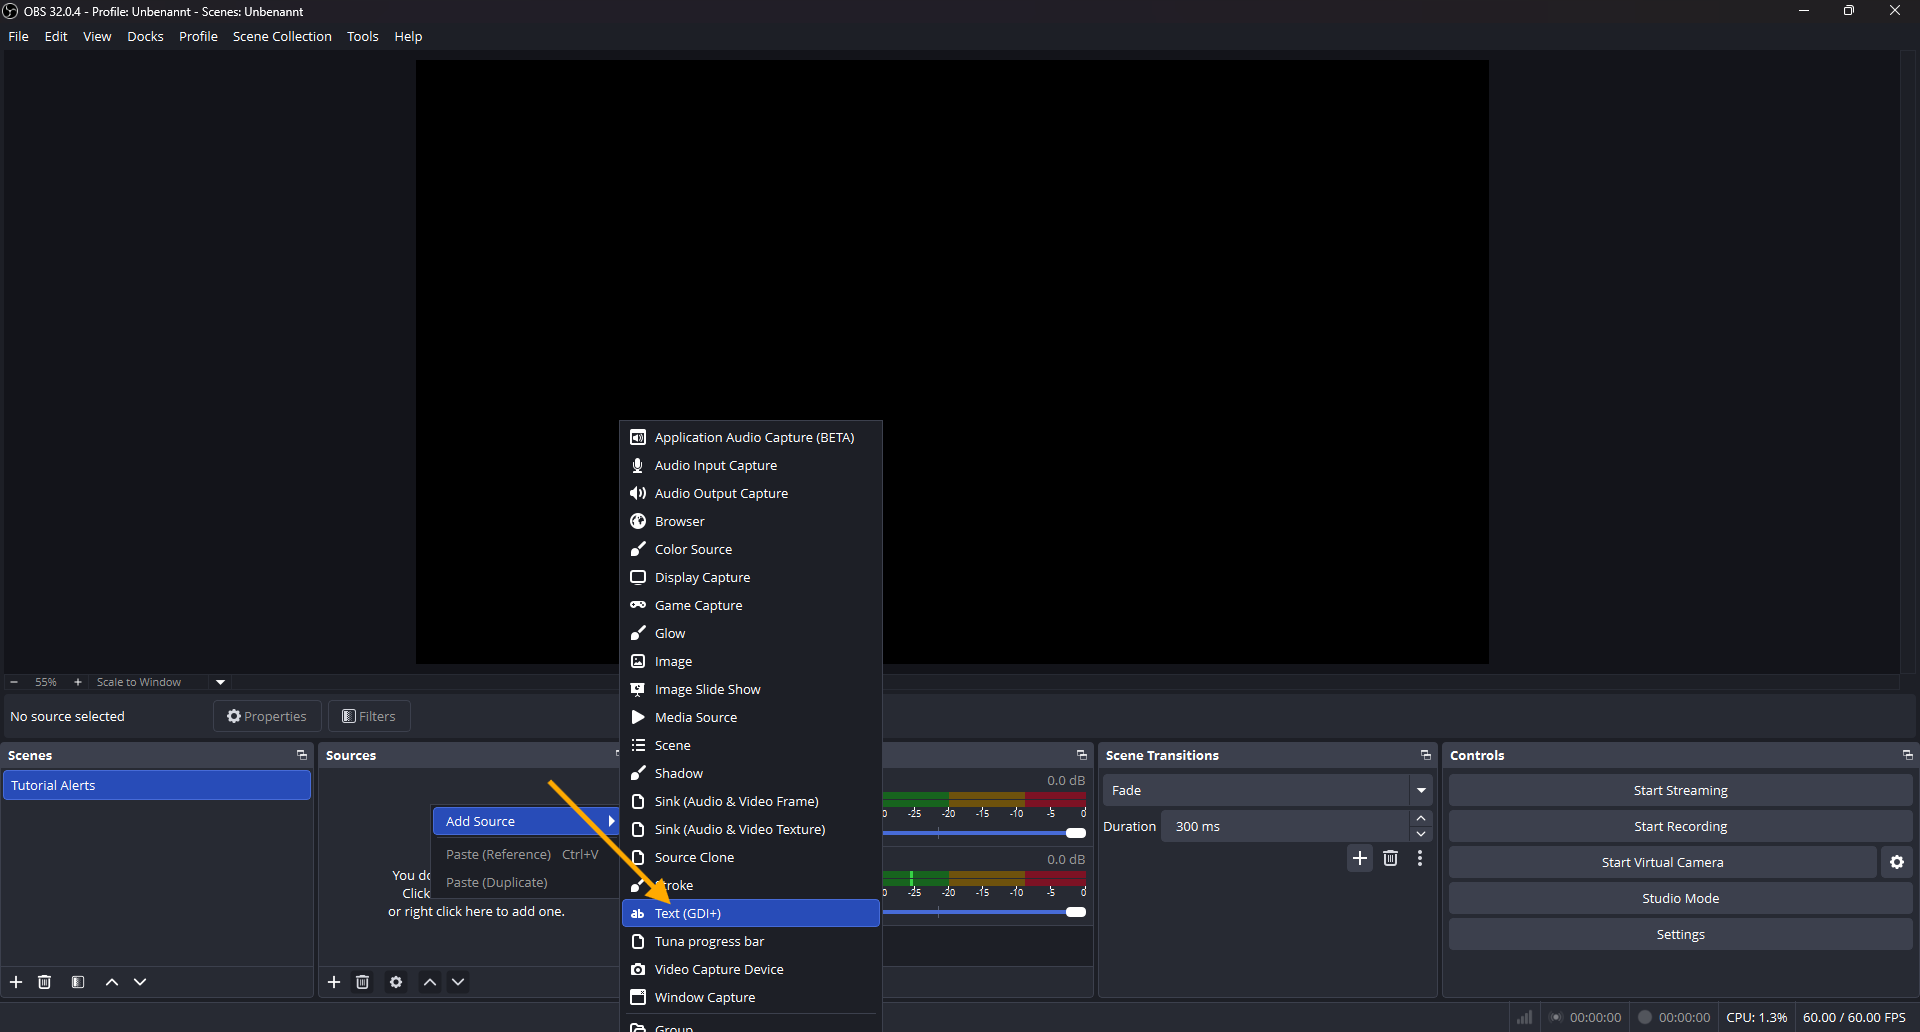
-
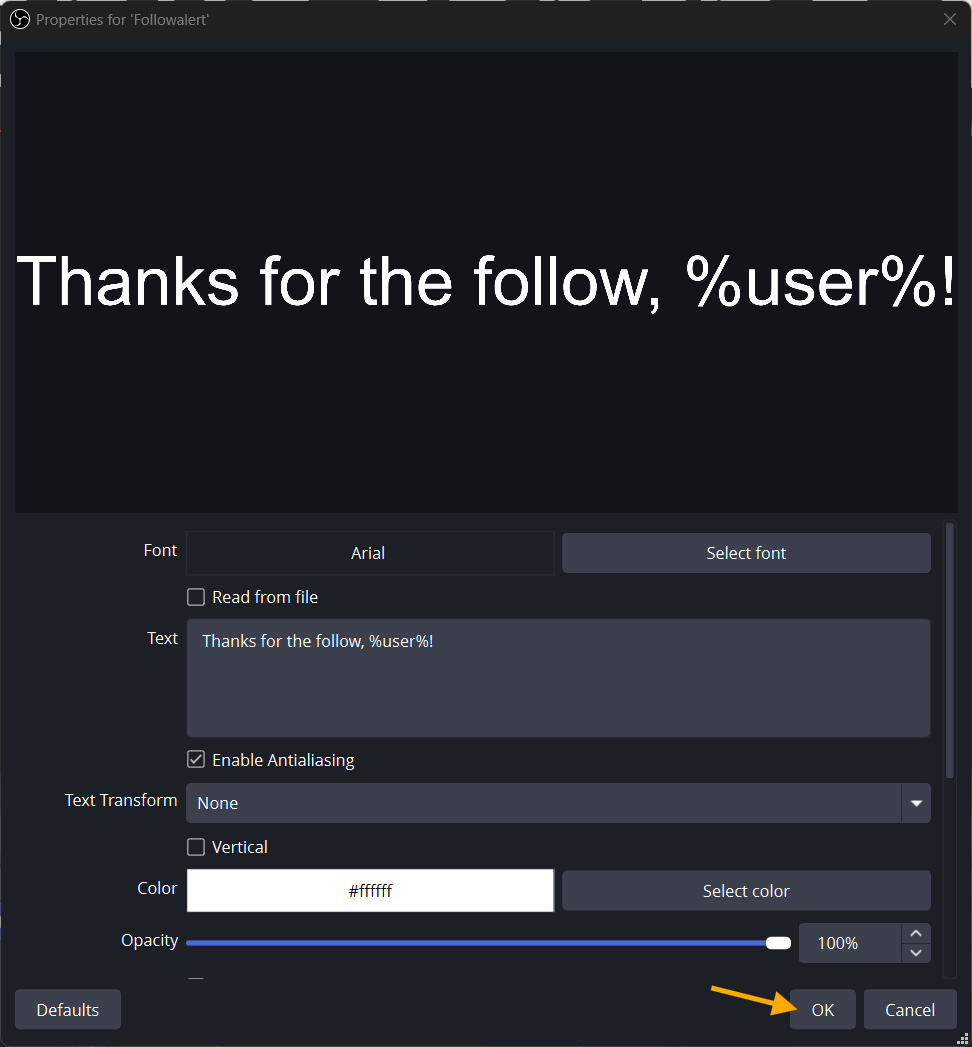
In TextGDI, enter Thanks for the follow, %user%! so you can align it properly.
-
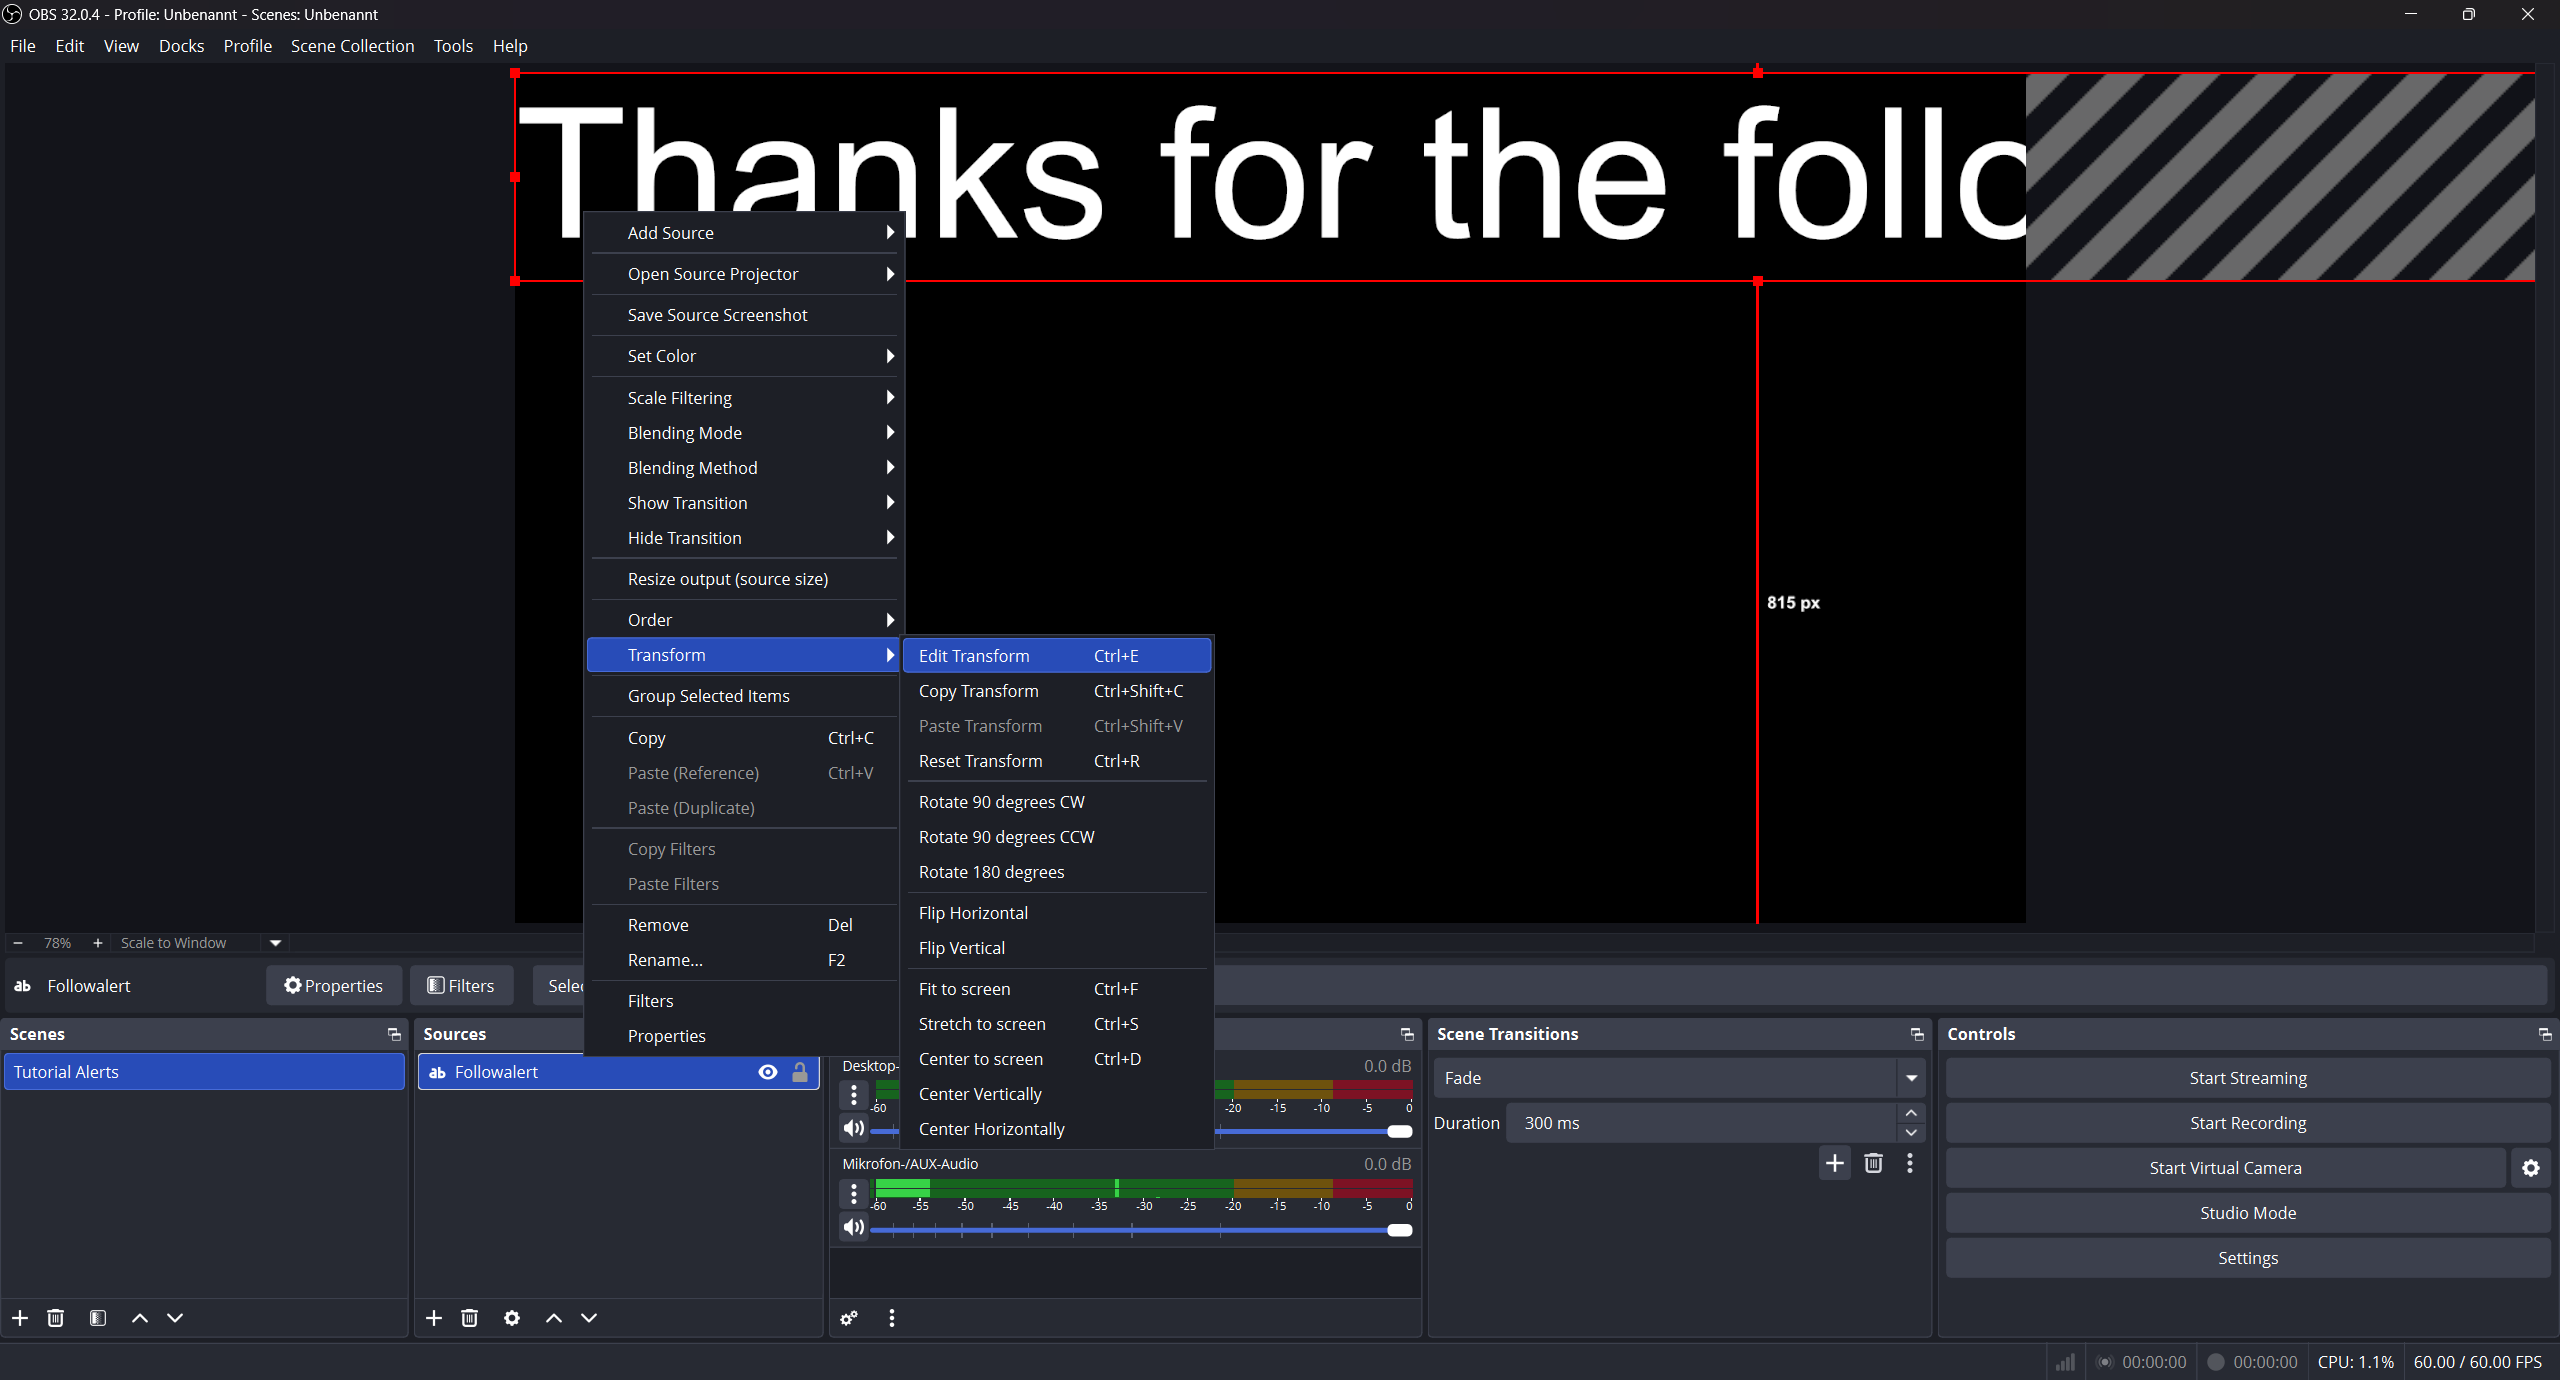
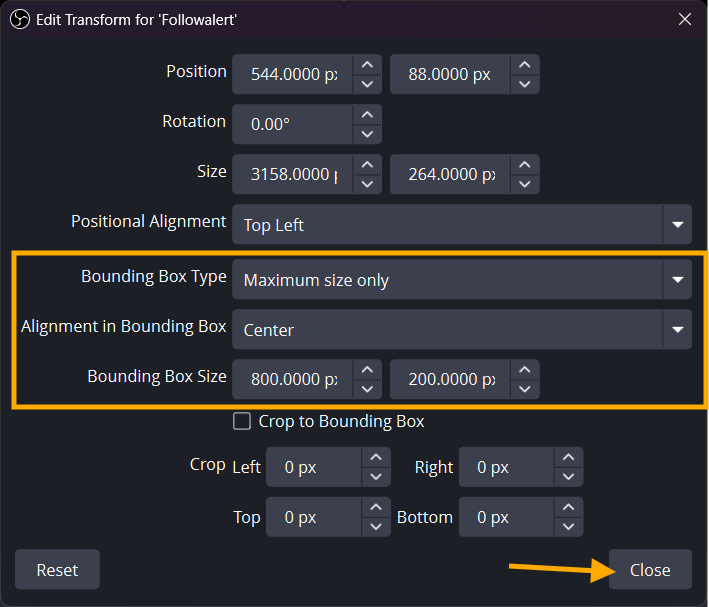
Go to Transform -> Edit Transform and set Bounding Box Type to Maximum Size Only. Set the size via Bounding Box Size (important: adjust the bounding box size, not the general scale).
-
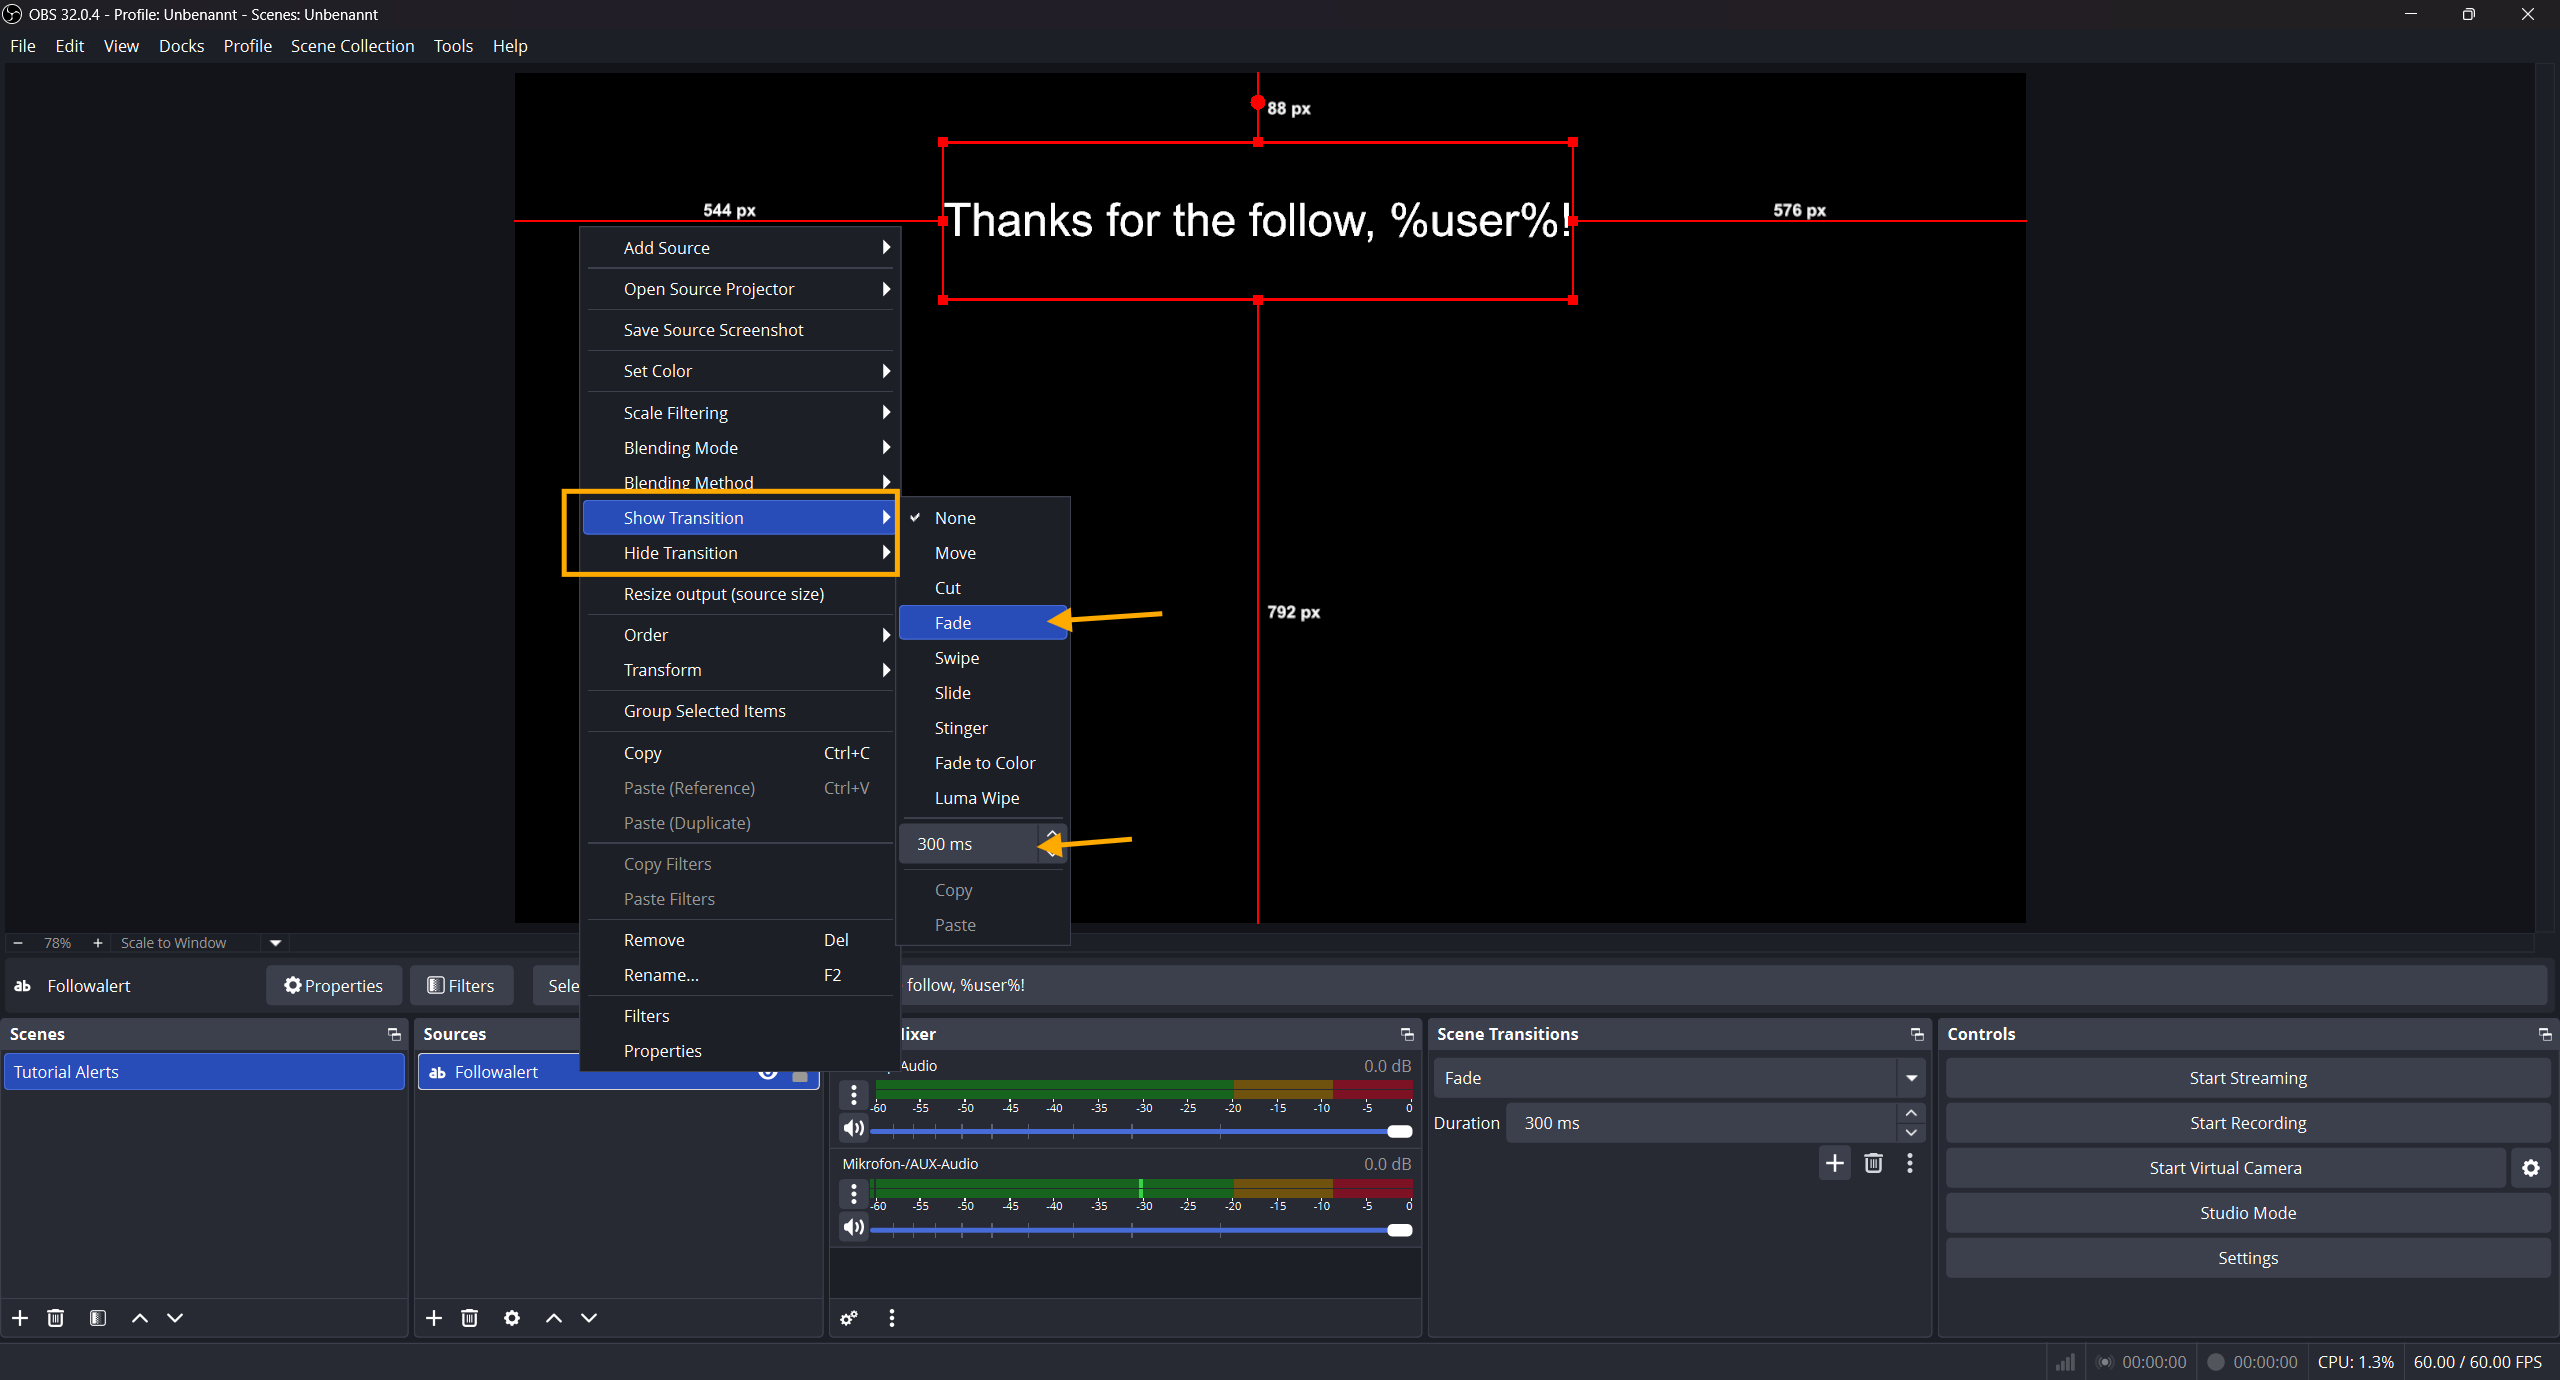
Right-click the TextGDI source and set your preferred Show Transition and Hide Transition (for example Fade with your desired duration in ms).
-
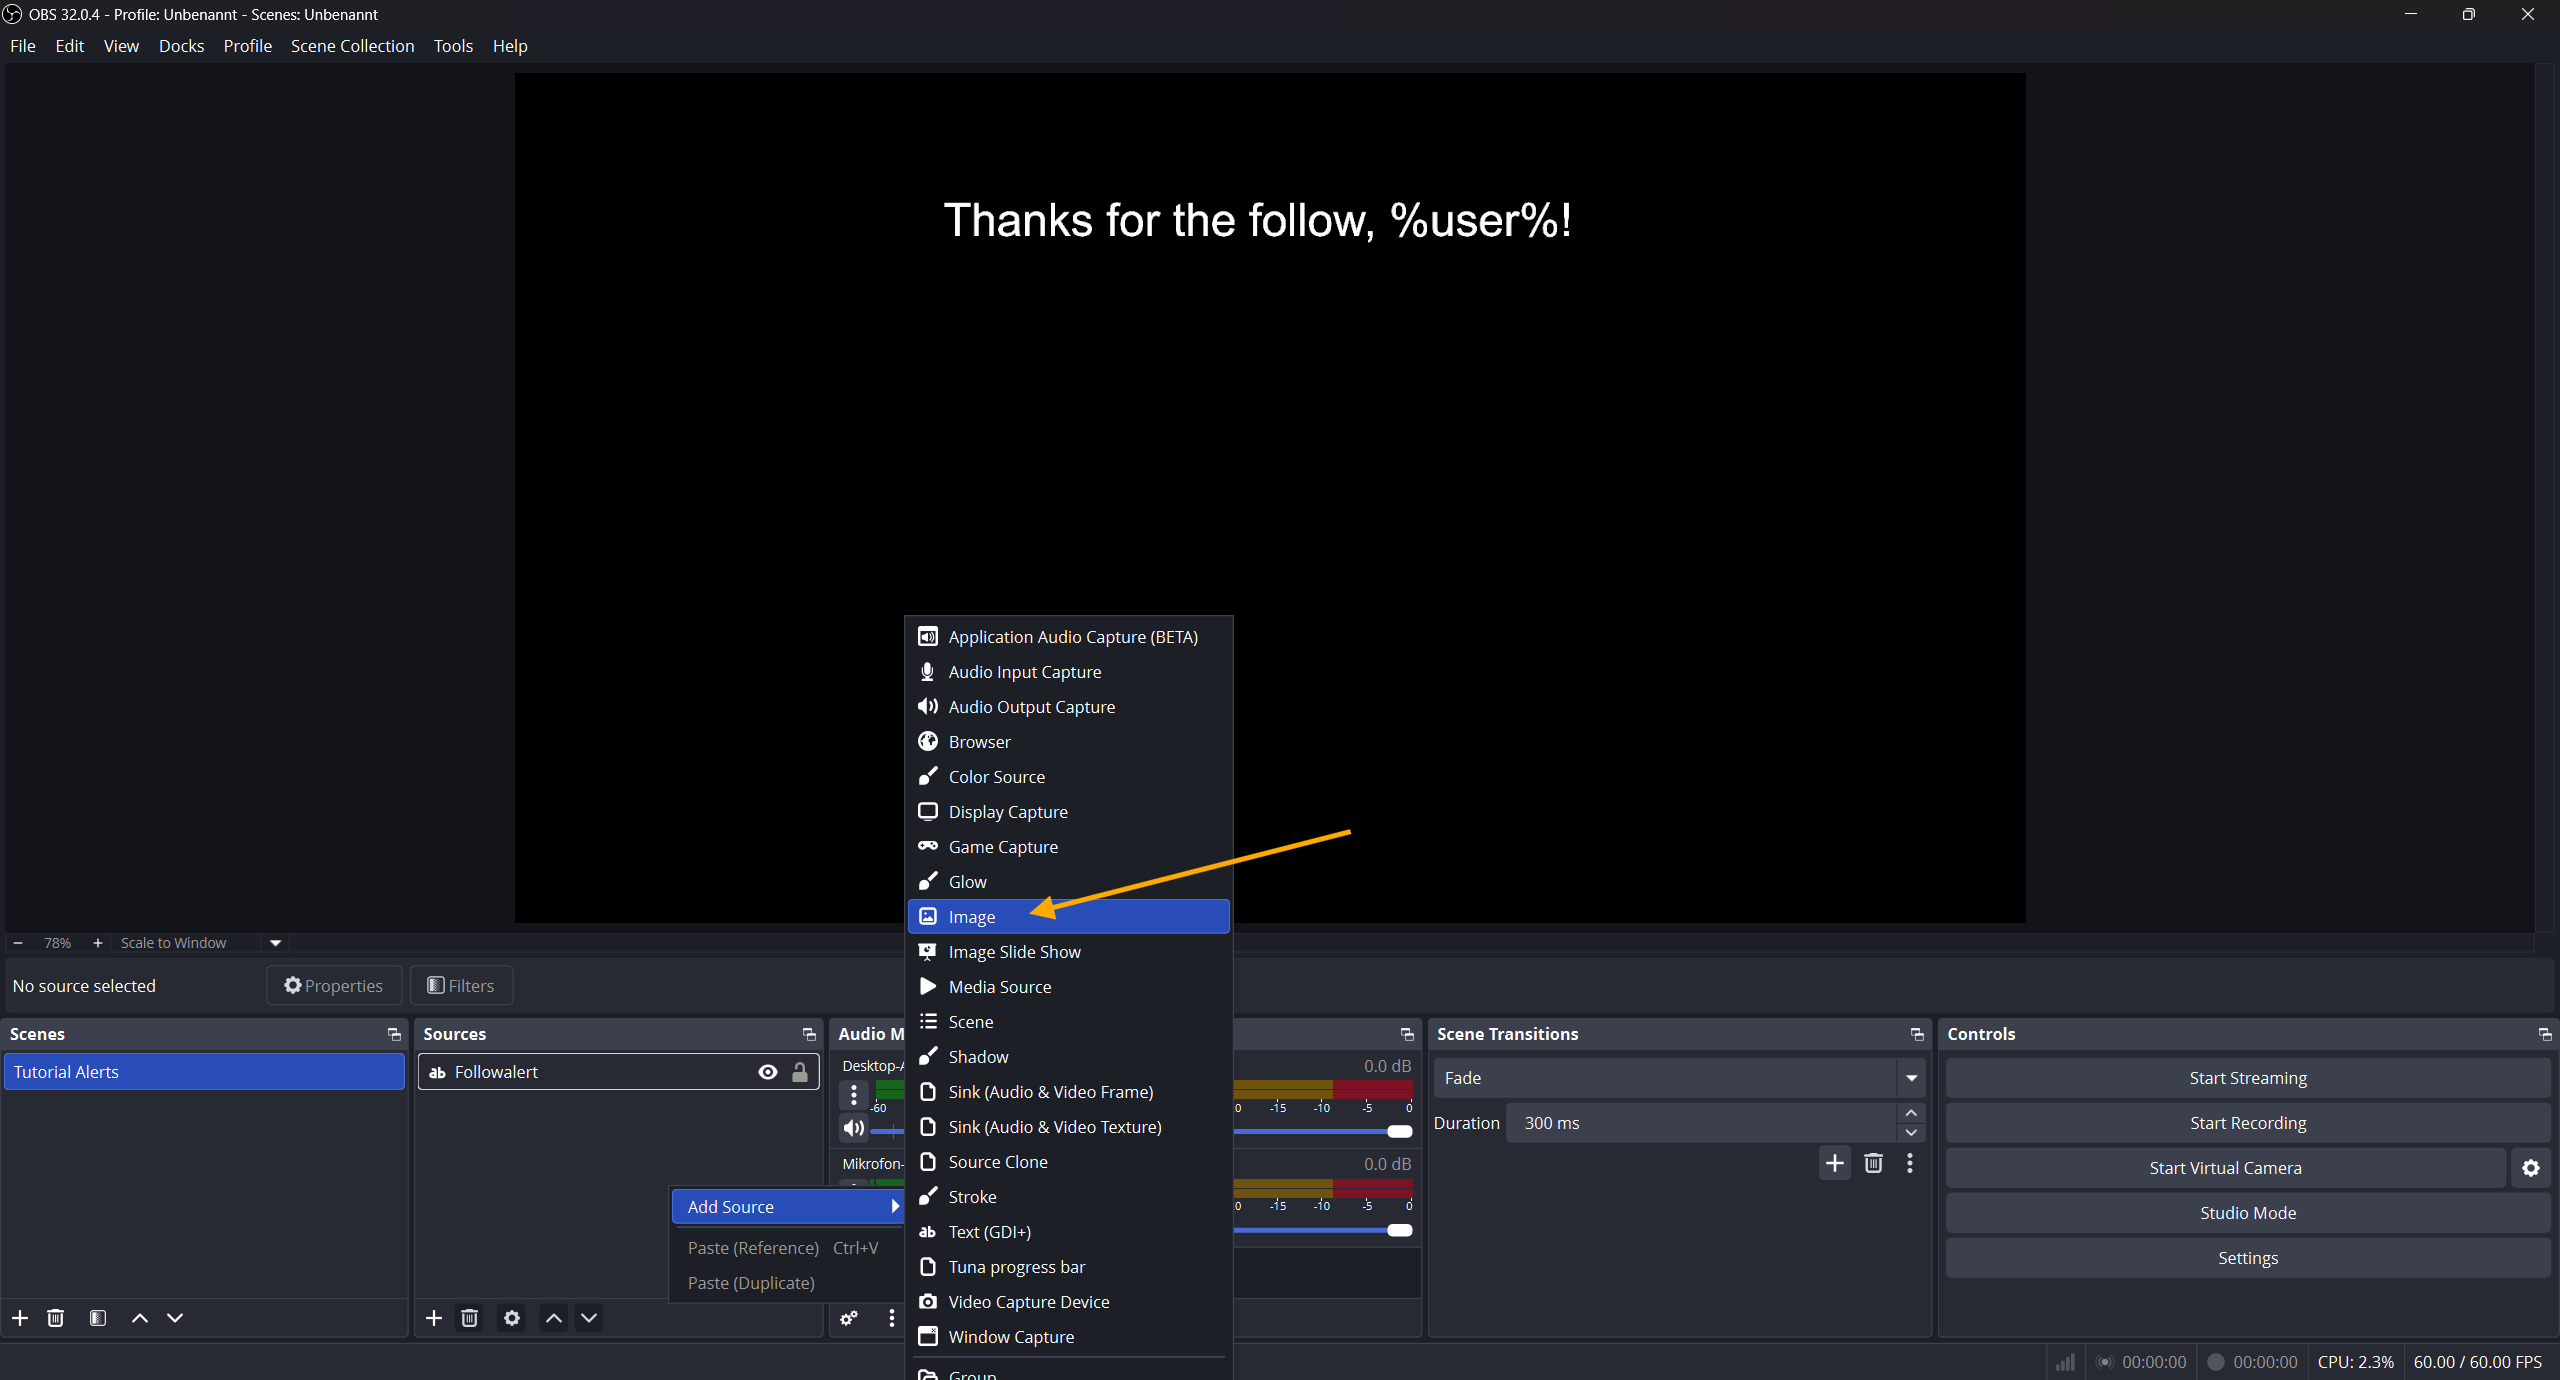
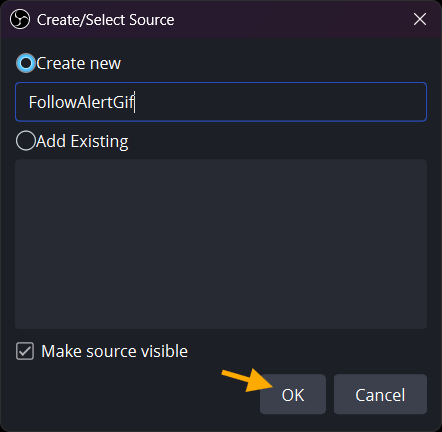
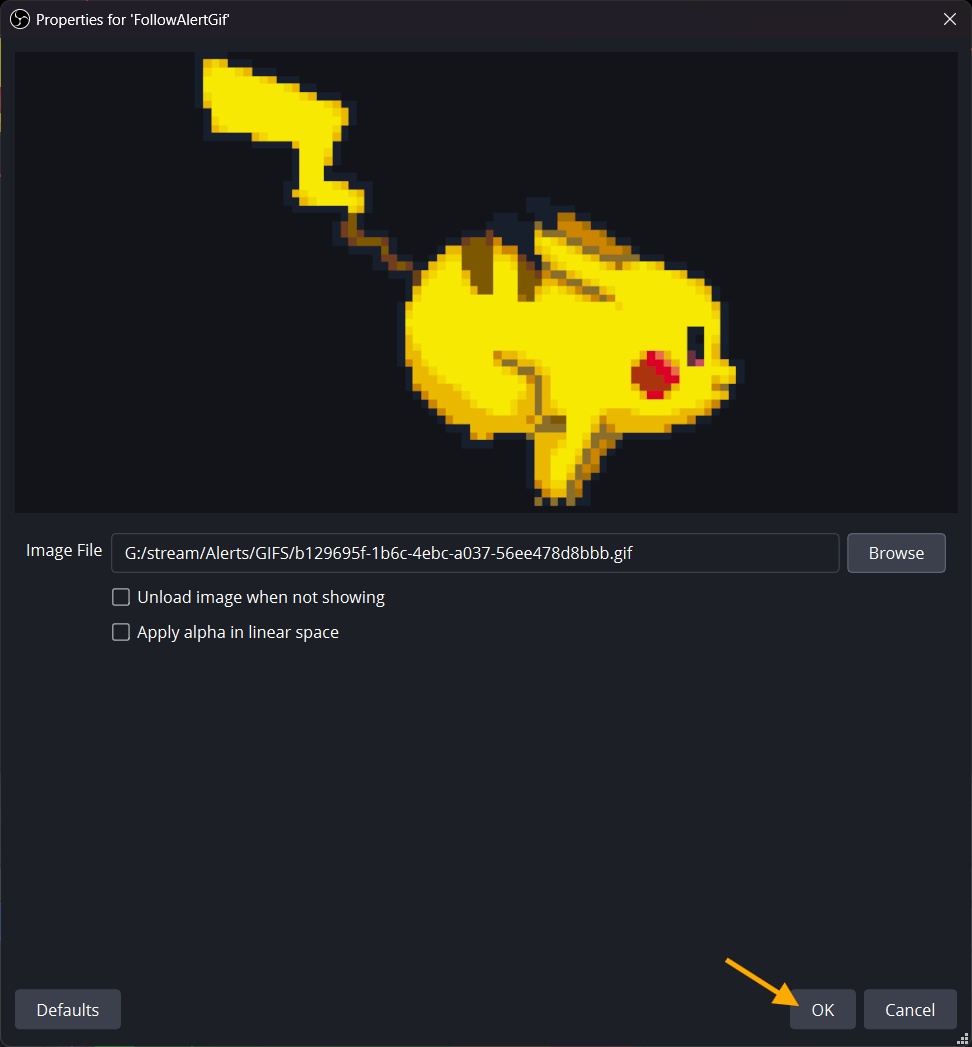
Add another source with your desired GIF.
- Right-click your GIF source and apply the same show/hide transitions. Optionally, put both elements into one folder/group and configure show/hide transitions on that folder instead of each source.
-
Hide both sources in OBS (or hide the folder/group that contains both elements). This way you can immediately verify if the show animation timing fits.
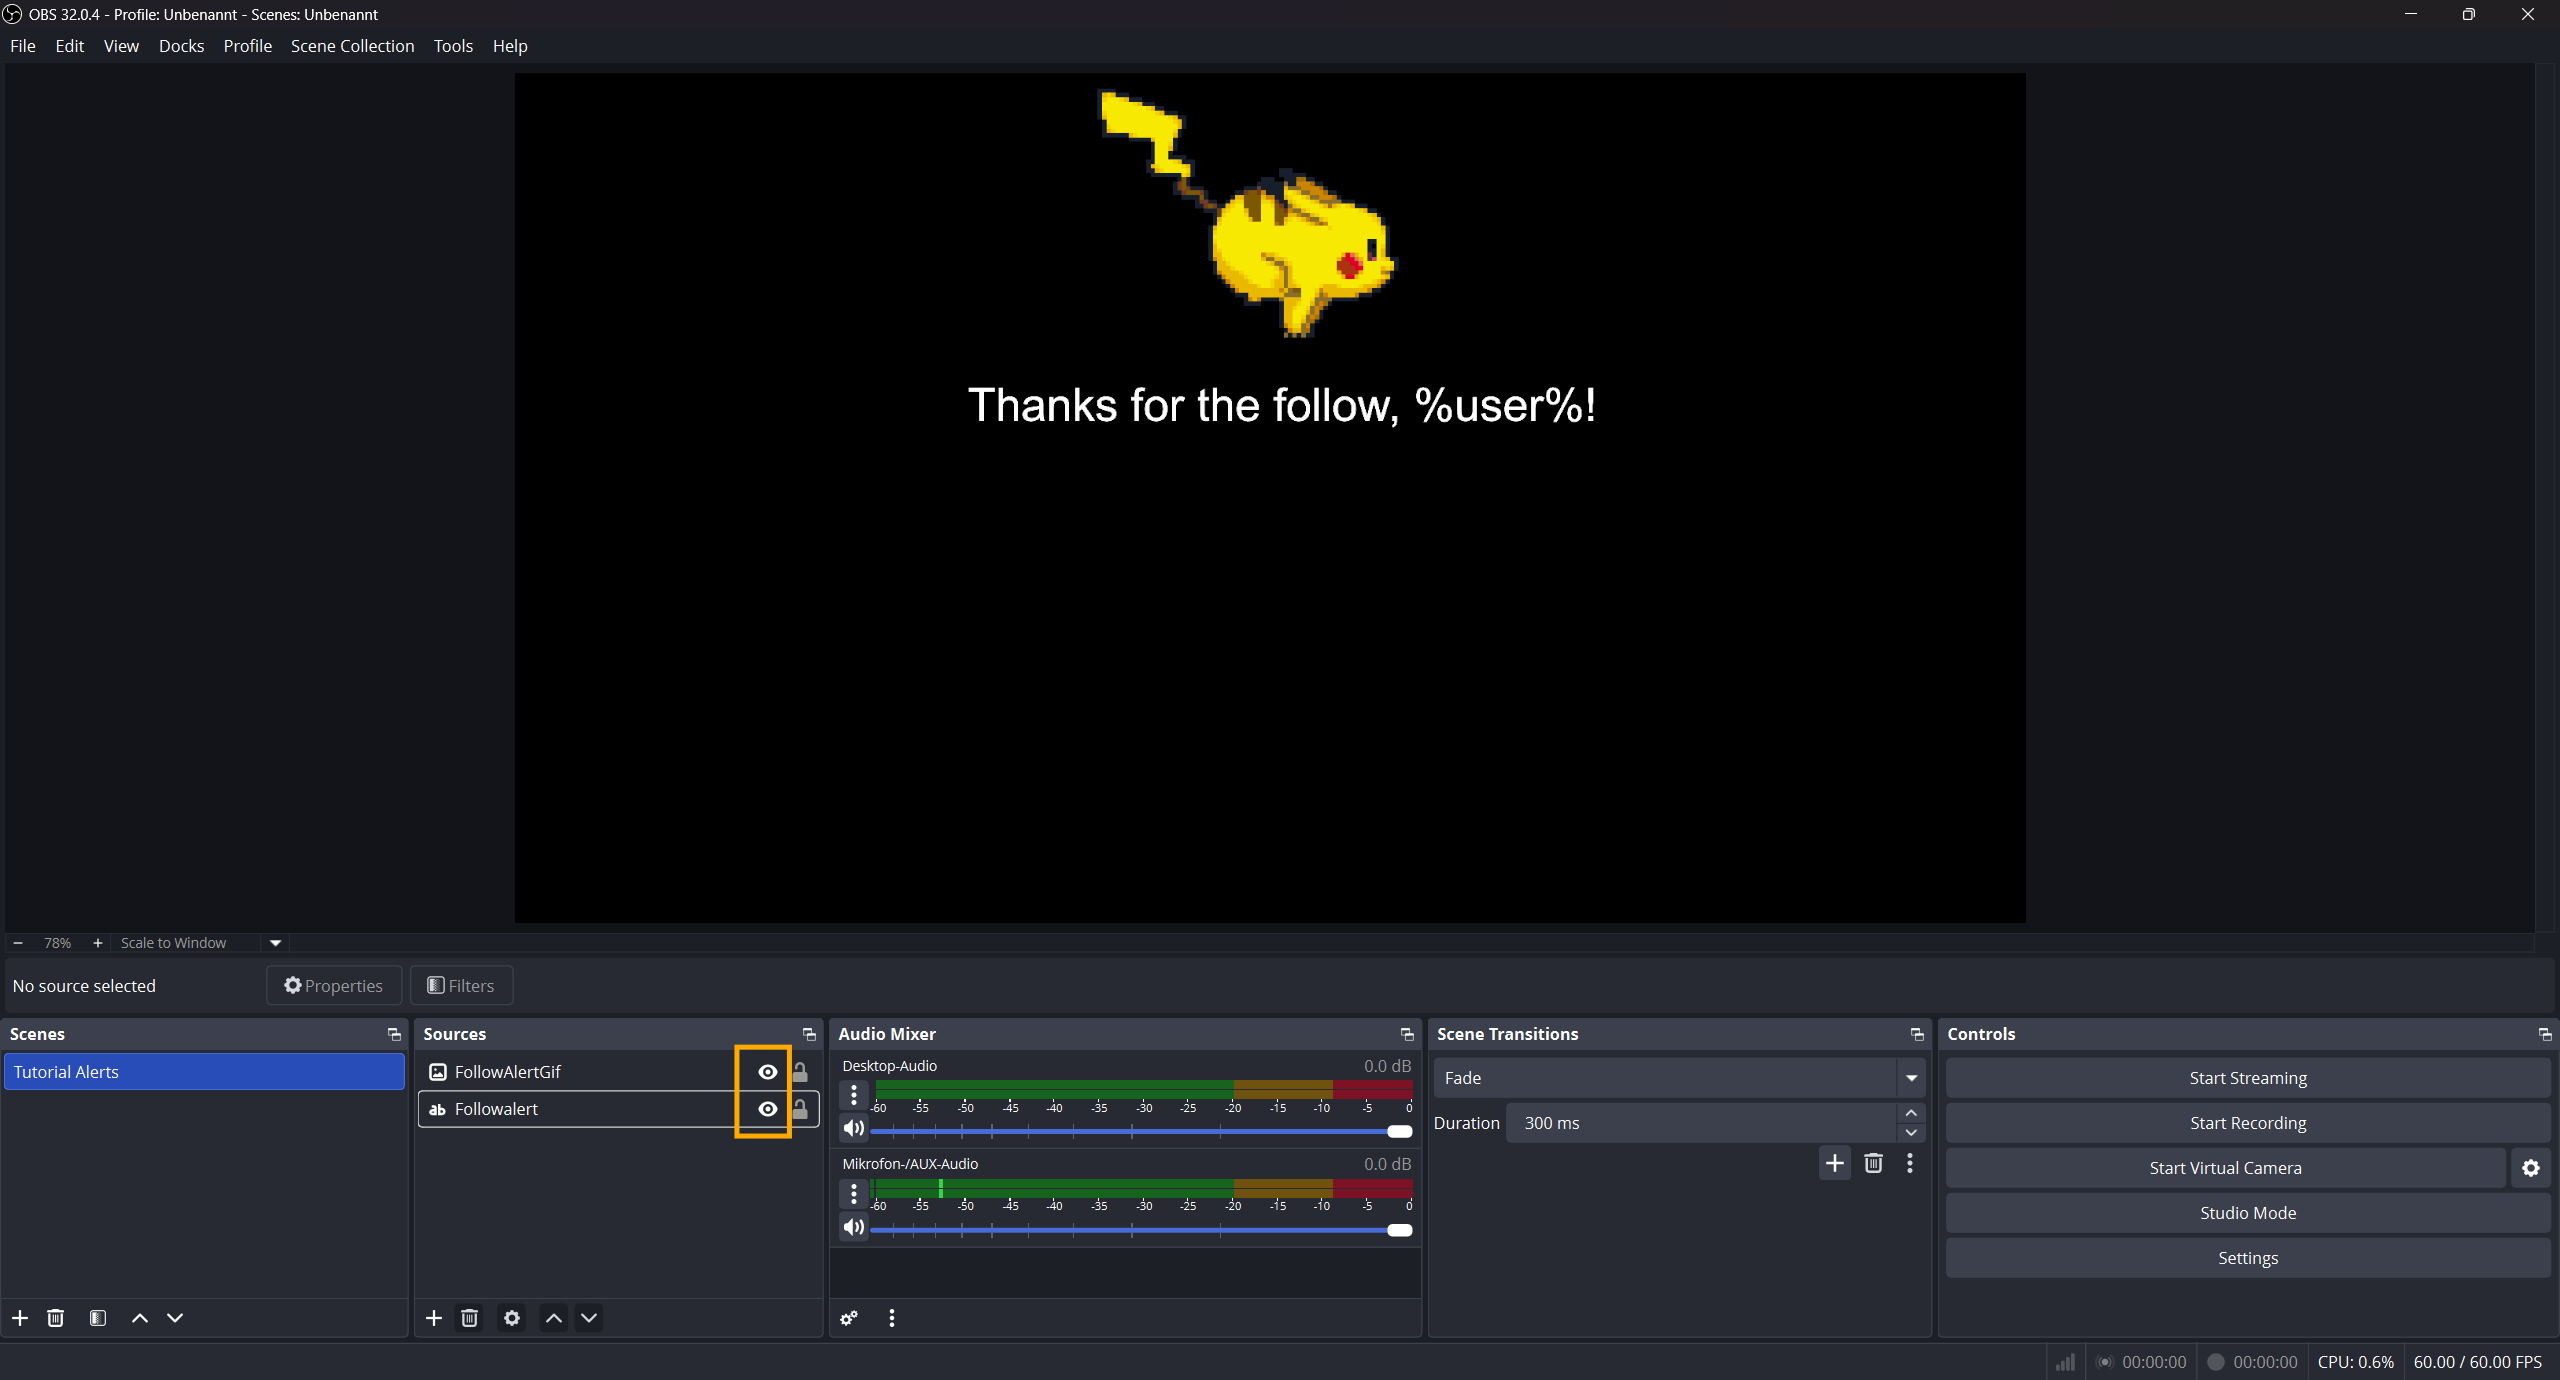
-
Right-click in Sub-Actions and add:
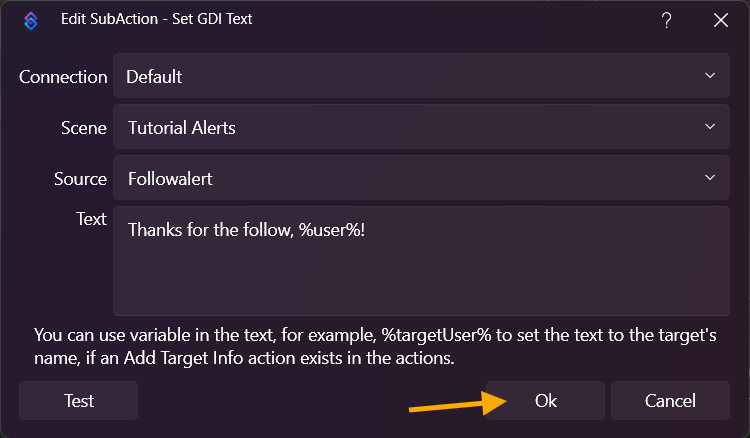
Add -> OBS Studio -> Sources -> Set GDI Text
Select your TextGDI source and set the text to Thanks for the follow, %user%!.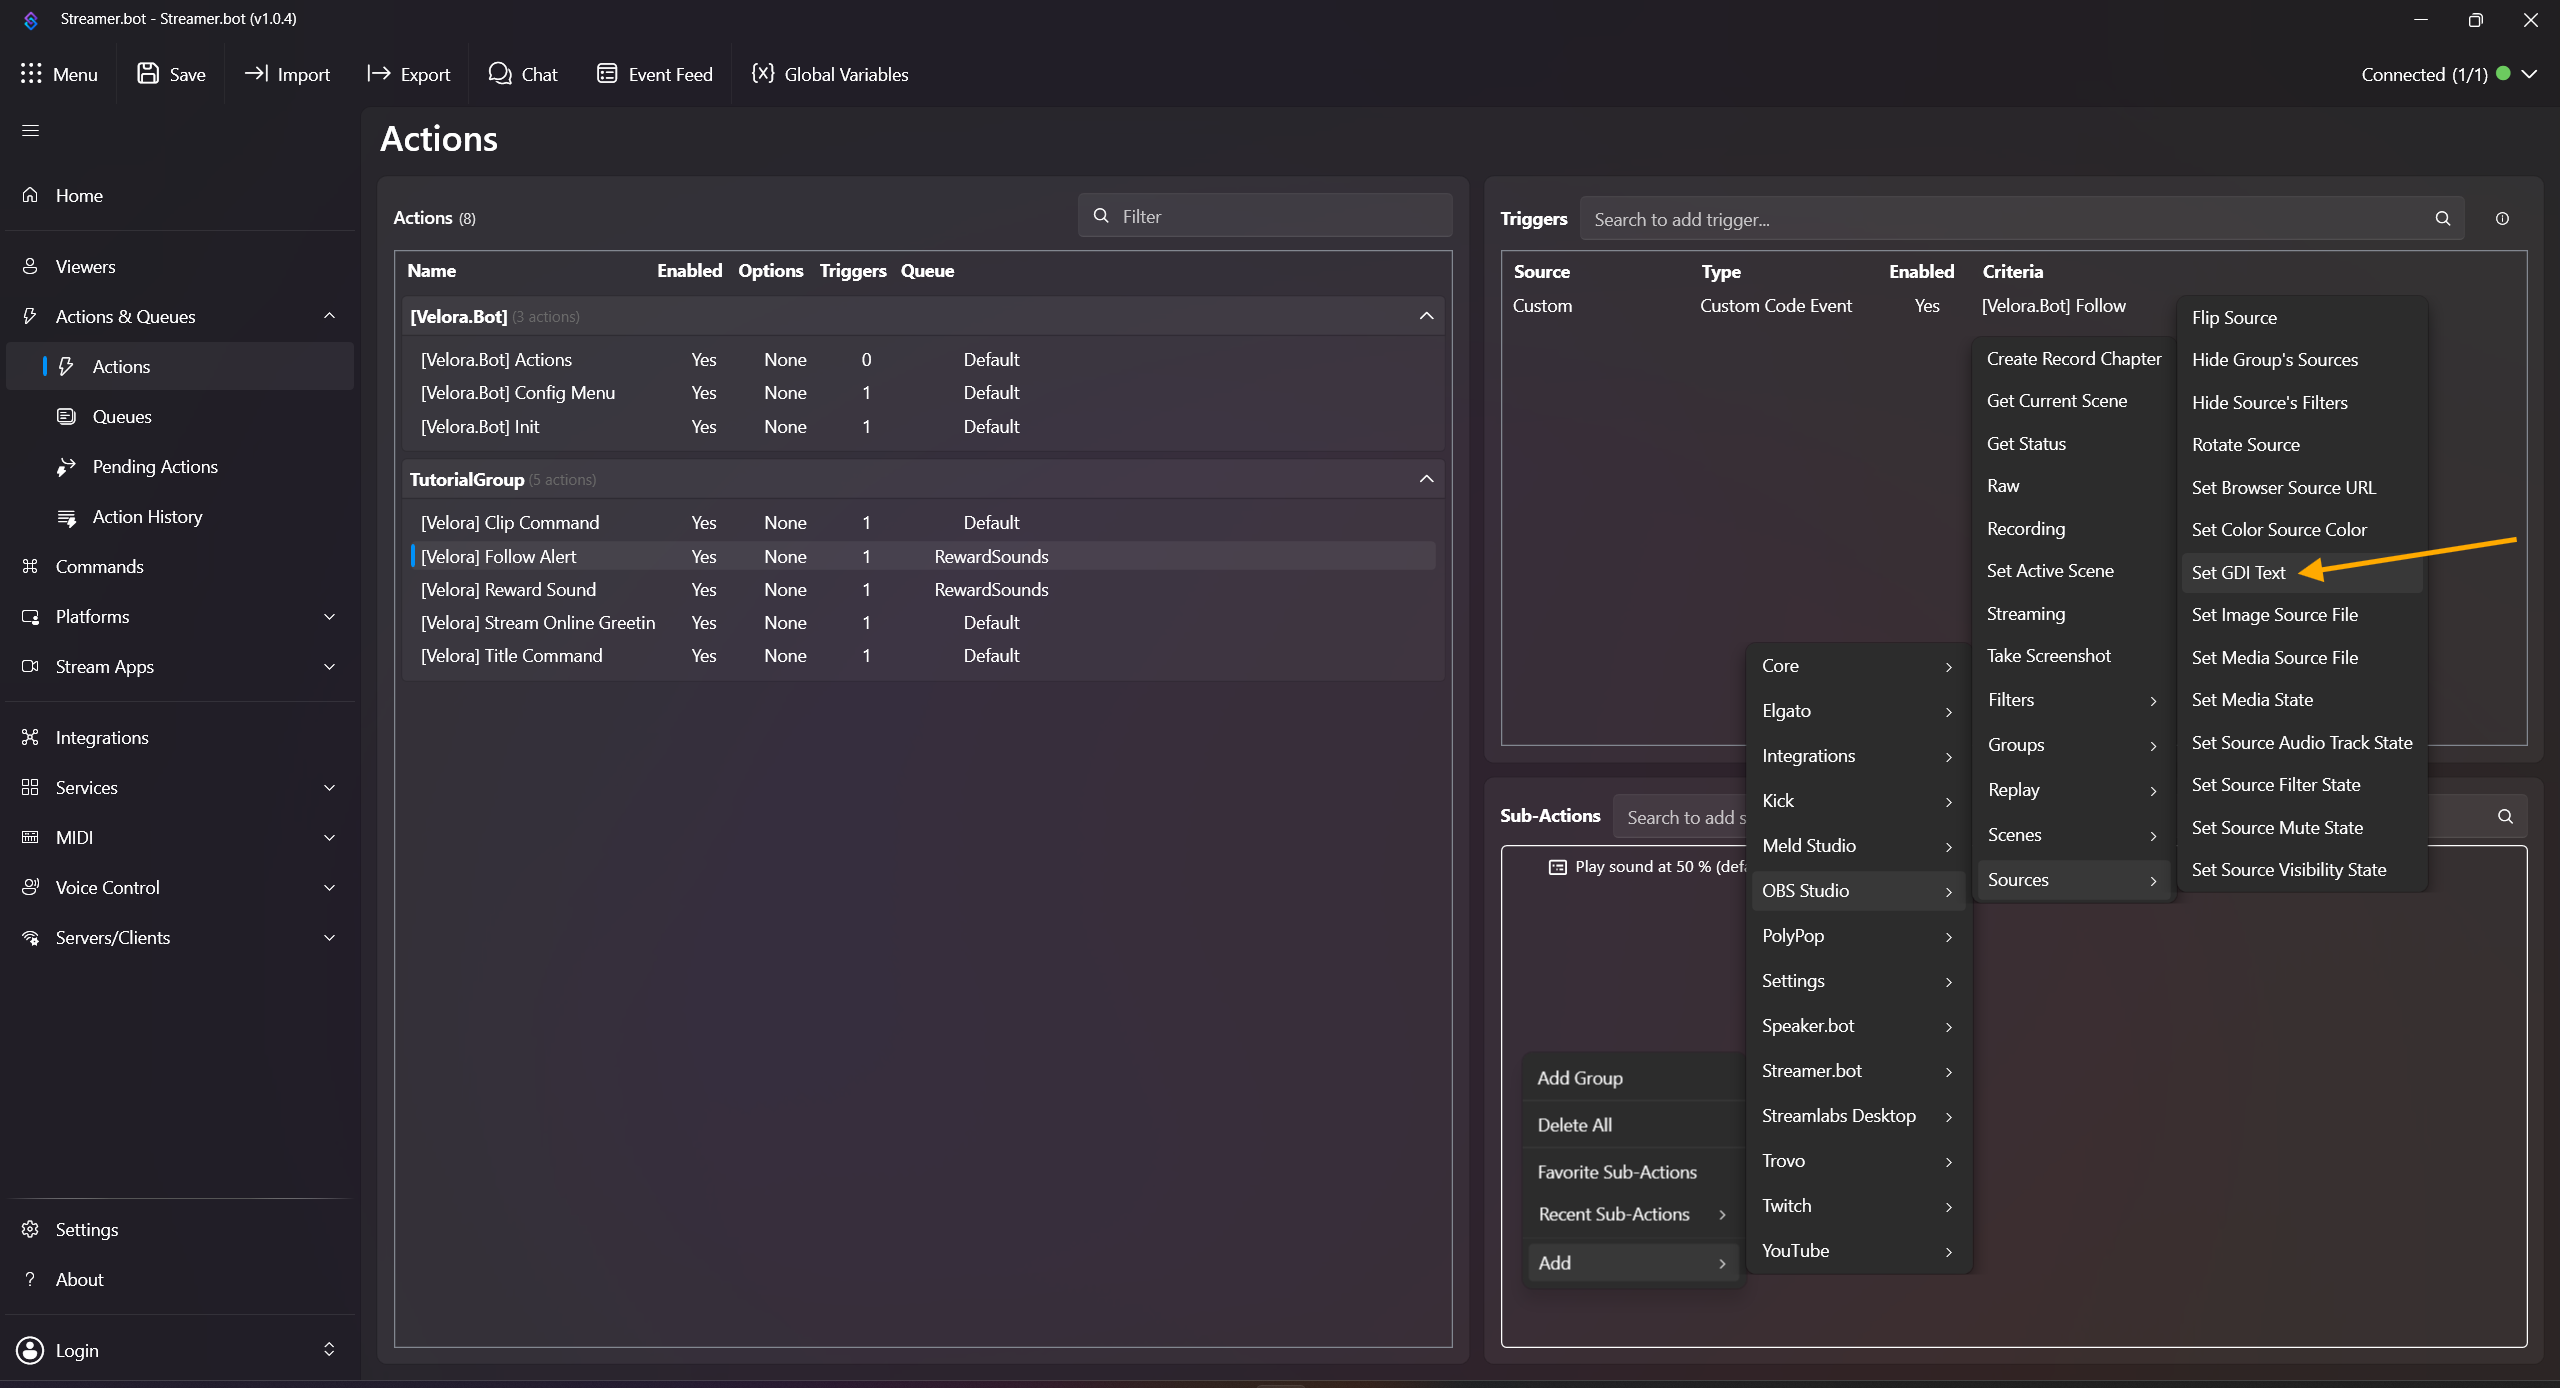
-
Right-click in Sub-Actions and add:
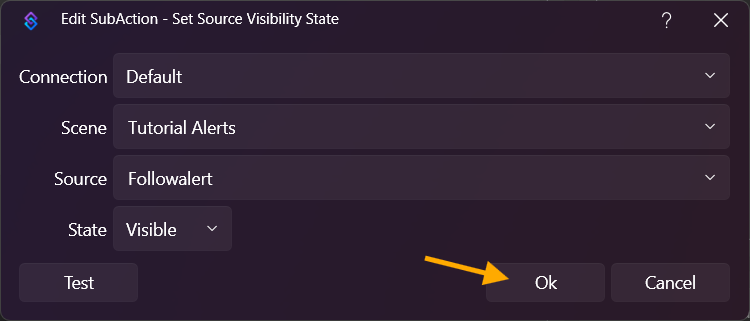
Add -> OBS Studio -> Sources -> Set Source Visibility State
Select your TextGDI source and set it to Visible. Repeat this for your GIF source, or select the folder/group once if both elements are inside it.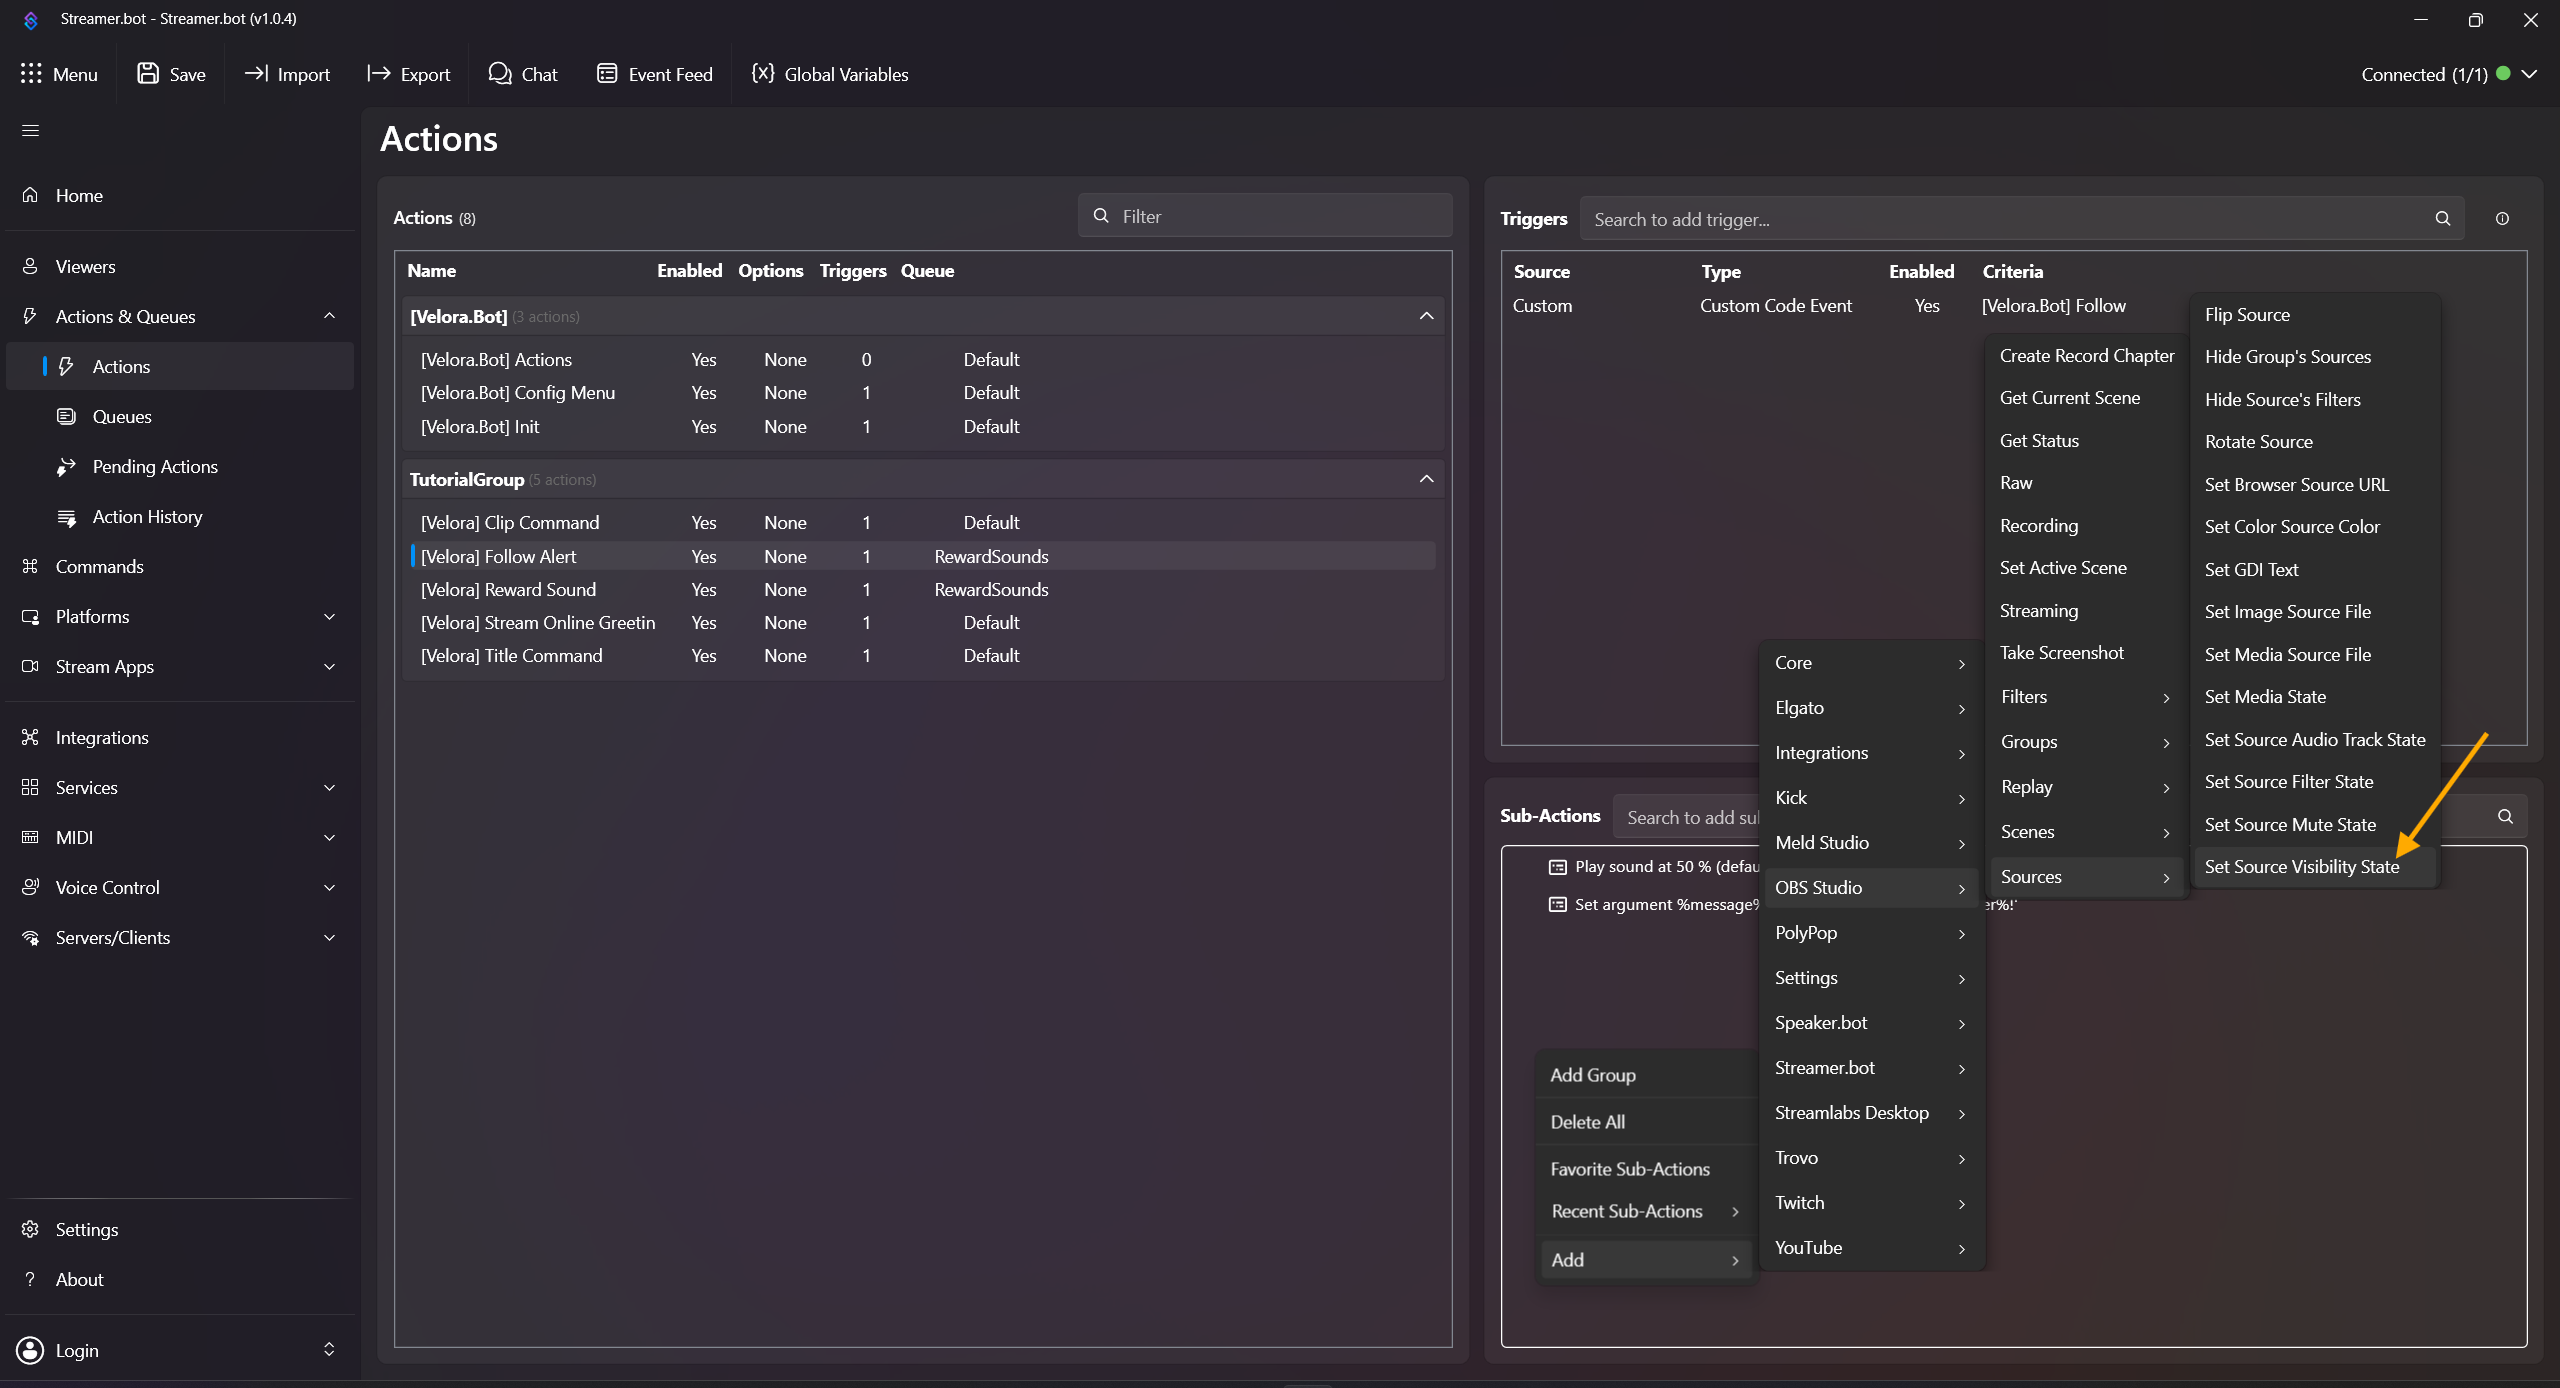
-
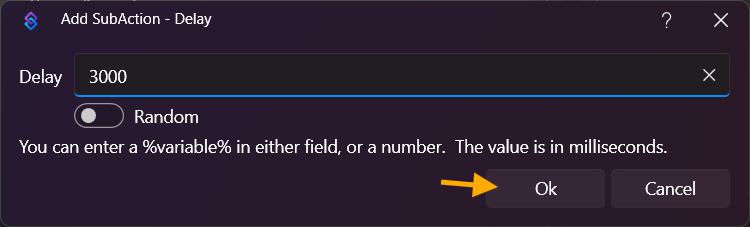
Right-click in Sub-Actions and add:
Add -> Core -> Delay
Set the delay to e.g. 3000 ms.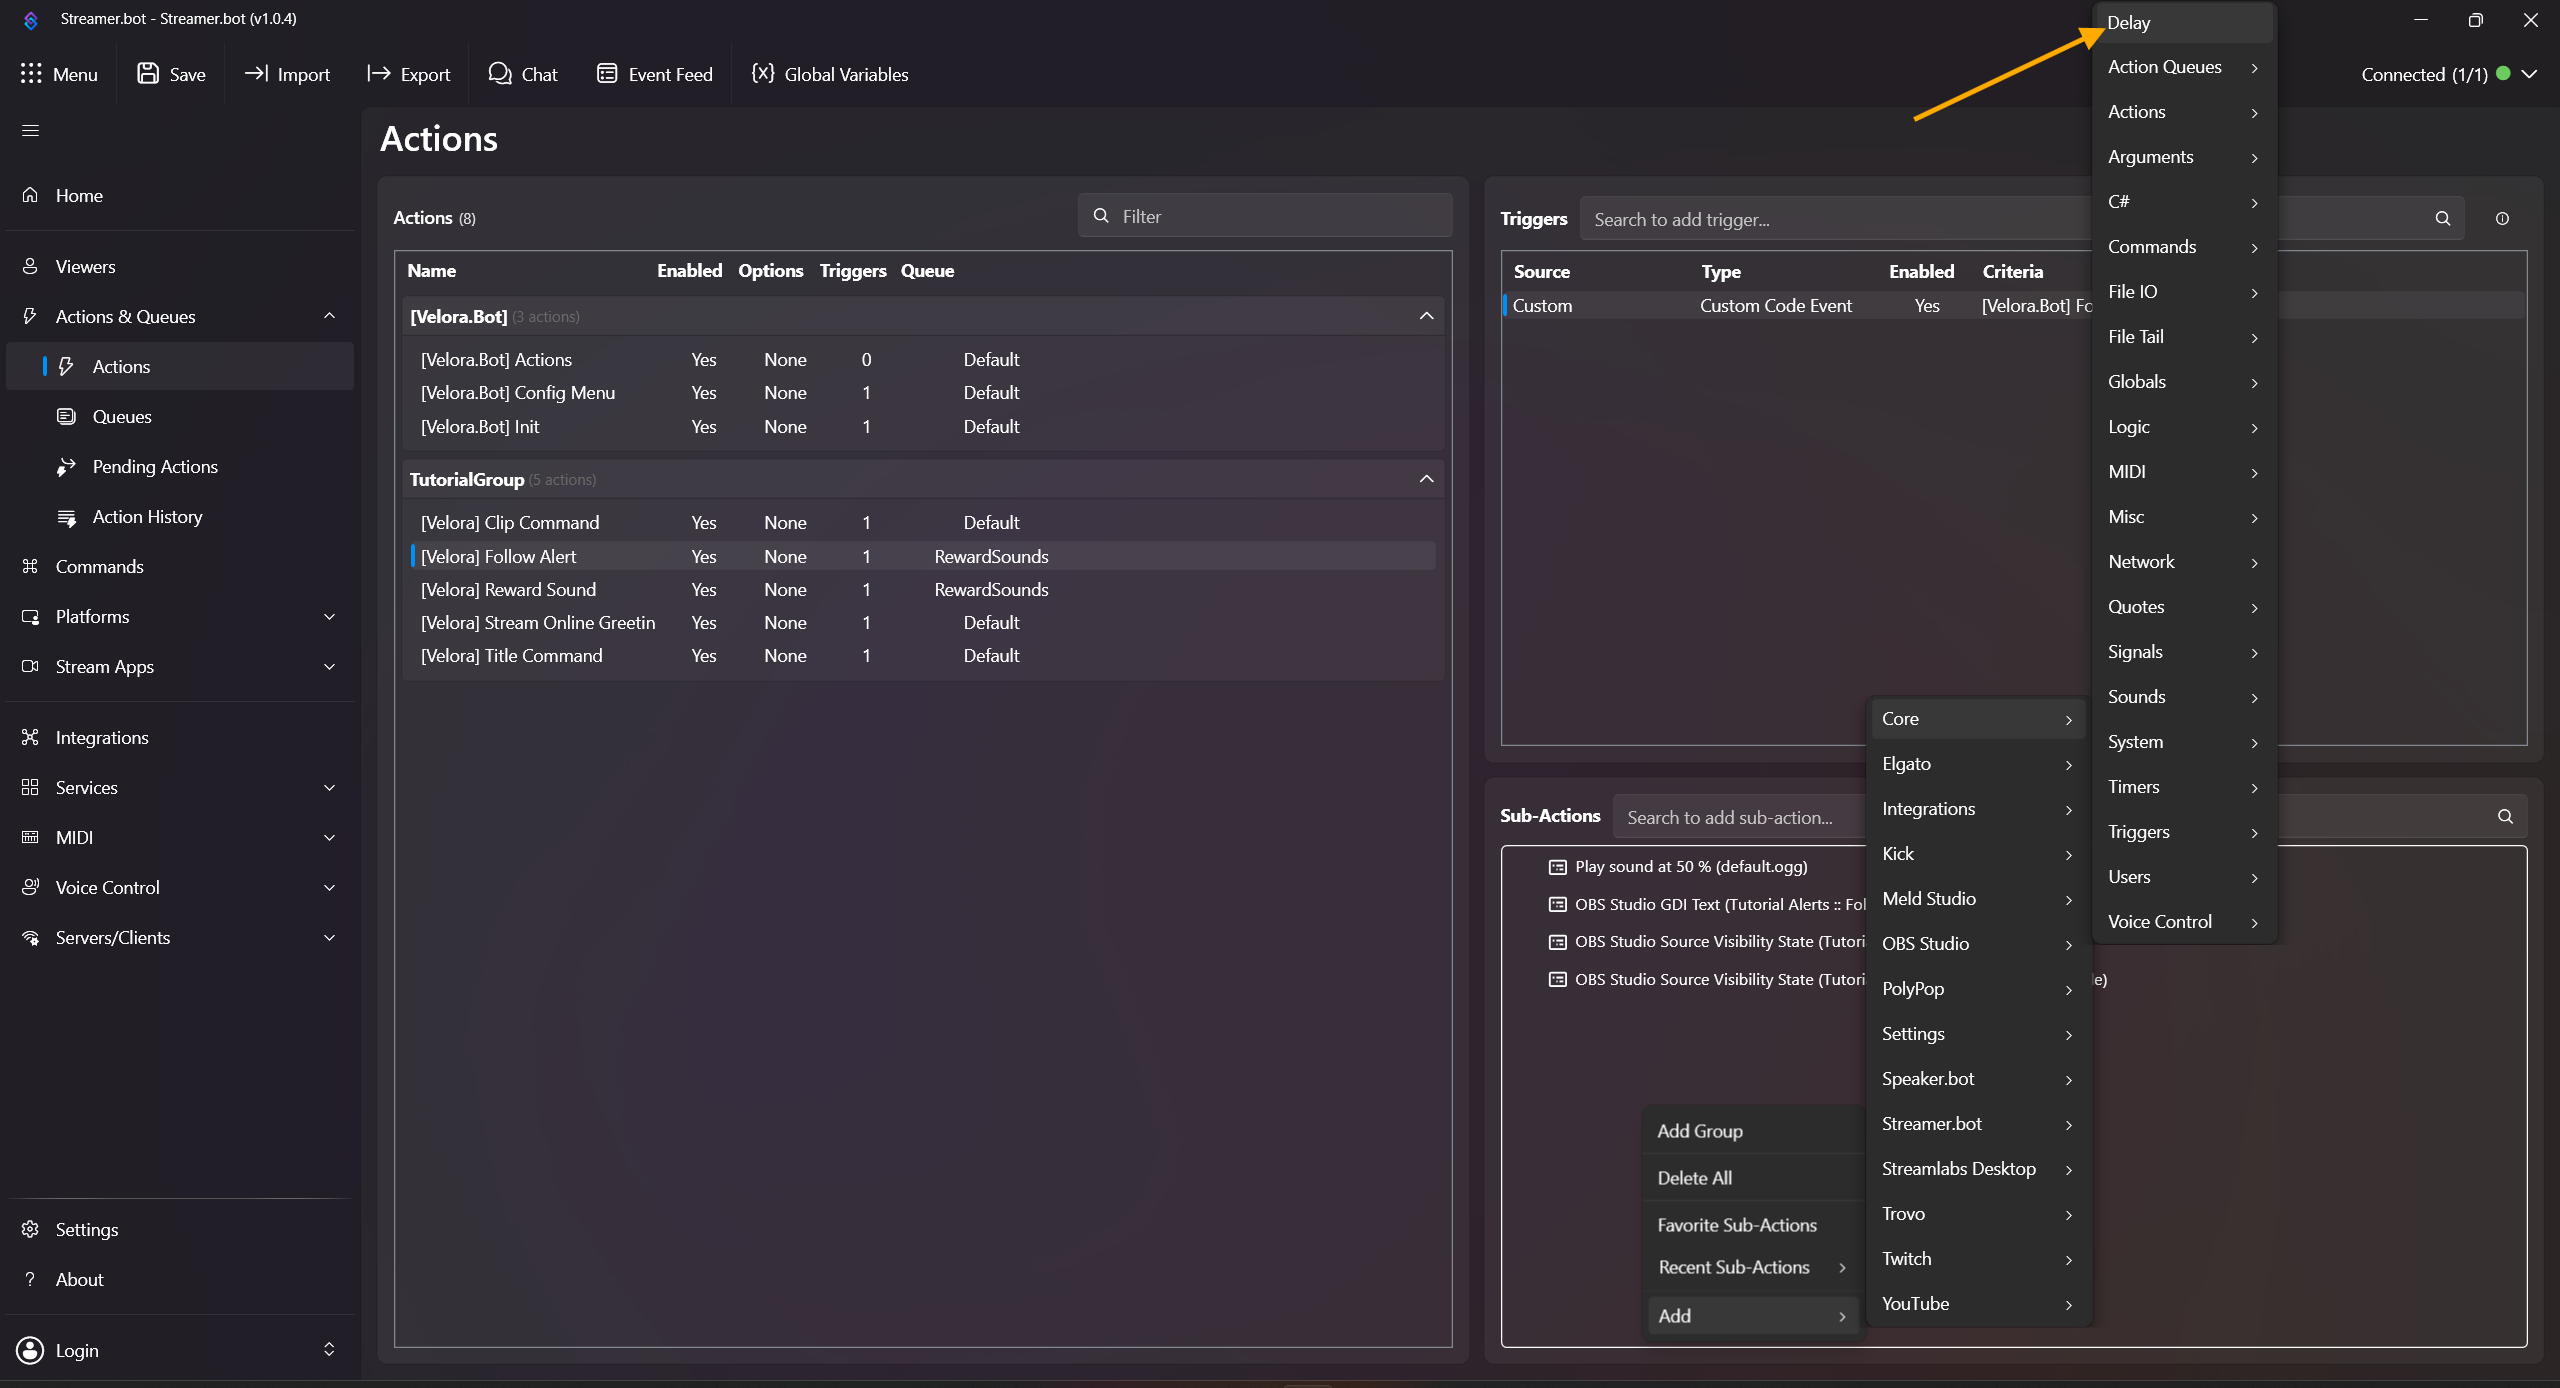
- Add the same subaction from Step 14 again:
Add -> OBS Studio -> Sources -> Set Source Visibility State
Select your TextGDI source and set it to Hidden. Repeat this for your GIF source, or select the folder/group once if both elements are inside it.
Done! For local testing, right-click the trigger and click Test Trigger. Note: %user% is only replaced with a real username when an actual follow event is received.
Useful variables: %user%, %userName%, %userId%, %avatarUrl%, %groupsDelimited%.
Bot aktiv Meldung beim Streamstart
Sendet eine einfache Statusmeldung, sobald dein Stream online geht.
-
Öffne Actions & Queues -> Actions.
-
Rechtsklick in das Actions-Feld, dann auf Add Action klicken und z. B. [Velora] Bot Active Message als Namen setzen.
- Rechtsklick im Triggers-Feld (oben rechts), dann im Kontextmenü:
Add -> Custom -> Velora -> Stream -> [Velora.Bot] Stream Started
- Rechtsklick in das Sub-Actions-Feld und im Kontextmenü:
Add -> Core -> Arguments -> Set Argument
Variable Name: message (wichtig: exakt so schreiben)
Wert: Velora.Bot ist hier! VeloraFlameMindBlown
- Füge danach Execute C# Method hinzu über:
Add -> Core -> C# -> Execute C# Method
Code: [Velora.Bot] Actions
Methode: SendMessage
Mit OK bestätigen.
Fertig! Zum lokalen Testen kannst du auf den Trigger per Rechtsklick auf Test Trigger klicken.
Nützliche Variablen: %game%, %status%, %gameId%, %startedAt%.
Clip-Command (!clip)
Erstellt Clips direkt aus dem Chat. Optional mit Sekundenangabe, z. B. !clip 45.
-
Öffne Actions & Queues -> Actions.
-
Rechtsklick in das Actions-Feld, dann Add Action, und z. B. [Velora] Clip Command als Namen setzen.
-
Öffne Commands, dann Rechtsklick in die Command-Liste und Add Command wählen.
-
Command konfigurieren:
Name: !clip
Command(s): !clip
Gewünschte Berechtigungen setzen und mit OK bestätigen. (In unserem Beispiel darf ihn jeder ausführen.)
-
Oben links auf Save klicken. (Dies ist nötig, damit Custom Trigger für Commands und Rewards hinzugefügt werden.)
- Zurück in Actions & Queues darauf achten, dass du in der soeben angelegten Action bist.
-
Rechtsklick im Trigger-Feld und hinzufügen:
Add -> Custom -> Velora -> Commands -> [Velora.Bot] !clip (!clip)
-
Clip-Titel:
Rechtsklick in Sub Actions und Add -> Core -> Arguments -> Set Argument
Variable Name: clipTitle
Wert: Clip erstellt von %user%
-
Rechtsklick in Sub Actions und Add -> Core -> C# -> Execute C# Method
Code: [Velora.Bot] Actions
Methode: CreateClip
-
Rechtsklick in Sub Actions und Add -> Core -> Logic -> If/Else
Eingabe: %clipSuccess%
Operation: Equals
Wert: True
- Im True-Zweig ist nichts nötig. Velora postet den Link und die Preview automatisch.
-
Im False-Zweig hinzufügen:
Add -> Core -> C# -> Execute C# Method -> SendReply (oder SendMessage)
Fertig! Teste im Chat mit !clip oder !clip 45. Das Erstellen eines Clips braucht einige Sekunden bis eine Rückmeldung erscheint, und sehr lange Clip-Dauern nahe am Maximum können vereinzelt eine falsche Timeout-/Abbruchmeldung auslösen. Wenn der Streamer offline ist, sendet Velora eine Offline-Nachricht.
!clip ohne Zeitangabe erstellt immer einen 60-Sekunden-Clip. Die Clip-Dauer ist auf 15-120 Sekunden begrenzt. Empfohlene Variablen: %clipSuccess%, %clipUrl%, %clipId%, %clipErrorMessage%.
Titel ändern per Command (!title)
Erlaubt Moderatoren, den Streamtitel direkt aus dem Chat zu ändern.
-
Öffne Actions & Queues -> Actions.
-
Rechtsklick in das Actions-Feld, dann Add Action, und z. B. [Velora] Title Command als Namen setzen.
-
Öffne Commands, dann Rechtsklick in die Command-Liste und Add Command wählen.
- Command konfigurieren:
Name: !title
Command(s): !title
Berechtigung auf Moderatoren setzen (oder eigene Rollenlogik) und mit OK bestätigen.
- Oben links auf Save klicken. (Dies ist nötig, damit Custom Trigger für Commands und Rewards hinzugefügt werden.)
- Zurück in Actions & Queues darauf achten, dass du in der soeben angelegten Action bist.
- Rechtsklick im Trigger-Feld und hinzufügen:
Add -> Custom -> Velora -> Commands -> [Velora.Bot] !title (!title)
- Rechtsklick in Sub Actions und Add -> Core -> C# -> Execute C# Method
Code: [Velora.Bot] Actions
Methode: ChangeStreamInfo
Fertig! Teste direkt im Chat mit !title Test title. Das kann aktuell nur live getestet werden, und nach der Command-Eingabe musst du die Seite neu laden, damit der neue Titel angezeigt wird.
Alles hinter !title wird als neuer Streamtitel verwendet.
Reward Redemption -> Sound abspielen
Spielt einen Sound ab, sobald ein Reward eingelöst wurde.
-
Erstelle zuerst deine Rewards auf Velora unter https://velora.tv/dashboard/community im Tab Channel Points.
-
Klicke in Streamer.bot oben links auf Save. Das sorgt dafür, dass neue Custom Trigger hinzugefügt werden.
- Öffne Actions & Queues -> Actions.
-
Rechtsklick in das Actions-Feld, dann Add Action, und z. B. [Velora] Reward Sound als Namen setzen.
-
Rechtsklick im Triggers-Feld, dann wählen:
Add -> Custom -> Velora -> Rewards -> [Velora.Bot] Reward Redeemed
oder einen reward-spezifischen Trigger wie [Velora.Bot] Reward Redeemed - <Reward Name>.
- Rechtsklick im Sub-Actions-Feld und hinzufügen:
Add -> Core -> Sounds -> Play Sound
Audio Output Device: Bei Application Default belassen oder ein Ausgabegerät deiner Wahl auswählen.
Name: Freilassen, wir nutzen hier einen lokalen Dateipfad.
Sound file to play: Auf das Icon neben dem Textfeld klicken und die Datei auswählen.
Anschließend mit OK bestätigen.
-
Öffne Queues, Rechtsklick in das Queue-Feld, dann Add, vergib z. B. den Namen RewardSounds und aktiviere den Haken bei Blocking.
-
In Actions Rechtsklick auf deine Reward-Action, Edit wählen und Queue auf die soeben erstellte Queue setzen.
Fertig! Teste durch Einlösen des Rewards auf Velora.
Nützliche Variablen: %rewardId%, %rewardTitle%, %rewardUserInput%, %user%.
Follow-Alert (Sound + OBS-Text + GIF-Fade)
Baut einen kompletten Follow-Alert mit Sound, Text und GIF-Fade für OBS.
-
Füge zuerst unter Stream Apps deine Streamsoftware hinzu (im Beispiel OBS). Rechtsklick in das Feld und einen neuen Eintrag anlegen, z. B. OBS. Stelle sicher, dass in OBS der WebSocket aktiviert ist. Falls der WebSocket ein Passwort hat, trage es dort ein. Aktiviere Auto Connect on Startup, Reconnect und Disconnect. Klicke danach in Streamer.bot per Rechtsklick auf die soeben erstellte WebSocket-Verbindung und dann auf Connect. Erfolgreich ist die Verbindung, wenn rechts unter OBS Information ein aktiver OBS-Status steht und mittig Status: Connected angezeigt wird.
- Öffne Actions & Queues -> Actions.
-
Rechtsklick in das Actions-Feld, dann Add Action, und z. B. [Velora] Follow Alert als Namen setzen. Wie bei den Channel-Point Sound-Alerts (siehe Reward Sound ab Schritt 7) empfiehlt es sich, eine eigene Queue mit Blocking zu verwenden oder exakt diese Queue zu übernehmen, damit Reward-Sounds und Follow-Alerts sich nicht überkreuzen.
-
Rechtsklick im Triggers-Feld, dann wählen:
Add -> Custom -> Velora -> Channel -> [Velora.Bot] Follow
-
Rechtsklick im Sub-Actions-Feld und hinzufügen:
Add -> Core -> Sounds -> Play Sound
Audio Output Device: Bei Application Default belassen oder ein Ausgabegerät deiner Wahl auswählen.
Name: Freilassen, wir nutzen hier einen lokalen Dateipfad.
Sound file to play: Auf das Icon neben dem Textfeld klicken und die Datei auswählen.
Anschließend mit OK bestätigen.
-
Gehe zurück zu OBS und füge eine neue Source mit dem Namen TextGDI hinzu.
-
In TextGDI trägst du Danke für den Follow, %user%! ein, um das Element sauber auszurichten.
-
Gehe auf Transform -> Edit Transform und stelle bei Bounding Box Type auf Maximum Size Only. Die Größe stellst du über Bounding Box Size ein (wichtig: Größe über Bounding Box Size ändern, nicht über die allgemeine Skalierung).
-
Rechtsklick auf TextGDI und bei Show Transition und Hide Transition einen gewünschten Effekt setzen (z. B. Fade mit gewünschter Dauer in ms).
-
Füge zusätzlich eine weitere Source mit deinem gewünschten GIF hinzu.
- Per Rechtsklick auf das GIF dieselben Show/Hide-Animationen setzen. Optional kannst du beide Elemente in einen Ordner/eine Gruppe legen und dort die Show/Hide-Animationen anpassen.
-
Verstecke beide Quellen in OBS (oder den Ordner/die Gruppe mit beiden Elementen). So siehst du direkt, ob die Show-Animation zeitlich sauber passt.
-
Rechtsklick im Sub-Actions-Feld und hinzufügen:
Add -> OBS Studio -> Sources -> Set GDI Text
Deine TextGDI-Quelle auswählen und den Text auf Danke für den Follow, %user%! setzen.
-
Rechtsklick im Sub-Actions-Feld und hinzufügen:
Add -> OBS Studio -> Sources -> Set Source Visibility State
Die TextGDI-Quelle auswählen und auf Sichtbar setzen. Für die GIF-Quelle wiederholen oder einmal den gemeinsamen Ordner/die Gruppe auswählen, falls beide Elemente dort enthalten sind.
-
Rechtsklick im Sub-Actions-Feld und hinzufügen:
Add -> Core -> Delay
Die Verzögerung z. B. auf 3000 ms setzen.
- Die gleiche Sub-Action aus Schritt 14 erneut hinzufügen:
Add -> OBS Studio -> Sources -> Set Source Visibility State
Die TextGDI-Quelle auswählen und auf Versteckt setzen. Für die GIF-Quelle wiederholen oder einmal den gemeinsamen Ordner/die Gruppe auswählen, falls beide Elemente dort enthalten sind.
Fertig! Zum lokalen Testen kannst du auf den Trigger per Rechtsklick auf Test Trigger klicken. Hinweis: %user% wird erst bei einem echten Follow-Event durch einen echten Nutzernamen ersetzt.
Nützliche Variablen: %user%, %userName%, %userId%, %avatarUrl%, %groupsDelimited%.